Better than Deli Marble Rye Sourdough Sandwich Bread
Three years ago, I developed an artisan marble rye that I still consider one of the most gorgeous loaves I’ve ever pulled out of my oven. Deep mahogany and pale gold swirled together in a wild, dramatic spiral, with a crackling crust and that unmistakable rye tang running all the way through. I turned it into a paid tutorial, and it sold better than almost anything else I’ve ever put out — bakers loved it, made it again and again, and tagged me in loaf after gorgeous loaf. Eventually I retired that tutorial, and to this day I still get messages asking when it’s coming back.
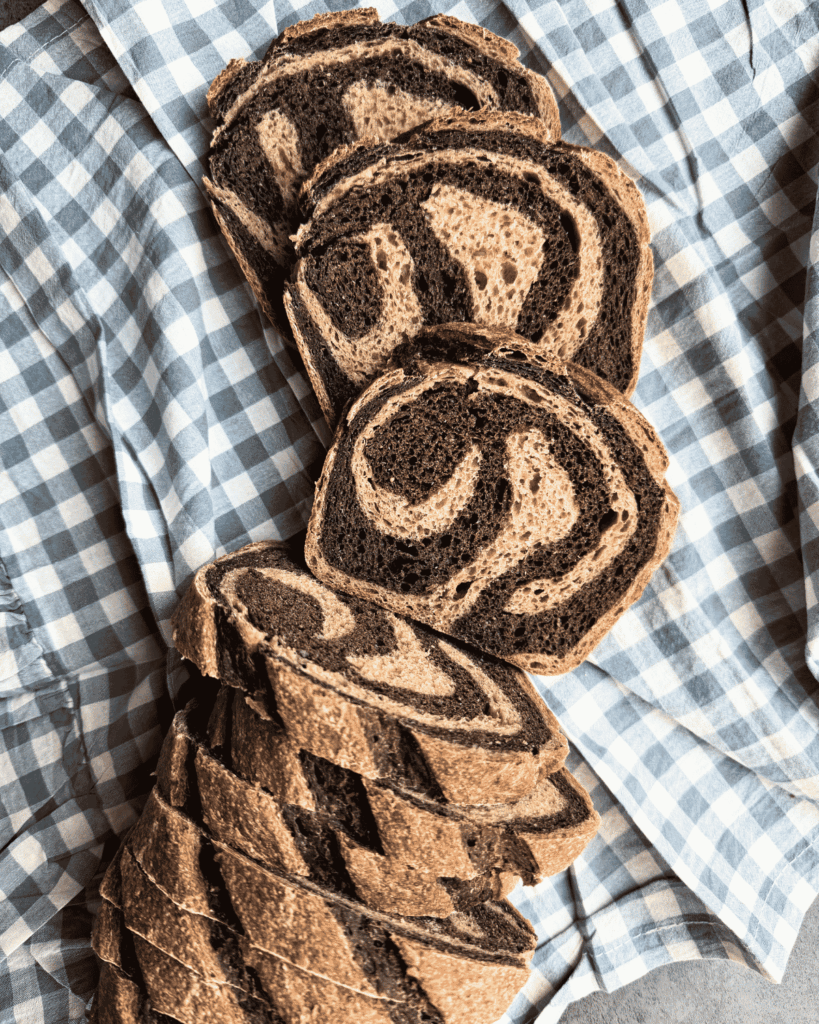
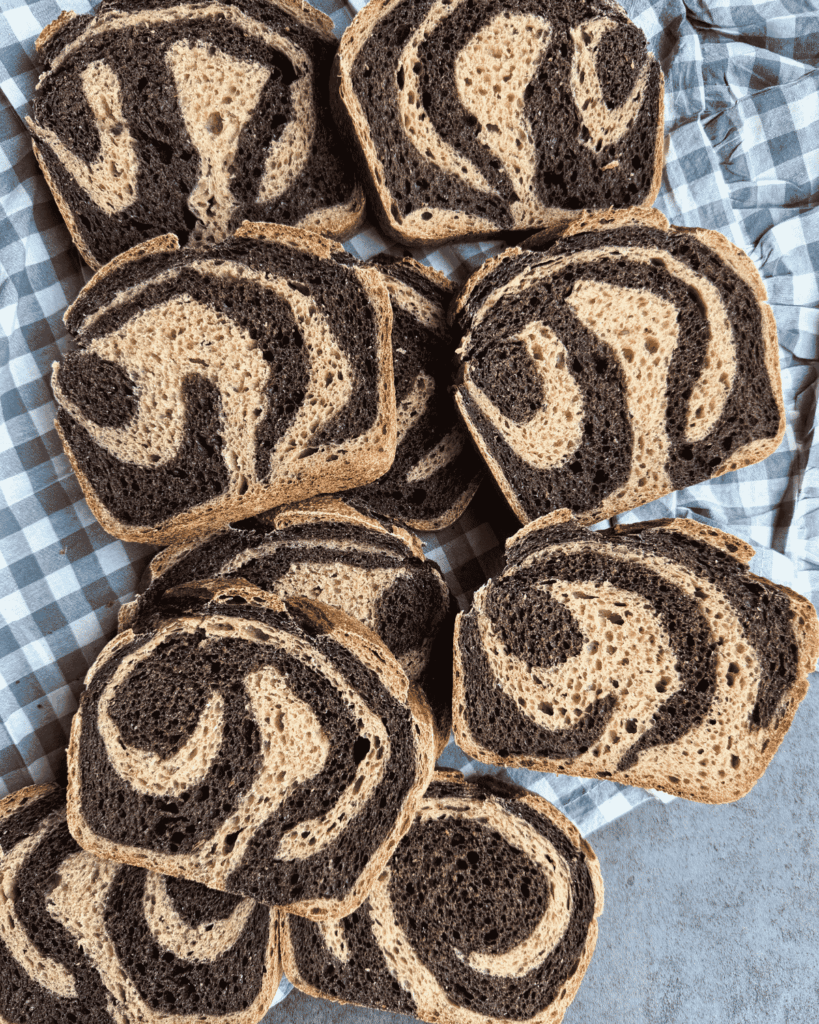
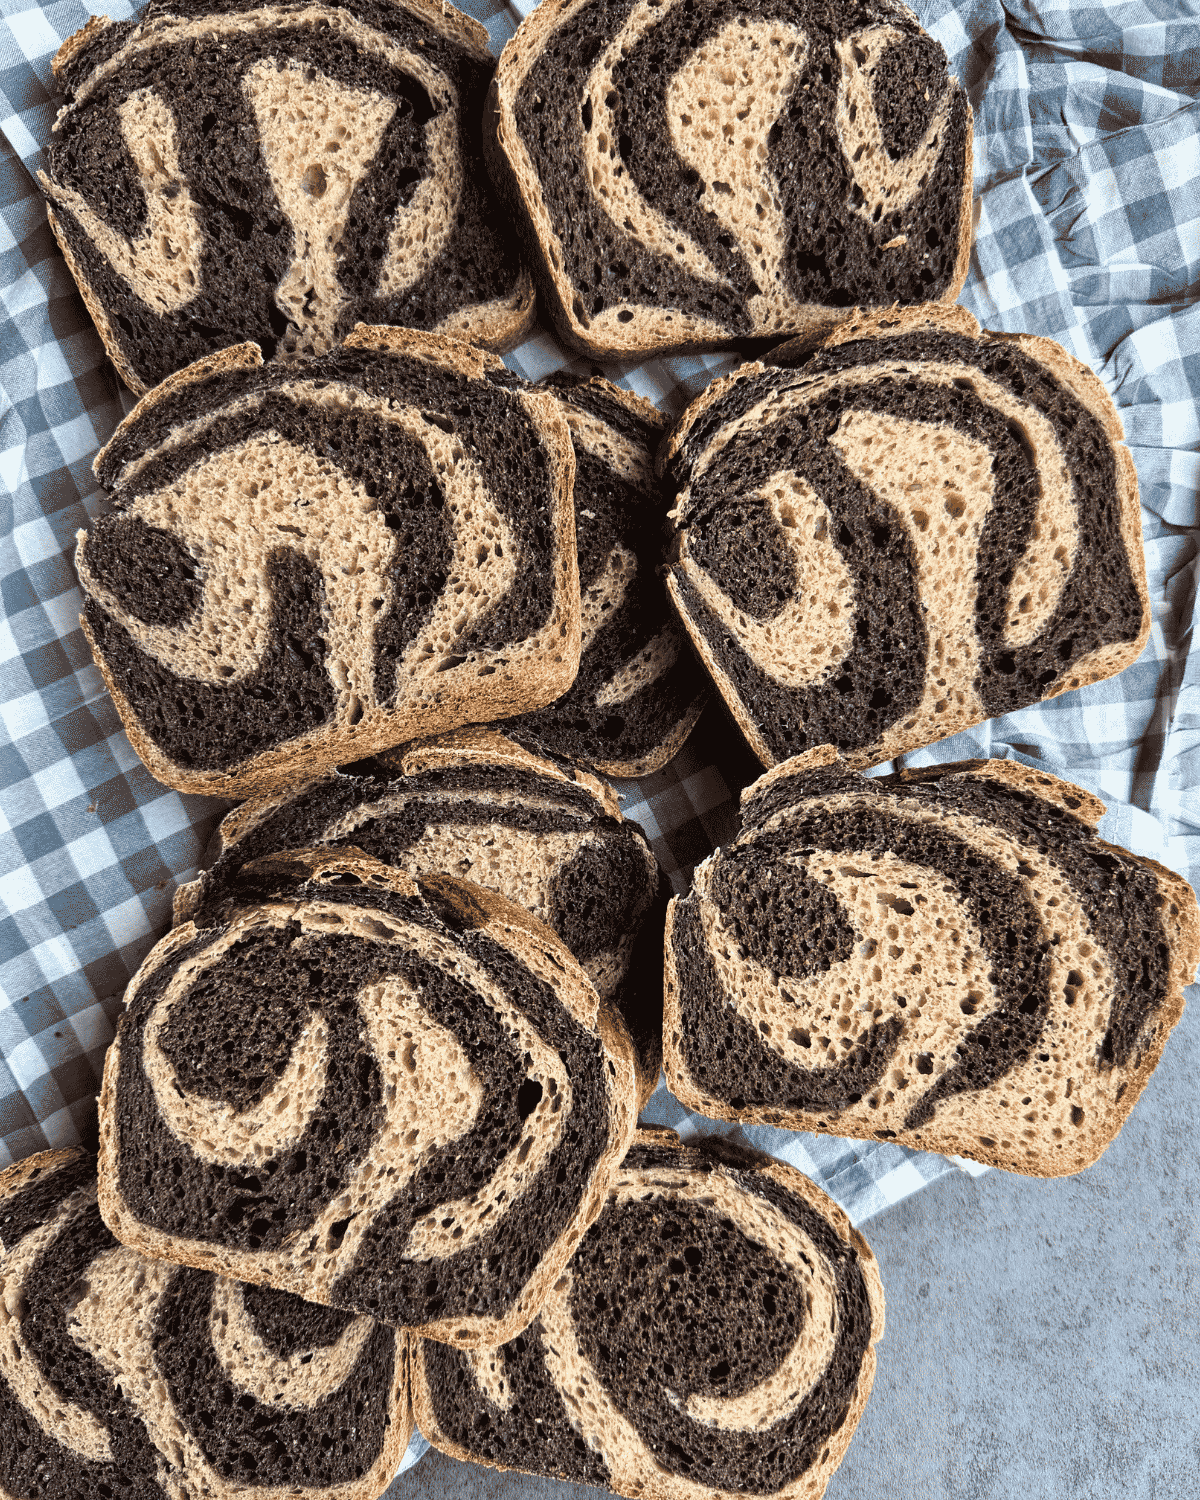
This isn’t that loaf. This is its softer, more practical cousin — a marble rye sourdough sandwich bread built for real life instead of a showpiece centerpiece. Where the artisan version was crusty, rustic, and meant to be admired before you tore into it, this one is tender, pillowy, and made to slice clean for actual sandwiches. Same striking swirl, same deep caraway flavor running through every bite, but baked in a pan instead of scored and opened up on a stone.
I’ll be honest with you: nothing beats a Reuben piled onto a slab of that original artisan marble rye, still warm, crust shattering with every bite. But most days, I’m not standing in my kitchen with time to spare — I’m packing lunches, running out the door, or just craving a sandwich without the ceremony. That’s where this loaf earns its keep. A cold Reuben on this bread the next day, or really anything you stack between two slices, holds up beautifully. It’s the version of marble rye I actually reach for most.
What Is Marble Rye Sourdough Sandwich Bread?
Marble rye is exactly what it sounds like: two doughs — a light rye and a dark rye — twisted or layered together so that when you slice into the finished loaf, you get a marbled swirl instead of one uniform color. It’s the bread you picture stacked high with corned beef and Swiss at a classic deli counter, or holding together a Reuben sandwich under a mountain of sauerkraut and Russian dressing.
Here’s the thing most people don’t realize, though: the dark half of marble rye usually isn’t darker because it has more rye flour in it. Both doughs in this recipe start from the exact same rye-and-bread-flour base. What separates them is a small amount of black cocoa powder mixed into the dark half — and that ingredient deserves a proper explanation, because it trips people up more than anything else in this recipe.
Black cocoa powder is not the same thing as baking cocoa, and it will not make your bread taste like chocolate. It’s a heavily Dutch-processed cocoa — meaning it’s been treated to neutralize its natural acidity — which strips out most of the bitter, roasty cocoa flavor you’d expect and leaves behind an almost pure black-brown pigment. It’s the same ingredient responsible for the jet-black color in Oreo cookies and classic black-and-white cookies, and bakers reach for it specifically because it colors without flavoring. In this loaf, you’re using just 10g mixed into a whole dough — nowhere near enough to register as “chocolate” on your palate, even to a sensitive taster. What you’ll notice instead is a very faint, almost imperceptible earthy depth that actually complements the rye rather than competing with it.
If you can’t track down black cocoa, regular Dutch-process cocoa powder will substitute in a pinch — just know you’ll land on a lighter, more reddish-brown swirl instead of that dramatic, near-black contrast, and it may carry a touch more actual cocoa flavor than the black variety does. Either way, this is bakery sleight of hand more than baking science, and once you know the trick, you’ll never look at a marble rye the same way again.
What makes this particular marble rye sourdough sandwich bread stand out beyond the swirl is the crumb. A lot of homemade rye leans dense and chewy in a way that fights you a little when you bite into it. This version, thanks to a generous hydration level, a good long knead, and naturally leavened fermentation, stays soft and tender — genuinely sandwich-bread soft — while still carrying all that classic caraway-and-rye flavor you’re after.
Why You’ll Love It
- That signature swirl. This loaf is a showstopper the second you slice into it — no fancy tools required, just a simple layer-and-roll technique.
- Soft, tender crumb. This isn’t a dense brick of a rye loaf. The texture is closer to a classic sandwich bread, which means it stays soft for days and doesn’t fight back when you bite into it.
- Real, classic caraway flavor. Between the caraway seed tea and the toasted seeds folded into the dough, the caraway flavor is front and center — aromatic, a little peppery, unmistakably rye.
- Naturally leavened. No commercial yeast here — just your active starter doing the work, which means better flavor development and easier digestibility for a lot of bakers.
- Genuinely flexible for real schedules. You can build your levain the night before. You can bake your loaf same day or cold ferment for up to 2 days before baking.
- Perfect for sandwiches. This bread was made for Reubens, pastrami melts, or just a thick slice with butter — it holds up under hearty fillings without turning soggy or falling apart. If you want to build out a full sandwich-bread lineup, this pairs beautifully alongside The Best Soft Sourdough Sandwich Bread and my Ultimate Soft Honey Whole Wheat Sourdough Sandwich Bread.
Here’s What You’ll Want for This Loaf
- The best stand mixer with spiral hook — a workhorse that develops gluten in even the stiffest dough
- 9×4-inch loaf pan — the right size to get that classic tall sandwich-bread shape
- Kitchen scale — essential for accurate and consistent measuring results
- 4-cup measuring cup — set of 2, great for measuring dough percentage rise
- Instant-read thermometer — the most reliable way to confirm doneness at 200°F
- Perfect Slices Bread Slicer – this tool is amazing, it folds up and stores easily and makes perfect slices
- Black Cocoa Powder – the ingredient that gives that black contrast to the dark rye dough
- Dark Rye Flour – you can’t always find rye flour in grocery stores, so I order mine off Amazon
- High Gluten Flour – just gives that extra strength to this dough since rye is lower on gluten
Ingredient Breakdown
Sourdough baking rewards you for understanding why an ingredient is there, not just tossing it in the bowl because the recipe says so. Here’s what’s doing the work in this loaf.
Note: gram weights are the most accurate way to measure, especially for flour — volume measurements below are approximate. If you can, weigh your ingredients.
For the Caraway Seed Tea (optional but recommended)
- Caraway seeds — 22g (3 Tbsp)
- Boiling water — 340g (about 1½ cups)
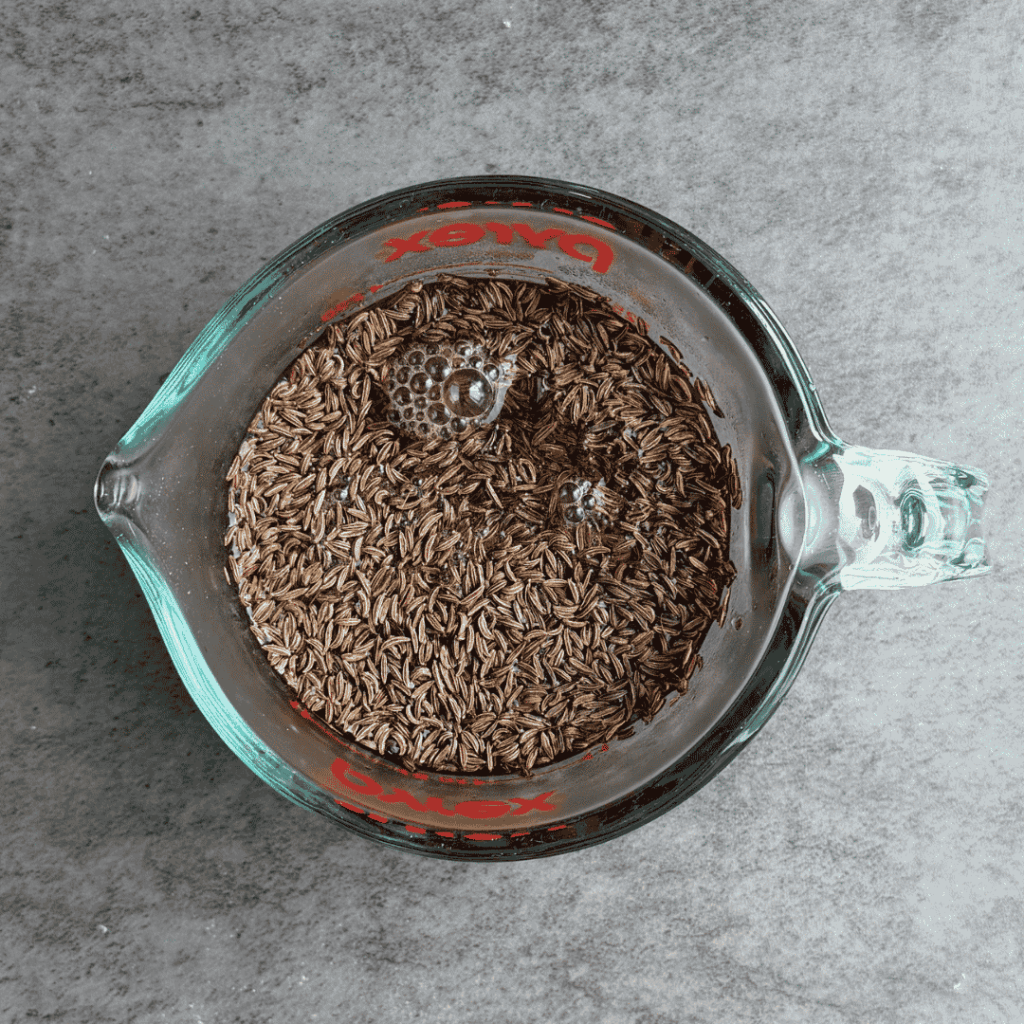
Steeping caraway seeds in boiling water overnight pulls their essential oils into the water itself, so that aromatic, slightly peppery caraway flavor gets distributed through the entire dough rather than just sitting in a few bites where you happen to bite into a seed. It’s a small step that makes a noticeably bigger flavor impact. If you skip this, you’ll swap in plain water — the loaf will still be good, but the caraway flavor will read more subtly.
For the Levain
- Sourdough starter — 15g (about 1 Tbsp)
- Water — 45g (3 Tbsp)
- Rye flour — 20g (about 2½ Tbsp)
- Bread flour — 25g (about 3 Tbsp)
This small overnight levain is what gives your dough its rise, its structure, and a good chunk of its flavor. If you bake with Phoebe, my 170-year-old San Francisco sourdough starter, this is exactly the kind of loaf she shines in — that extra depth of flavor from a mature culture really comes through in a bread with this much going on.
For the Dough
- Caraway seed tea (strained) OR room-temp water — 335g (about 1⅓ cups + 2 Tbsp)
- Active starter, at peak — 100g (about ⅓ cup + 1 Tbsp)
- Molasses (or honey) — 15g (1 Tbsp) — adds a touch of sweetness and helps the crust brown beautifully. Molasses leans deeper and more traditional; honey will read a little lighter and sweeter.
- Avocado oil (or any neutral oil) — 30g (2 Tbsp) — enriches the dough and helps keep the crumb soft over the following days.
- Rye flour (dark rye) — 150g (about 1¼ cups) — brings that unmistakable rye flavor and a slightly denser, more complex crumb than an all-wheat loaf. If you love what rye flour brings to a bake, it’s also the star of my Pumpernickel Sourdough Bagels.
- High gluten flour or bread flour — 350g (about 2¾ cups) — this is what gives the dough enough structure to rise well and hold that soft, sliceable texture, since rye flour on its own is too low in gluten to do the job alone.
- Salt — 8g (1½ tsp) — for flavor, and to help regulate fermentation so your dough doesn’t over-proof too quickly.
- Additional caraway seeds, lightly toasted (optional) — 8g (1 Tbsp) — toasting wakes the oils back up and gives you little pockets of concentrated caraway flavor throughout the crumb.
For the Dark Rye Half
- Unsweetened black cocoa powder — 10g (2 Tbsp)
- Water (to make a paste) — 15g (2 Tbsp)
This is the marble-maker. Black cocoa is much darker and less bitter than regular cocoa powder, which is exactly why it’s the bakery-world secret for a deep, almost pumpernickel-black color without a strong chocolate taste coming through. If you can’t find black cocoa, regular Dutch-process cocoa will work in a pinch, but expect a lighter, more reddish-brown swirl rather than that deep near-black contrast.
Step-by-Step Directions
The Night Before
Step 1: Build your levain. In a small jar or bowl, combine the water, starter, rye flour, and bread flour. Mix well until no dry flour remains, cover loosely, and set it on your counter overnight.
💡 Pro Tip: Don’t have time to feed your starter the night before? You can build this levain up to 2 days in advance and store it in the fridge, pulling it out and letting it come to room temperature before you mix your dough. Sourdough baking doesn’t have to fit a rigid schedule — I want you baking on your timeline, not the recipe’s.
Step 2: Steep the caraway seed tea (if using). Pour boiling water over the caraway seeds, stir, cover loosely, and let it steep overnight alongside your levain.
The Next Morning
Step 3: Mix the wet ingredients. In the bowl of a stand mixer, strain the caraway seed tea to measure out 335g (top off with plain water if you’re short). If skipping the tea, just use 335g room-temp water. Add all of your levain (it should look flattened on the top and bubbly, dimples throughout, with a slightly sour, yeasty smell — that’s how you know it’s at peak), the molasses, oil, and 1 Tbsp of fresh toasted caraway seeds. (I discard the caraway seeds that were used for the tea as they no longer have much flavor left and add a fresh, lightly toasted tablespoon of seeds in the dough). Whisk to combine.
⚠️ Watch Out: If your levain hasn’t visibly risen and doesn’t smell tangy and active, give it more time before moving forward. A sluggish levain means a sluggish dough, no matter how carefully you follow the rest of the steps. If your levain has noticeably receded, or fallen, it will need to be fed and allowed to peak before using.
Step 4: Add the flour and salt. Add the rye flour, bread flour, and salt. Mix on low speed with the dough hook for 2–4 minutes, until the dough comes together and looks well hydrated.
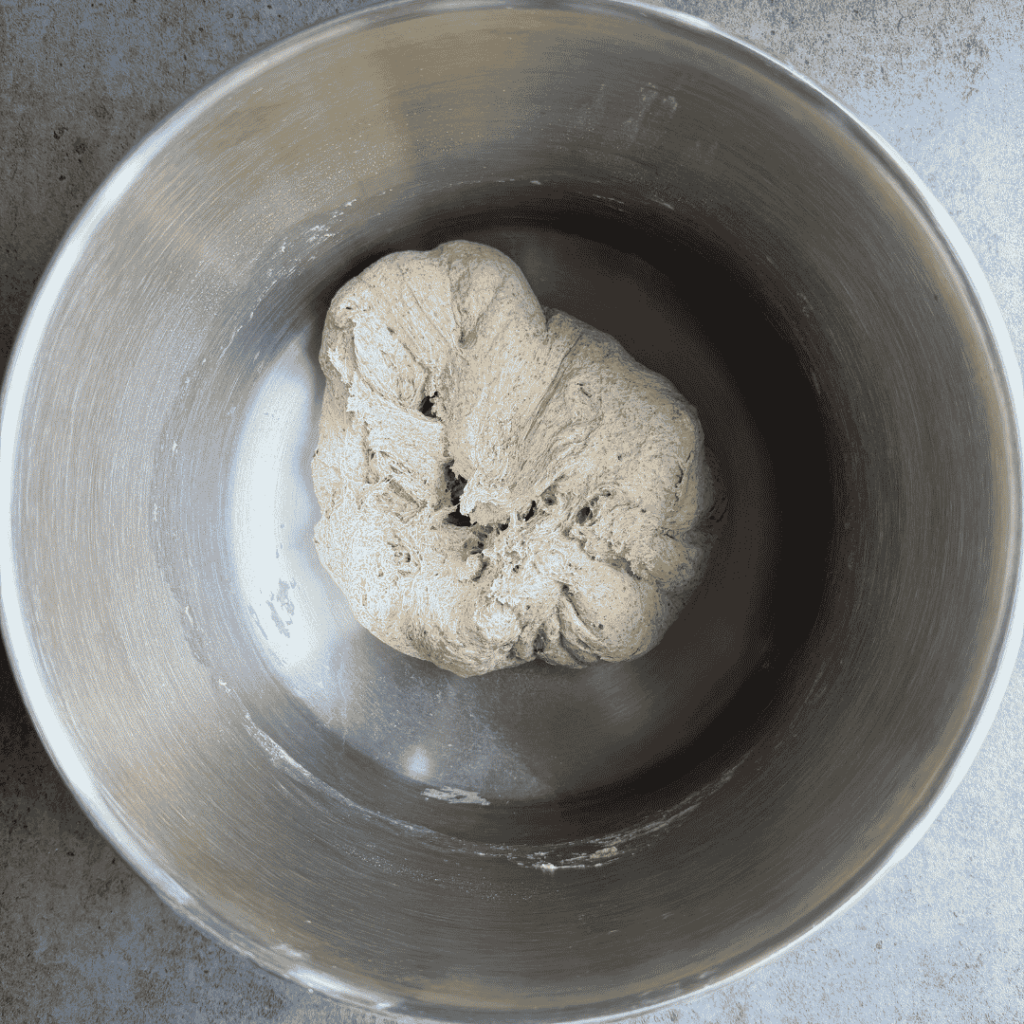
Step 5: Knead. If kneading by hand, turn the dough onto an unfloured surface and knead until smooth, elastic, and tacky but not sticky, about 5–6 minutes. If using a mixer, this is where you’ll split the process — see Step 6.
Splitting and Developing the Two Doughs
Step 6: Divide the dough. Divide the dough in half. Leave one half in the stand mixer and set the other aside on a plate or your counter.
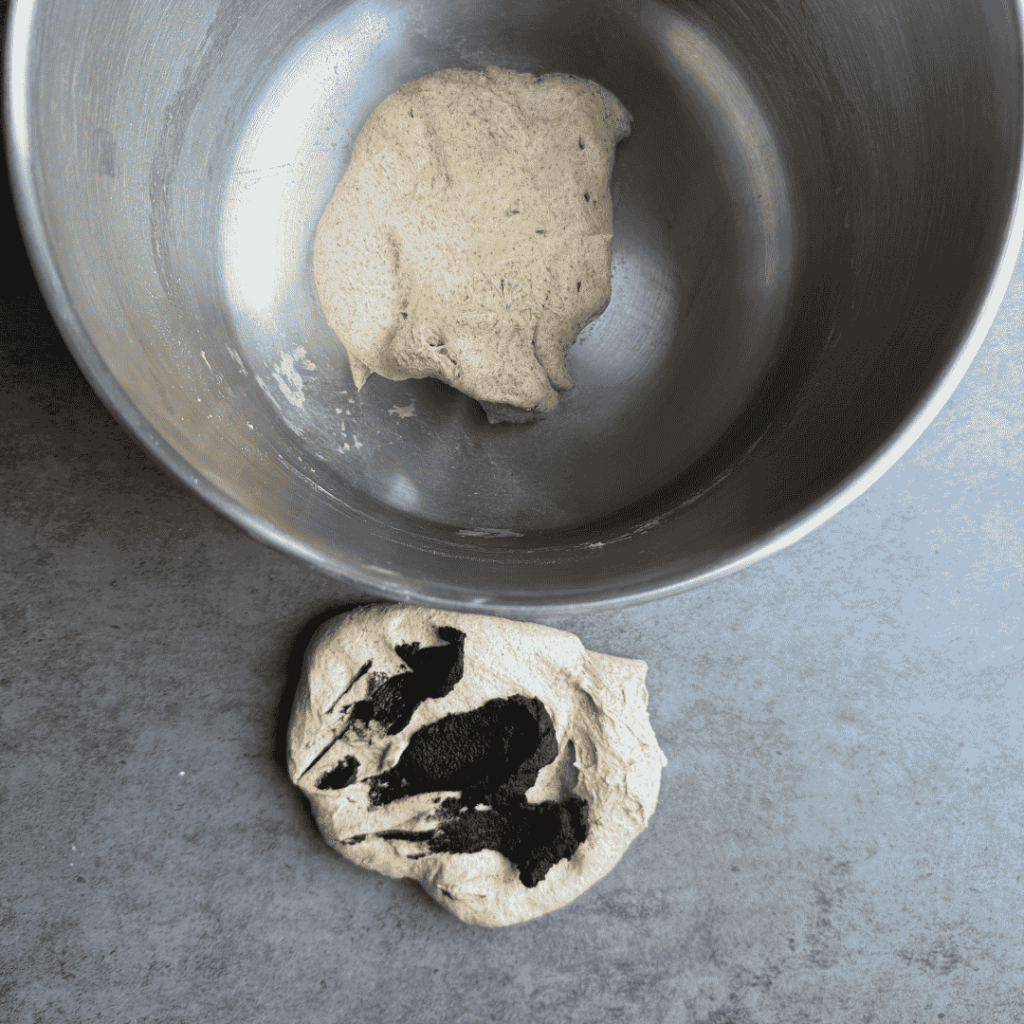
Step 7: Knead the light half. Increase your mixer speed to medium (or as close as your machine tolerates with a stiff dough) and knead the dough in the mixer until smooth, elastic, and tacky but not sticky, about 5 minutes. Place it in a lightly oiled 4-cup measuring cup or bowl, pat it level, and note where the dough sits on the measuring line — this matters for the next step. Cover and set aside.
Step 8: Make the cocoa paste and mix the dark half. In a small dish, stir the black cocoa powder and water together into a smooth paste. Add the second dough half back to your stand mixer along with the cocoa paste, and mix on medium-low until the color is even and the gluten has developed, about 5 minutes. Place in a separate lightly oiled bowl and cover.
Step 9: Bulk rise by percentage, not by the clock. Let both doughs rise until they’ve increased by about 50% in volume. For example: if your light dough started at the 450ml mark in your measuring cup, you’re looking for it to reach roughly 675ml.
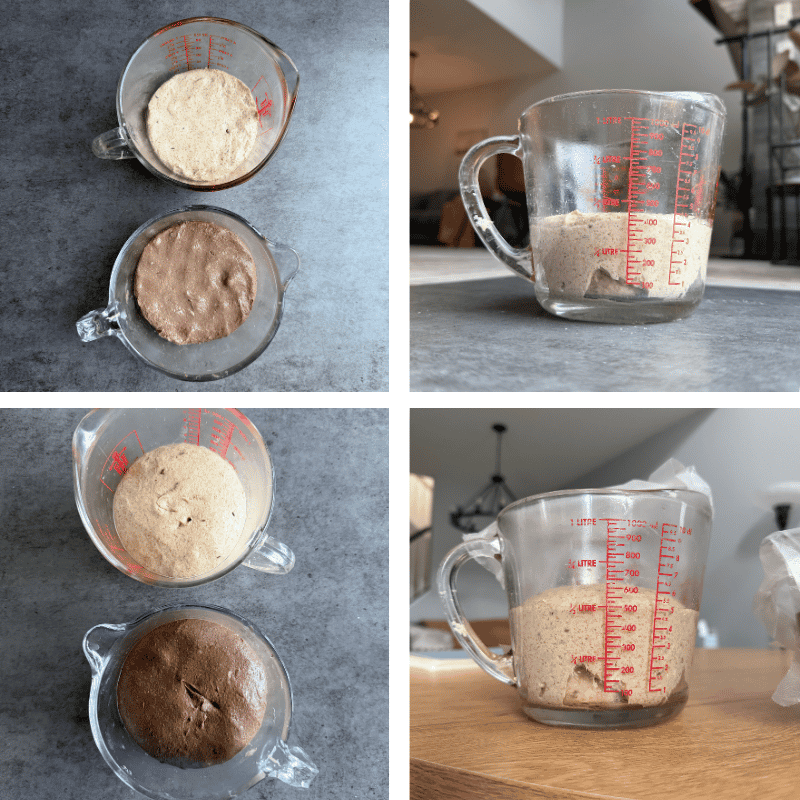
💡 Pro Tip: This is one of the most important habits you can build as a sourdough baker: watch the dough, not the clock. A 50% rise might take 3 hours on a warm summer afternoon and 6 hours in a chilly kitchen in January — the timeline shifts, but the dough’s behavior doesn’t lie to you. Marking your container level ahead of time takes the guesswork out completely.
Shaping the Marble Swirl
Step 10: Stretch both doughs. Once both doughs have risen, turn them out onto a lightly floured surface. Stretch each piece into a rough rectangle, about 5 by 10 inches.
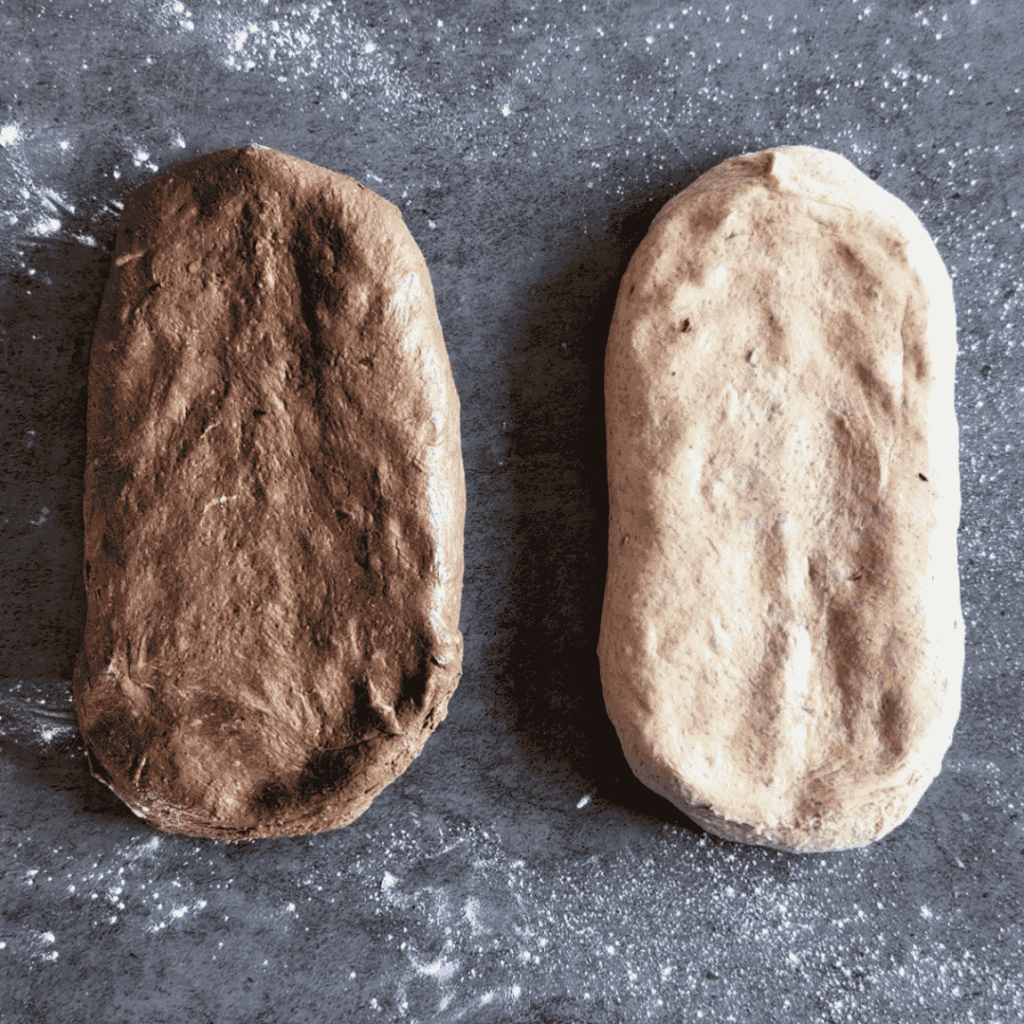
Step 11: Layer the two doughs. Place the dark rye rectangle on top of the light rye rectangle, offset about halfway up, so the light dough peeks out at the bottom and the dark dough peeks out at the top, with the middles overlapping. If the dough feels sticky as you work, lightly oil your fingertips rather than reaching for more flour — extra flour at this stage can create dry seams in your finished swirl.
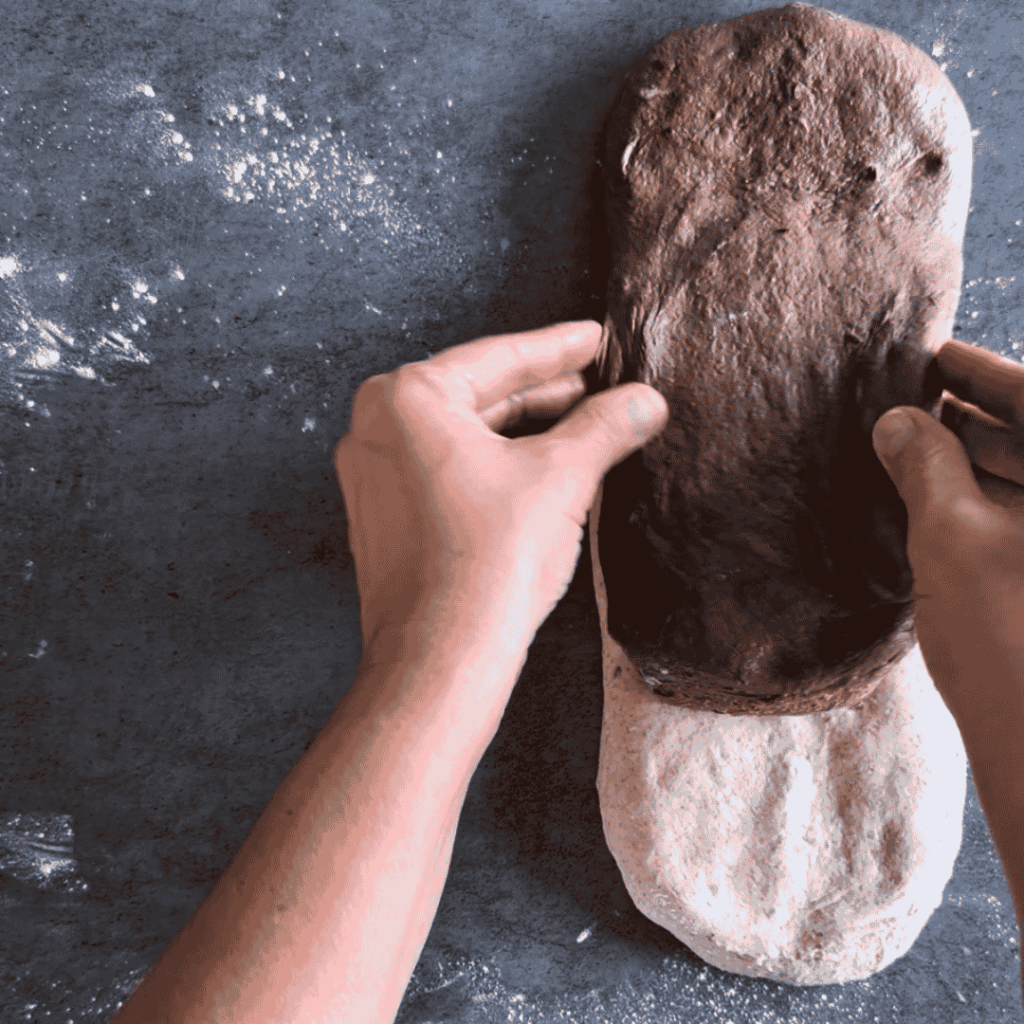
Step 12: Fold and turn. Fold the bottom (light) portion up and over the dark layer, then fold the top (dark) portion down over that. You’ll now have a square that reads, from bottom to top: light, dark, light, dark. Turn the square 90 degrees and gently pat it into a rectangle roughly 5 inches wide and 8 inches long.
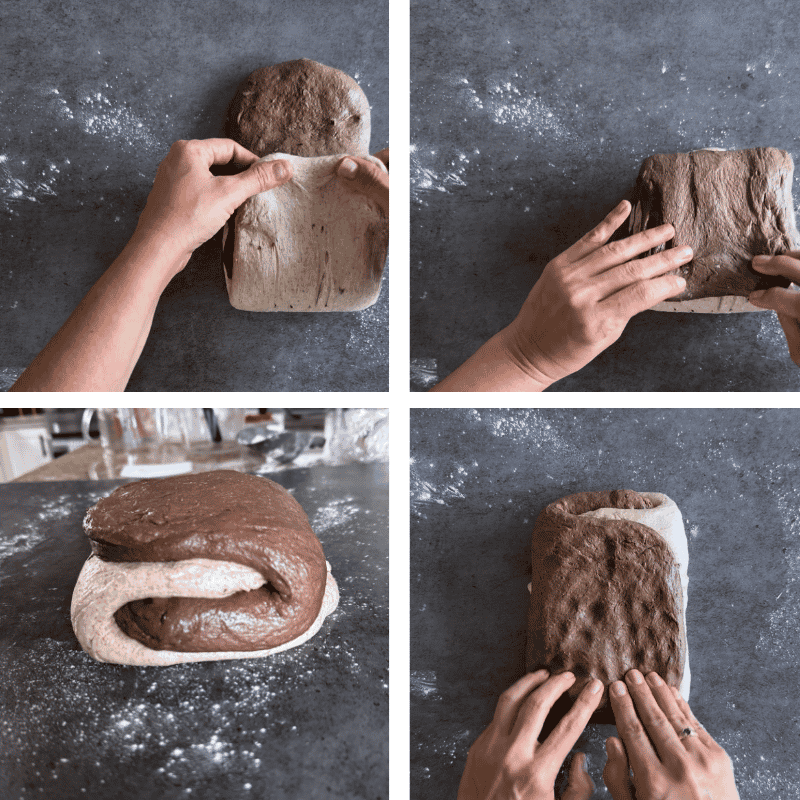
Step 13: Roll and place in the pan. Roll the dough up tightly but gently from the bottom, like a jelly roll. Place the log seam-side down into a lined and lightly greased 9×4-inch loaf pan.
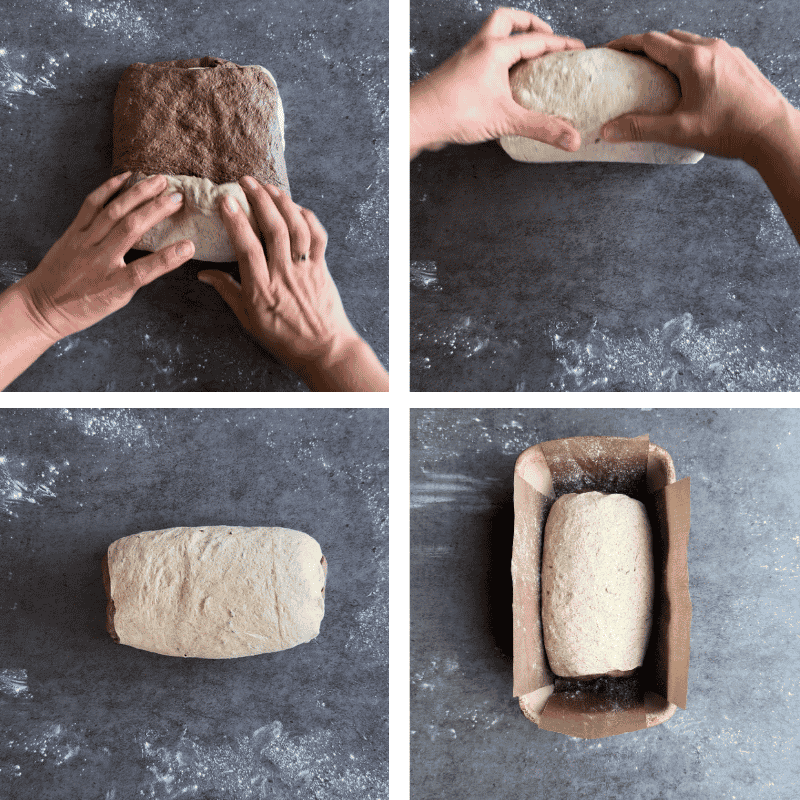
⚠️ Watch Out: Resist the urge to roll too loosely or too tightly. Too loose, and you’ll get gaps and tunneling once it bakes. Too tight, and you risk tearing the layers and muddying your swirl. A snug, even roll is what gives you that clean spiral when you slice into the finished loaf.
Final Rise and Baking
Step 14: Second rise. Mist the top of the loaf lightly with cooking spray and cover with plastic wrap or a shower cap. Let it rise until doubled.
💡 Pro Tip: Short on time, or want deeper flavor? Place the shaped loaf in the fridge overnight for a cold ferment. Pull it out the next day and let it finish rising at room temperature until doubled before baking — an easy way to work sourdough into a real, busy schedule.
Step 15: Score and bake. Preheat your oven to 375°F. Score the top of the loaf with a single slash down the center, or several angled slashes, about ¼ inch deep. Bake on the center rack for 40–45 minutes, rotating the loaf 180 degrees halfway through, until golden brown and baked through. An internal temperature of 200°F is your best indicator of doneness.
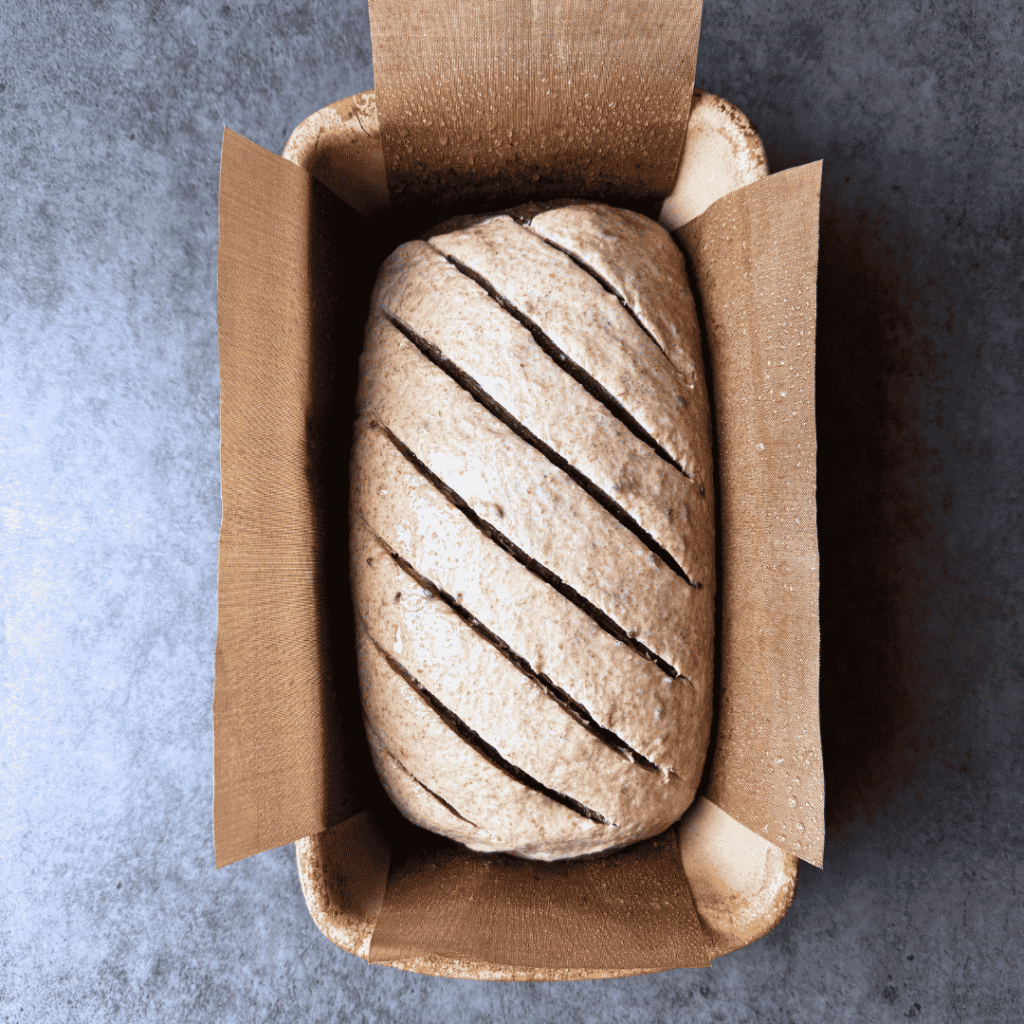
Step 16: Cool. Let the loaf rest in the pan for 5 minutes, then remove it from the pan and lining and transfer to a cooling rack. Brush the top and sides with melted butter for a glossy, soft crust. Let the loaf cool completely before slicing — I know it’s tempting, but cutting into hot rye bread leads to a gummy crumb, and this loaf deserves better than that.
How to Store & Freeze
Room temperature: Store the cooled, sliced or whole loaf in a bread bag, beeswax wrap, or airtight container at room temperature for up to 3 days. Rye bread with this much hydration tends to stay soft longer than a lean white sourdough, but it will still dry out if left uncovered.
Refrigerator: I don’t recommend refrigerating this loaf. Bread staling actually accelerates in the fridge, and rye bread is especially prone to drying out and turning gummy when chilled. If you need extended storage, skip straight to the freezer instead.
Freezer: Slice the fully cooled loaf before freezing so you can pull out exactly what you need. Place a small piece of parchment between each slice, then place in a freezer-safe bag, pressing out as much air as possible. Freeze for up to 3 months. To thaw, let slices come to room temperature or pop them straight into the toaster from frozen — this is honestly my favorite way to enjoy this bread, since a light toast brings the caraway aroma right back to life.
Troubleshooting
Problem: My marble swirl looks muddy instead of distinct. Why it happened: This usually comes from over-handling the dough during shaping, or working with dough that was too warm and soft. How to fix it: Keep your hands lightly oiled instead of floured, work efficiently once you start layering, and if your kitchen runs warm, chill both doughs for 15–20 minutes after the bulk rise before shaping.
Problem: My loaf turned out dense and gummy in the center. Why it happened: Most often this means the loaf was underfermented, undebaked, or it was sliced before it finished cooling. How to fix it: Allow your dough to double in size in the loaf pan, it should come up to the top before baking. Always check for a 200°F internal temperature before pulling the loaf from the oven, and give it the full cool-down time on a rack.
Problem: My dough never seemed to rise, even after hours. Why it happened: This is almost always a levain or starter issue — either your starter wasn’t at true peak activity, or your kitchen is on the cooler side and everything is simply moving slower. How to fix it: Make sure your levain is domed, bubbly, and smells actively sour before using it. Your starter may need to be fed a few times back to back to become very active and vigorous before creating this levain. If your kitchen runs cold, find a warmer spot — near a proofing setting on your oven, or even just a warm corner of the kitchen — and be patient. Watch the dough’s rise, not the clock.
Problem: The dark and light doughs won’t stick together and separate during baking. Why it happened: This usually happens when the surfaces of the dough dried out slightly before you layered them, or the fold wasn’t pressed together firmly enough. How to fix it: Work with the doughs promptly after stretching them, and press each fold down firmly as you layer to help the surfaces bond before you roll.
Problem: My crust turned out tough or overly thick. Why it happened: This can come from baking too long, an oven running hotter than the dial suggests, skipping the butter brush at the end, or the loaf was underfermented. How to fix it: Use an oven thermometer to confirm your actual temperature, pull the loaf as soon as it hits 200°F internally, and don’t skip brushing the crust with butter right out of the oven — it makes a real difference in softness. Allow your loaf to rise more if it is underfermented and dense.
Frequently Asked Questions
Can I make sourdough marble rye bread without a stand mixer? Yes. You can mix and knead both doughs entirely by hand — it will take a lot more time to knead by hand, but the result will be just as good.
Do I have to use black cocoa powder, and will it make the bread taste like chocolate? No, it won’t taste like chocolate — that’s actually the whole point of using it. Black cocoa is heavily processed to strip out most of its natural flavor, so it colors the dark half of this loaf a dramatic, deep near-black without contributing any real chocolate taste. Regular Dutch-process cocoa powder will work as a substitute if you can’t find black cocoa, but expect a lighter, more reddish-brown contrast and a touch more actual cocoa flavor coming through.
Can I skip the caraway seeds entirely? Yes — this is a purely optional, traditional flavor. Leaving them out will give you a milder, sweeter marble rye that’s still delicious, just less “deli counter” in flavor.
Why is my rye dough stickier than other sourdough I’ve made? Rye flour behaves differently than wheat flour — it absorbs liquid differently and has less gluten-forming protein, which naturally gives rye doughs a tackier feel. This is completely normal, and it’s why this recipe leans on bread flour or high gluten flour to help balance the structure.
Can I use this dough to make a free-form loaf instead of a pan loaf? This particular recipe is built and hydrated for a loaf pan, which gives the soft, tender sandwich texture this bread is known for. A free-form version would need adjustments to hydration and shaping to hold its structure without a pan.
How do I get clean, even slices for sandwiches? Make sure the loaf has cooled completely — even a little residual warmth in the center will make it compress under a knife. A sharp serrated bread knife with a gentle sawing motion will give you clean, even slices every time. And my favorite tool I use for perfect slices is this Bamboo Bread Slicer.
Better than Deli Marble Rye Sourdough Sandwich Bread
Ingredients
Method
- Step 1: Build your levain. In a small jar or bowl, combine the water, starter, rye flour, and bread flour. Mix well until no dry flour remains, cover loosely, and set it on your counter overnight.
- Step 2: Steep the caraway seed tea (if using). Pour boiling water over the caraway seeds, stir, cover loosely, and let it steep overnight alongside your levain.
- Step 3: Mix the wet ingredients. In the bowl of a stand mixer, strain the caraway seed tea to measure out 335g (top off with plain water if you’re short). If skipping the tea, just use 335g room-temp water. Add all of your levain (it should look flattened on the top and bubbly, dimples throughout, with a slightly sour, yeasty smell — that’s how you know it’s at peak), the molasses, oil, and 1 Tbsp of fresh toasted caraway seeds. (I discard the caraway seeds that were used for the tea as they no longer have much flavor left and add a fresh, lightly toasted tablespoon of seeds in the dough). Whisk to combine.
- Step 4: Add the flour and salt. Add the rye flour, bread flour, and salt. Mix on low speed with the dough hook for 2–4 minutes, until the dough comes together and looks well hydrated.
- Step 5: Knead. If kneading by hand, turn the dough onto an unfloured surface and knead until smooth, elastic, and tacky but not sticky, about 5–6 minutes. If using a mixer, this is where you’ll split the process — see Step 6.
- Step 6: Divide the dough. Divide the dough in half. Leave one half in the stand mixer and set the other aside on a plate or your counter.
- Step 7: Knead the light half. Increase your mixer speed to medium (or as close as your machine tolerates with a stiff dough) and knead the dough in the mixer until smooth, elastic, and tacky but not sticky, about 5 minutes. Place it in a lightly oiled 4-cup measuring cup or bowl, pat it level, and note where the dough sits on the measuring line — this matters for the next step. Cover and set aside.
- Step 8: Make the cocoa paste and mix the dark half. In a small dish, stir the black cocoa powder and water together into a smooth paste. Add the second dough half back to your stand mixer along with the cocoa paste, and mix on medium-low until the color is even and the gluten has developed, about 5 minutes. Place in a separate lightly oiled bowl and cover.
- Step 9: Bulk rise by percentage, not by the clock. Let both doughs rise until they’ve increased by about 50% in volume. For example: if your light dough started at the 450ml mark in your measuring cup, you’re looking for it to reach roughly 675ml.
- Step 10: Stretch both doughs. Once both doughs have risen, turn them out onto a lightly floured surface. Stretch each piece into a rough rectangle, about 5 by 10 inches.
- Step 11: Layer the two doughs. Place the dark rye rectangle on top of the light rye rectangle, offset about halfway up, so the light dough peeks out at the bottom and the dark dough peeks out at the top, with the middles overlapping. If the dough feels sticky as you work, lightly oil your fingertips rather than reaching for more flour — extra flour at this stage can create dry seams in your finished swirl.
- Step 12: Fold and turn. Fold the bottom (light) portion up and over the dark layer, then fold the top (dark) portion down over that. You’ll now have a square that reads, from bottom to top: light, dark, light, dark. Turn the square 90 degrees and gently pat it into a rectangle roughly 5 inches wide and 8 inches long.
- Step 13: Roll and place in the pan. Roll the dough up tightly but gently from the bottom, like a jelly roll. Place the log seam-side down into a lined and lightly greased 9×4-inch loaf pan.
- Step 14: Second rise. Mist the top of the loaf lightly with cooking spray and cover with plastic wrap or a shower cap. Let it rise until doubled.
- For a deeper flavor, place the shaped loaf in the fridge overnight for a cold ferment. Pull it out the next day and let it finish rising at room temperature until doubled before baking — an easy way to work sourdough into a real, busy schedule.
- Step 15: Score and bake. Preheat your oven to 375°F. Score the top of the loaf with a single slash down the center, or several angled slashes, about ¼ inch deep. Bake on the center rack for 40–45 minutes, rotating the loaf 180 degrees halfway through, until golden brown and baked through. An internal temperature of 200°F is your best indicator of doneness.
- Step 16: Cool. Let the loaf rest in the pan for 5 minutes, then remove it from the pan and lining and transfer to a cooling rack. Brush the top and sides with melted butter for a glossy, soft crust. Let the loaf cool completely before slicing — I know it’s tempting, but cutting into hot rye bread leads to a gummy crumb, and this loaf deserves better than that.
