The Best Soft Sourdough Sandwich Bread
There’s something magical about slicing into a loaf of homemade sourdough sandwich bread—especially when it’s soft, fluffy, gut healthy, and boasts that signature tang we all love. After countless bakes and tweaks, I’ve crafted a recipe that delivers consistent, bakery-quality results right from your kitchen. Whether you’re a seasoned sourdough enthusiast or just starting out, this guide will walk you through every step to achieve the best soft sourdough sandwich bread that you will bake on repeat.
Why You’ll Love This Recipe
- Cotton Soft & Fluffy Texture: Perfect for sandwiches, toast, or simply slathered with butter.
- Naturally Leavened: No commercial yeast—just the power of your sourdough starter.
- Beginner-Friendly: With clear instructions and tips, even novice bakers can succeed.
- Flexible Schedule: Options for same-day baking or an overnight cold ferment.
- Freezer-Friendly: Bake once, enjoy for weeks.
Tools you’ll want
Basic Ingredients
- Sourdough Starter: You’ll need an active sourdough starter, if you don’t have one, my 170yr old San Francisco sourdough starter “Phoebe” is vibrant and very active.
- Flour: You can use Bread flour or All-Purpose flour, both work great, feel free to substitute 20% of whole wheat flour as well.
- Oil: You can use melted butter or any oil you like – I prefer to use avocado oil as it does not add flavor.
- Sweetener: Sugar, maple syrup, date syrup, or honey will do.
Baking Timeline for The Best Soft Sourdough Sandwich Bread
This loaf can be baked same day or refrigerated and baked next day. Additionally, you can feed your sourdough starter 3 days in advance, allow it to come to peak and then refrigerate it and use right out of the fridge for the next 2-3 days to mix your sourdough sandwich bread. Here are two baking timelines (with dough temperatures of 75F) that should give you a starting point, just keep in mind you will end up adjusting based on temperatures you’re working in.
Same day mixing and baking (Option 1)
| Day 1 (Evening) | Feed Your Starter |
| Before bedtime the day before | For an overnight feed, depending on your house temperature, feed a higher ratio. Example: 1:4:4 (25g fridge starter: 100g water: 100g flour) |
| Day 2 (Morning) | Mix Dough, Bulk Fermentation |
| 9:00 am | Mix your dough ingredients, rest 1 hr. |
| 10:00 am | 1st set of Stretch & Folds |
| 10:45 am | 2nd set of Stretch & Folds |
| 10:45 am-2 pm | Cover, and let sit in room temperature until it just rises by 50% percent, just puffs up a little. The timing on how long this will take will vary depending on temperature. |
| Shaping | |
| 2:00 pm (ish) | Shape your loaves. Hoax your dough out of the bowl onto a lightly floured surface. Divide in half and gently stretch out each section into a square. Then fold the left and the right sides into the middle, tightly roll up the dough into a log, tightening at the end by dragging the loaf towards you to create tension on the outside. Repeat with the 2nd loaf. Place the loaves seam side down into the lined bread pans. Lightly dust with flour & cover with a plastic wrap. |
| 2nd Rise and Bake | |
| 2:30 pm-7:30 pm | If baking same day, let the dough sit in room temperature to rise about an inch above the surface of the top of the bread pan, again, depending on temperature, this can take anywhere from 2 hours to 5 hours. Preheat oven to 375F, once the loaf is puffed up an inch above the top of the bread pan, and soft to the touch like a balloon, bake for 40 min. Once baked, flip the loaf out of the pan and cool on a rack completely before slicing. |
Next day baking – 2 day process (Option 2)
Day 1
| Morning | Feed Your Starter |
| 8:00 am | For a 4-6 hr starter activation feed your starter early in the morning with warm water a 1:1:1 ratio. Example: (75g fridge starter: 75g very warm water: 75g flour. |
| Afternoon | Mix Dough, Bulk Fermentation |
| 2:00 pm | Mix your dough ingredients, cover, rest 1 hr. |
| 3:00 pm | 1st set of Stretch & Folds |
| 3:45 pm | 2nd set of Stretch & Folds |
| 3:45 pm-8:00 pm | Cover, and let sit in room temperature until it just rises by 50% percent, just puffs up a little. The timing on how long this will take will vary depending on temperature. |
| Evening | Cold Fermentation |
| Once the dough puffed up by 50%, put the covered bowl away in the refrigerator for cold fermentation. I don’t skip cold fermentation because it gives the bread that deeper, tangy while breaking down the gluten further for easier digestion and lots of gut healthy bacteria. |
Day 2
| Morning-Noon | Shaping |
| Note: | You can take out your refrigerated dough any time the next day, just keep in mind that refrigerated, cold dough will take longer during it’s 2nd rise in the bread pan – so it is best to shape it before noon to give it plenty of time to warm up and rise before baking. |
| 8:00 am-12:00 pm | Shape your loaves. Hoax your dough out of the bowl onto a lightly floured surface. Divide in half and gently stretch out each section into a square. Then fold the left and the right sides into the middle, tightly roll up the dough into a log, tightening at the end by dragging the loaf towards you to create tension on the outside. Repeat with the 2nd loaf. Place the loaves seam side down into the lined bread pans. Lightly dust with flour & cover with a plastic wrap. |
| Afternoon/Early evening | 2nd Rise & Baking |
| 2:00 pm- 6:00 pm | Allow the dough to sit in room temperature for it’s 2nd rise, since the dough is straight out of the refrigerator and cold, it will take longer for it to rise to about an inch above the surface of the top of the bread pan. This can take anywhere from 4 hours to 8 hours. Be patient with it and give it time. Preheat oven to 375F, once the loaf is puffed up an inch above the top of the bread pan, and soft to the touch like a balloon, bake for 40 min. Once baked, flip the loaf out of the pan and cool on a rack completely before slicing. |
Sourdough Sandwich Bread Ingredients
- 600g (2 2/3 cups) water (lukewarm)
- 200g (1 cup) active sourdough starter
- 80g (1/4 cup) honey or pure maple syrup
- 40g (2 1/2 Tbsp) avocado oil or any mild flavored oil
- 1050g (7 cups, sifted and leveled) bread flour (unbleached all-purpose flour will work too!)
- 24g (4 tsp) salt
Step 1: Feed your Sourdough Starter – Prepare a Levain
- Option 1: To mix your sandwich bread dough in the morning, feed your starter the night before for an overnight activation, depending on your house temperature, feed a higher ratio. Example:
1:4:4 (25g fridge starter: 100g water: 100g flour) - Option 2: To prepare a levain in the morning, so it peaks by afternoon, feed your starter early in the morning with warm water a 1:1:1 ratio.
Example: (75g fridge starter: 75g very warm water: 75g flour.
💡 TIP: Make sure your starter comes to peak before using it to mix your dough. Give it time to rise, level off, and then start slightly descending and bubbling up.

Step 2: Mix & Rest – Bulk Fermentation
- Mix. In a large bowl, whisk together the water and active starter until dissolved. Add honey and oil, whisk again. Add flour and salt, stirring until no dry bits remain. You can use a dough whisk or mix by hand. The dough will be shaggy and sticky. Use a dough scraper to clean the sides of the bowl and gather the dough to the middle.
- Let the dough rest. Cover the bowl with plastic wrap, wet towel, a lid, or a shower cap and let the dough rest for 1 hour. This helps the flour hydrate and starts gluten development without the need for excessive kneading.
💡 TIP: I highly recommend using a digital kitchen scale for the most consistent results.

Step 3: Strengthen the Dough (Stretch & Folds)
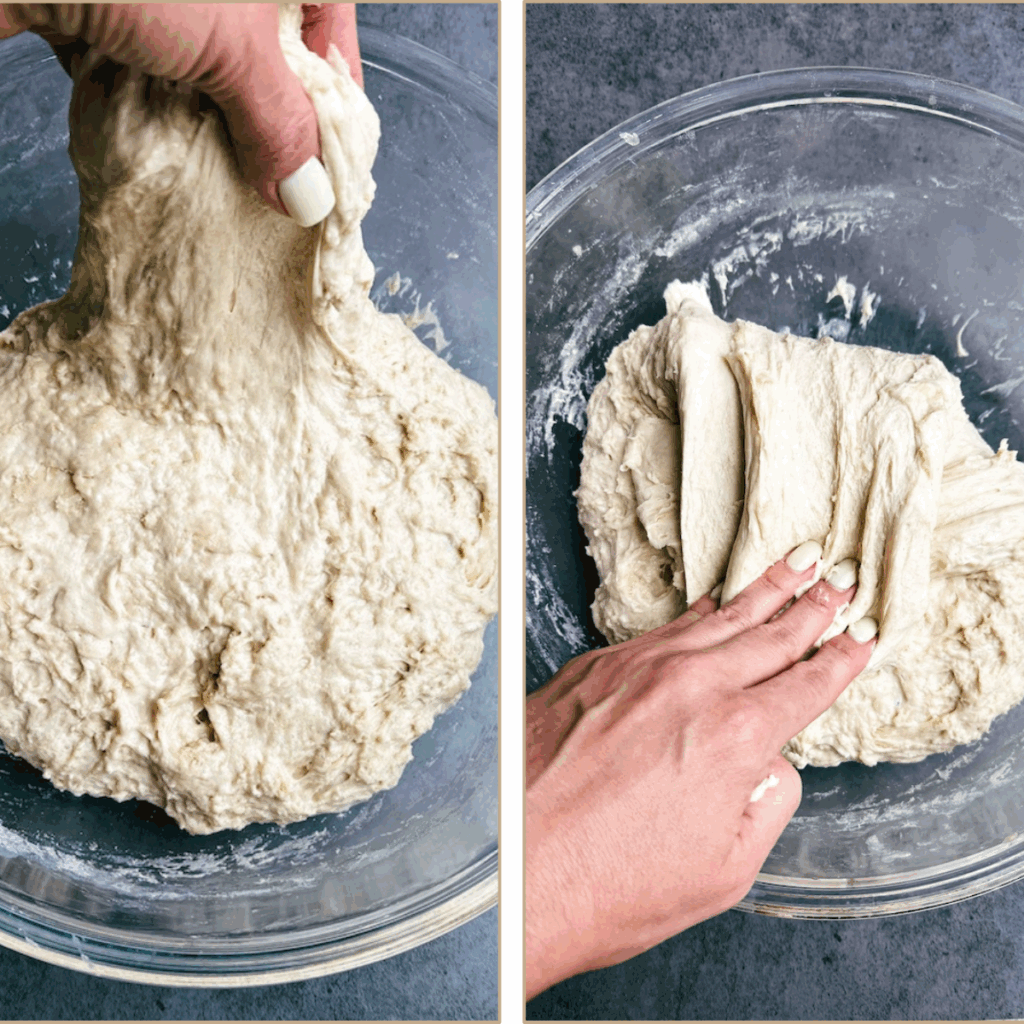
- 1st Stretch & Fold. After the dough has rested for 1 hour, perform a set of stretch & folds. Wet your hands slightly, grab a section of the dough with your fingers from the outside, stretch it upward about 4-6 inches, and fold it over itself to the other side of the bowl. Grab another section of the dough and repeat the process going around the bowl until everything comes into a rough ball and the dough starts to resist being stretched and tugged. Cover the bowl and set aside for 45 minutes.
- 2nd Stretch & Fold. After a 45 min rest, the dough has relaxed and is ready to be stretched and folded again. Repeat the process as in the 1st set.
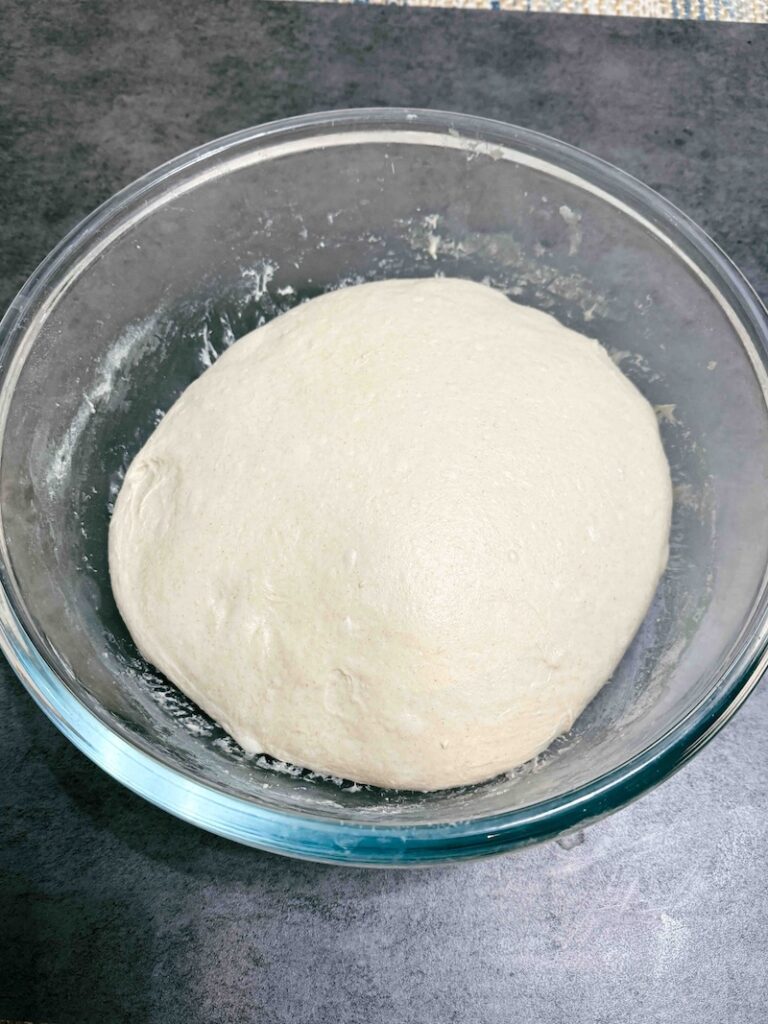
Step 4: First Rise
Cover the bowl and let the dough ferment at room temperature until it has increased by about 50% in volume. This may take 3-6 hours, depending on your kitchen temperature.
Step 5: Cold Proof / Cold Ferment
Cover with a shower cap or plastic wrap and refrigerate overnight for 8-16 hours to develop flavor and make the dough easier to handle.
Cold fermentation develops incredible flavor and firms up the dough for easier scoring.
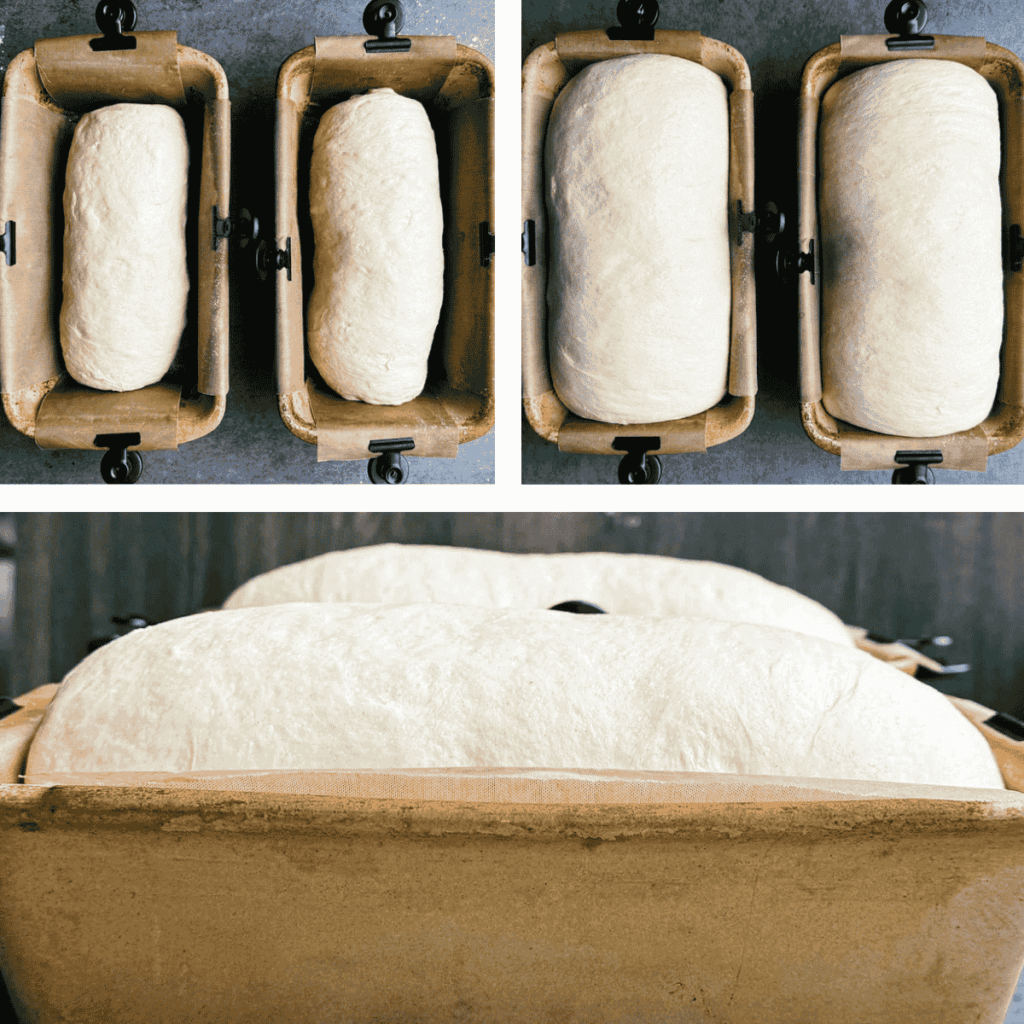
Step 6: Shape & Second Rise
- Divide & Shape: Remove the dough from the fridge and turn it onto a floured surface. Divide it into two equal pieces. Gently stretch each piece into a rectangle, pressing out air bubbles. Roll each rectangle tightly into a log.
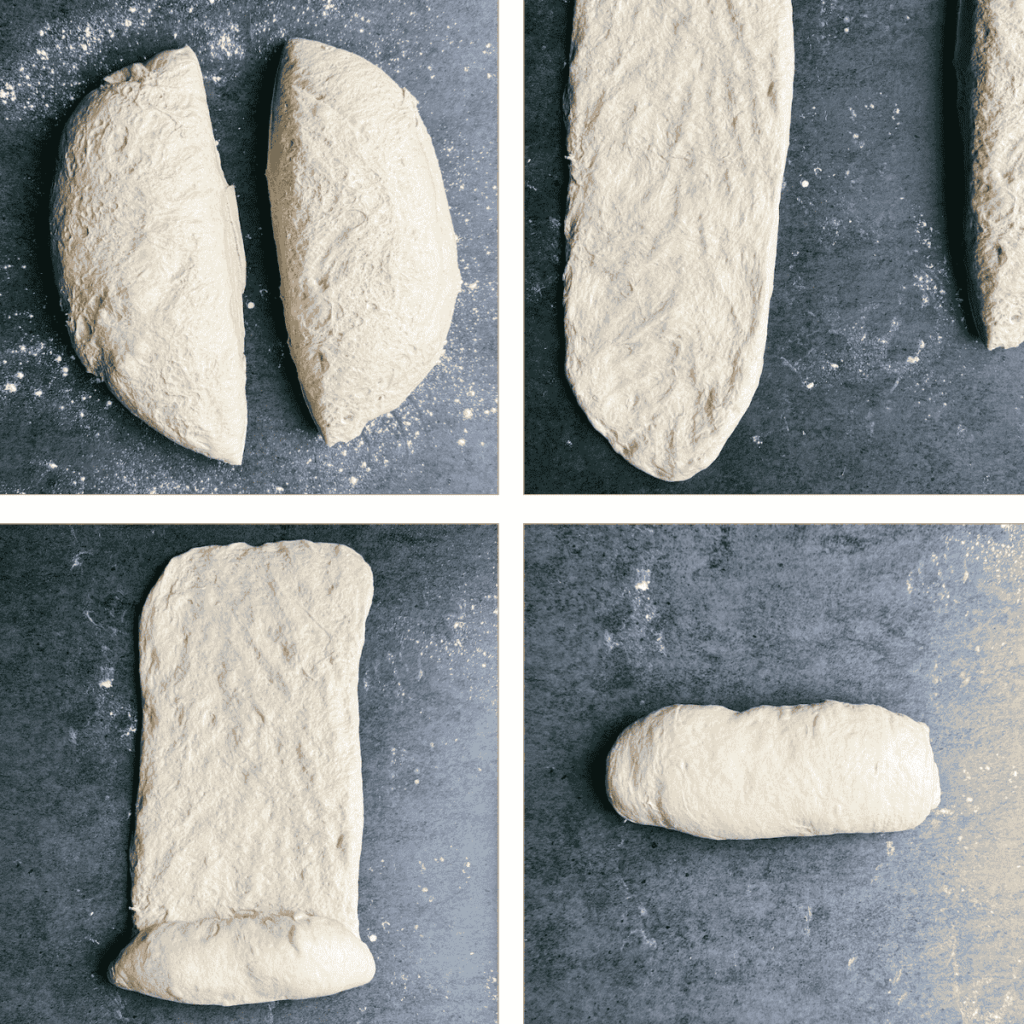
- Prepare Pans: Line two 9×5-inch loaf pans with parchment paper and lightly grease them. Place each dough log seam-side down into the prepared pans.
- Final Proof: Cover the pans and let the dough rise at room temperature until it has doubled in size and domed over the pan edges. This may take 2-4 hours.
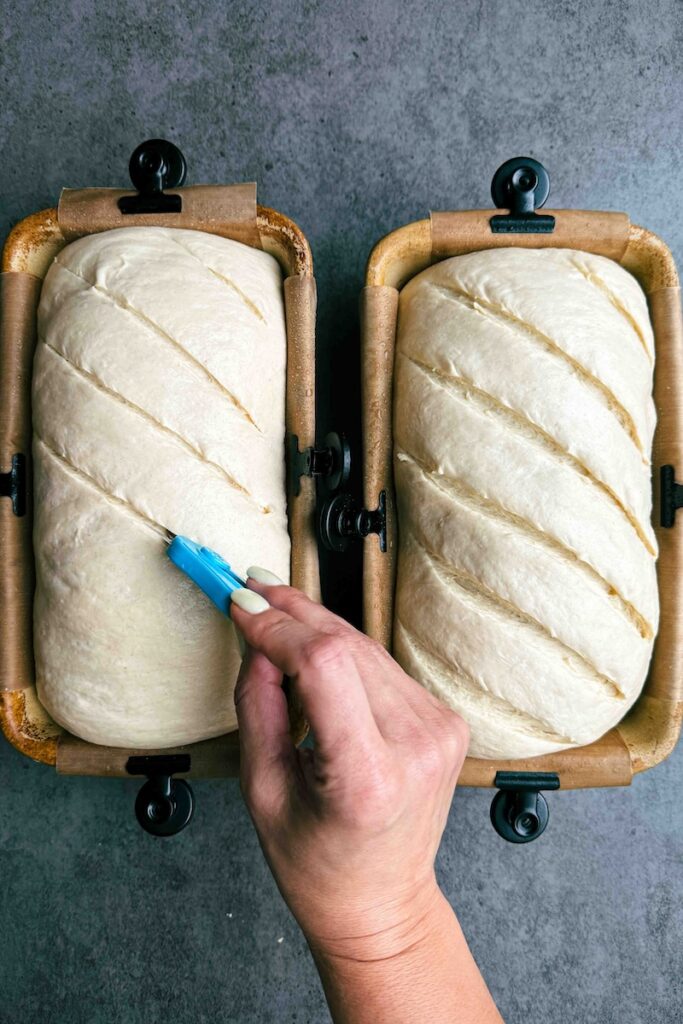
Step 7: Score and Bake
Preheat Oven: Preheat your oven to 375°F (190°C).
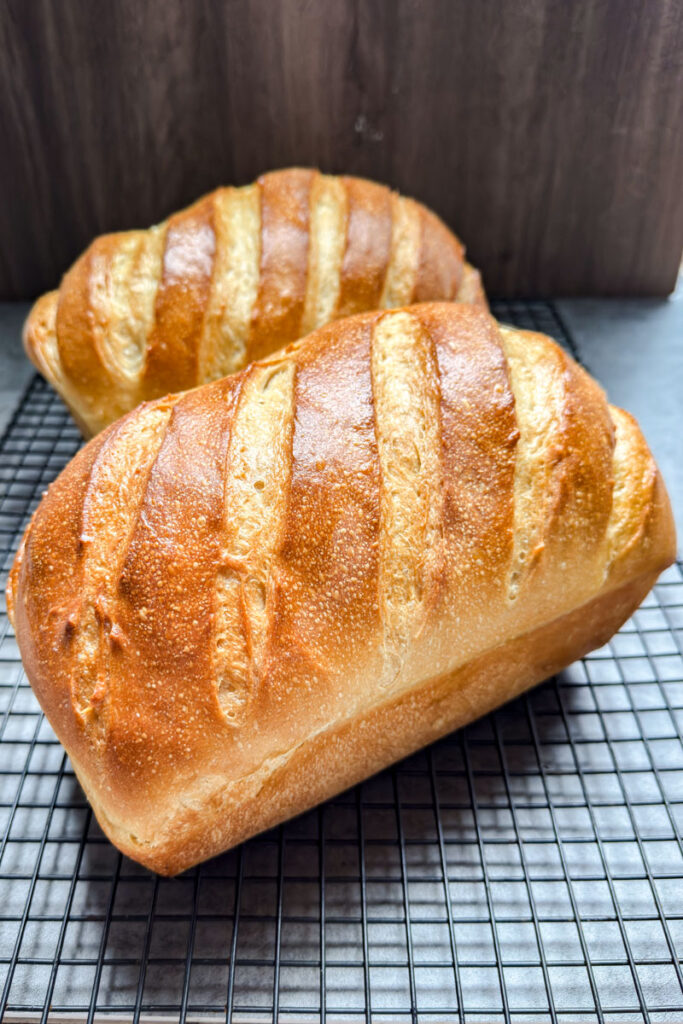
Score & Bake: Using a sharp knife or bread lame/razor, score the tops of the loaves. Bake for 40 minutes, or until the crust is golden brown and the internal temperature reaches 198°F (92°C).
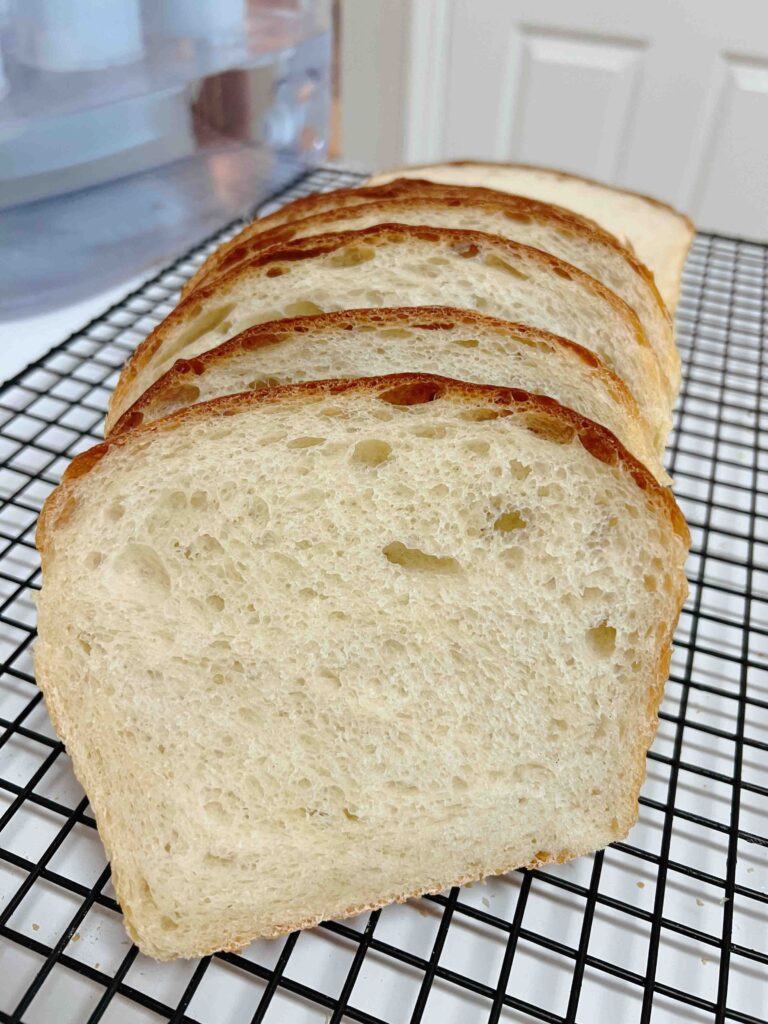
Step 8: Cool, Slice, & Enjoy
Remove the loaves from the pans and place them on a wire rack. Brush the tops with butter for a soft crust. For the best Soft Sourdough Sandwich bread slices, allow to cool completely before slicing.

Storage and Freezing Tips
To keep your sourdough sandwich bread fresh:
- Short-Term Storage: Once cooled, store the loaf in a plastic bag leaving a small air hole to avoid moisture build up and mold.
- Freezing: Slice the cooled loaf and place parchment paper squares between slices. Place the slices in a ziplock bag and seal while squeezing out as much air as possible without crushing the bread. This method allows you to retrieve individual slices as needed.
- Thawing: Remove the desired number of slices and let them thaw at room temperature for a few minutes. For a crisp texture, toast the slices directly from frozen.
The Best Soft Sourdough Sandwich Bread
Ingredients
Method
- Option 1: To mix your sandwich bread dough in the morning, feed your starter the night before for an overnight activation, depending on your house temperature, feed a higher ratio. Example: 1:4:4 (25g fridge starter: 100g water: 100g flour)
- Option 2: To prepare a levain in the morning, so it peaks by afternoon, feed your starter early in the morning with warm water a 1:1:1 ratio.Example: (75g fridge starter: 75g very warm water: 75g flour.
- Mix. In a large bowl, whisk together the water and active starter until dissolved. Add honey and oil, whisk again. Add flour and salt, stirring until no dry bits remain. You can use a dough whisk or mix by hand. The dough will be shaggy and sticky. Use a dough scraper to clean the sides of the bowl and gather the dough to the middle.
- Let the dough rest. Cover the bowl with plastic wrap, wet towel, a lid, or a shower cap and let the dough rest for 1 hour. This helps the flour hydrate and starts gluten development without the need for excessive kneading.
- 1st Stretch & Fold. After the dough has rested for 1 hour, perform a set of stretch & folds. Wet your hands slightly, grab a section of the dough with your fingers from the outside, stretch it upward about 4-6 inches, and fold it over itself to the other side of the bowl. Grab another section of the dough and repeat the process going around the bowl until everything comes into a rough ball and the dough starts to resist being stretched and tugged. Cover the bowl and set aside for 45 minutes.
- 2nd Stretch & Fold. After a 45 min rest, the dough has relaxed and is ready to be stretched and folded again. Repeat the process as in the 1st set.
- Cover the bowl and let the dough ferment at room temperature until it has increased by about 50% in volume. This may take 3-6 hours, depending on your kitchen temperature.
- Cover with a shower cap or plastic wrap and refrigerate overnight for 8-16 hours to develop flavor and make the dough easier to handle.
- Cold fermentation develops incredible flavor and firms up the dough for easier scoring.
- Divide & Shape: Remove the dough from the fridge and turn it onto a floured surface. Divide it into two equal pieces. Gently stretch each piece into a rectangle, pressing out air bubbles. Roll each rectangle tightly into a log.
- Prepare Pans: Line two 9×5-inch loaf pans with parchment paper and lightly grease them. Place each dough log seam-side down into the prepared pans.
- Second Rise: Cover the pans and let the dough rise at room temperature until it has doubled in size and domed over the pan edges. This may take 2-4 hours.
- Preheat Oven: Preheat your oven to 375°F (190°C).
- Score: Using a sharp knife or bread lame/razor, score the tops of the loaves.
- Bake: Bake for 40 minutes, or until the crust is golden brown and the internal temperature reaches 198°F (92°C).
- Remove the loaves from the pans and place them on a wire rack. Brush the tops with butter for a soft crust. For the best Soft Sourdough Sandwich bread slices, allow to cool completely before slicing.
Video
Notes
- Make sure your starter comes to peak before using it to mix your dough. Give it time to rise, level off, and then start slightly descending and bubbling up.
- Use a digital kitchen scale for the most consistent results.
- To store: Slice a completely cooled loaf and place parchment paper squares between slices. Place the slices in a ziplock bag and seal while squeezing out as much air as possible without crushing the bread.
Troubleshooting Common Issues
Even seasoned bakers encounter hiccups. Here’s how to tackle some common challenges:
Uneven Crust or Pale Color: This could be due to inconsistent oven temperatures or insufficient baking time. Ensure your oven is fully preheated, and use an oven thermometer to verify accuracy.
Dense or Gummy Loaf: This often results from an underactive starter or underproofed dough. Ensure your starter is strong, bubbly, and at its peak before mixing. Also, confirm that the dough has risen adequately during bulk fermentation.
Large Air Pockets: If you notice sizable holes, especially near the top, it might be due to trapped gas bubbles. During shaping, gently degas the dough to distribute air evenly before rolling it up tightly.
Frequently Asked Questions
1. What if I don’t have honey or maple syrup?
You can substitute with granulated sugar, brown sugar, coconut sugar or omit it entirely, though the sweetness balances the sourdough’s tang.
2. Can I use discard instead of active starter?
Yes if it is no more than a 2 day old discard, otherwise if it is an older discard you would need to add about 1/4 tsp of instant yeast to the dough as well (hybrid) to make sure your dough rises properly.
3. How do I know if my sandwich bread is fully baked?
You can use a probe thermometer: a fully baked loaf should reach a minimum of 198°F (92°C) inside temperature.
4. Can I skip adding oil?
Adding some sort of fat to the recipe is what gives the sandwich bread it’s cotton like softness, you can use melted butter or liquid coconut oil. Another option – omit oil but substitute water for full fat milk.
Time Breakdown
- Mixing & Rest: 1 hour
- Stretch & Folds: 1 hour (with breaks)
- Rest & 1st Rise: 3-6 hours (depending on temperature)
- Shaping: 5 minutes
- Cold Proof: 8-24 hours
- 2nd Rise: 3-6 hours (depending on dough temperature)
- Baking: 40 minutes
- Cooling: at least 1 hour
Final Thoughts
If you’re anything like me, once you bake the best, soft sourdough sandwich bread, you’ll find yourself making it on repeat, because your family will be asking for it over and over again.
Versatile Delights
This bread is a chameleon in the best way. Here are some ideas to get you started:
- Classic Sandwiches: Layer it with turkey, cheese, and your favorite veggies, or slather it with peanut butter and your favorite jam for a hearty lunch.
- French Toast: Dip thicker slices in a cinnamon-egg-milk-vanilla-sugar mixture and cook until golden for a delightful breakfast.
- Grilled Cheese: Melt your favorite cheese between two slices and griddle in some butter for a crispy, gooey treat.
- Bread Pudding: Cube the bread and bake it with a sweet custard for a comforting dessert.
Family Favorite
This bread has become a staple in my household. Its soft texture and rich flavor make it a hit with both kids and adults. Whether it’s for school lunches or midnight snacks, it’s always the first to disappear.
Perfect for Gifting
Looking for a heartfelt gift? Wrap a loaf in parchment paper, tie it with twine, add a personalized tag. It’s a thoughtful gesture that’s sure to be appreciated.
Join the Community
I love seeing how others make this recipe their own. Share your creations, tweaks, or serving suggestions in the comments below. Let’s inspire each other and celebrate the joy of baking.
Happy baking!
If you made The Best Soft Sourdough Sandwich Bread and loved it, please leave a review!
23 responses to “The Best Soft Sourdough Sandwich Bread”
-

Delish!! I did the 2 day method as it worked for me. Super soft and fresh. I bet it won’t last 2 days in this house.-
It’s delicious, so glad your family loves it!
-
-
Fantastic results, 2 day method. Thanks for sharing your recipe.-
Glad you enjoyed it!
-
-
Can this be baked in a Dutch oven instead of a loaf pan??-
I don’t know how the shape would hold up baking in a dutch oven, since it’s a sandwich bread, it is meant to be baked in a bread pan. But go ahead and expirement.
-
-
Used another recipe and it didn’t work out. This time I used your cold proofing method. Out of this world delicious. Took a loaf to my mother-in-law, so I’m making another batch a day later. My family devoured the loaf. Thank you!-
Love it! Thank you for your feedback!
-
-
I just tried your sandwich bread recipe for the first time and it was so good! I have been using a different recipe for a while now and I was interested to try your recipe especially because of the different options for scheduling when I bake my loaves. My husband and I like the texture of your recipe so much better and I am now eager to try adding in wheat flour next time!-
Thank you for your feedback Judy, happy to hear!
-
-
I tried baking this recipe two ways: in a loaf pan and then one in a loaf dutch oven (20 min covered, 20 min uncovered). Both came out so good! Everyone that tried them, loved them!-
Love the versatility, happy to hear everyone loved it!
-
-
This really is the best sourdough loaf recipe. My bread was so soft and delicious. I let it ferment overnight. I have made it twice. The first time I used a bubbly starter. The second time I was in a hurry and just used my starter straight from the fridge unfed and no bubbles. It still turned out amazing. My husband loved it. This definitely is a repeater.-
So glad you loved this recipe, it truly is amazing!
-
-
Would I be able to add cinnamon and sugar after I roll it out?
-
You can definitely add cinnamon and sugar after rolling it out, but sugar does tend to turn to liquid syrup and can create a soggy mess. I’ve done better with cinnamon and raisins for sweetness.
-
-
Made it yesterday and today (2 day recipe.) I think the cold ferment gives it a really nice sourdough flavor. After I divided the dough and rolled one of them, I noticed it’s quite large. So divided the other half again. Ended up with 1 large loaf and 2 somewhat smaller ones. All super delicious! Smaller ones were a bit faster cooking but used a thermometer and took them out at exactly 40 mins at 198 degrees. Larger loaf took about 50 minutes. My 13 year old said “wow, that sourdough lady knows what she’s doing!” I couldn’t agree more! Thank you! (I wish there was a way to post pictures here because all turned out perfectly.)-
Thank you! This sandwich bread is loved by kids and teens, so happy your family is enjoying this recipe.
-
-
This was my first time making sandwich bread. Wow! I picked the right recipe to follow! I had several moments of anxiety throughout the process, but it turned out perfectly. Nice rise, soft crust, beautiful crumb. I will be making this on a regular basis! Thank you for sharing this wonderful recipe! -
Can this be made using whole wheat flour? If so, what ratio of white flour to whole wheat flour would you recommend? I do understand the rise times may be longer. Thank you!
-
You can sub 20% of the regular flour with whole wheat flour. If you use more than 20%, you’d have to adjust the water as well.
-
-
I am a beginner at sour dough. This recipe was easy to make, and I agree with others—this recipe is excellent! It has a great sourdough flavor, which we love, and I can’t wait to make it again. Thank you so much for sharing this recipe!
-
Forgot to give it 5 stars. This recipe is worth every one of them!
Leave a Reply
You must be logged in to post a comment.