The Ultimate Soft Honey Whole Wheat Sourdough Sandwich Bread
There’s a particular kind of quiet that settles over my kitchen the night I build the levain and the soaker for this ultimate soft honey oat whole wheat sourdough sandwich bread. It’s usually the last thing I do before bed — I mix them up, cover them, and leave them on the counter overnight to bloom. By the time I come down the next morning, the starter has tripled in size, puffy and fragrant, while the oats have swelled into a soft, thick porridge.
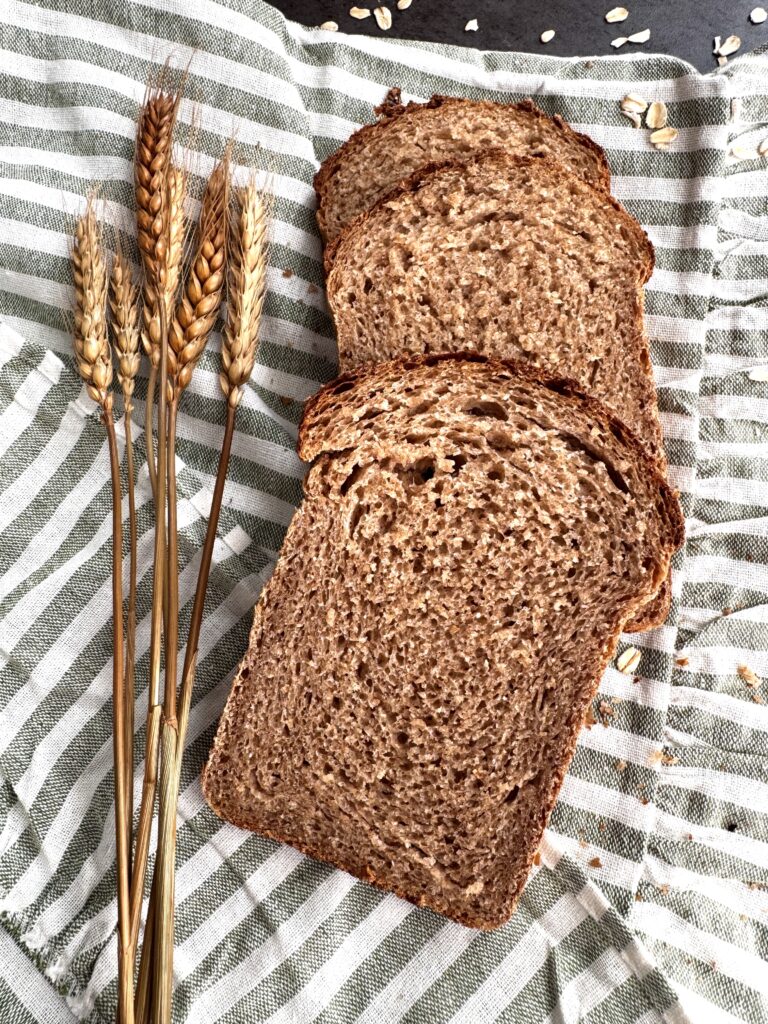
This is my daughter’s favorite sandwich bread. It’s a whole grain loaf with just a hint of sweetness — moist and tender the way a whole grain bread should be, but so rarely is. She loves it toasted, piled high with sliced avocado and scrambled eggs. As for me, I love it under a scoop of chicken salad with grapes, craisins, and cashews.
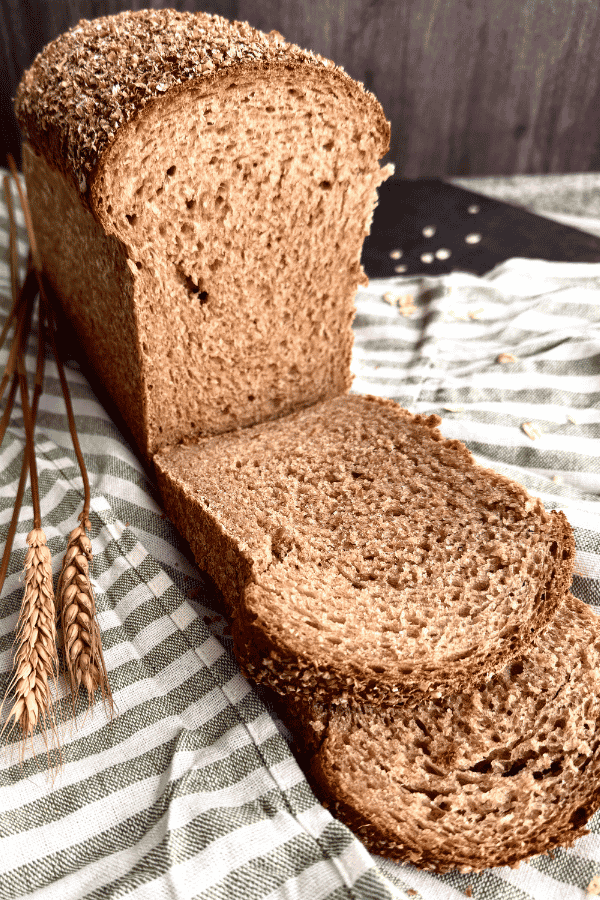
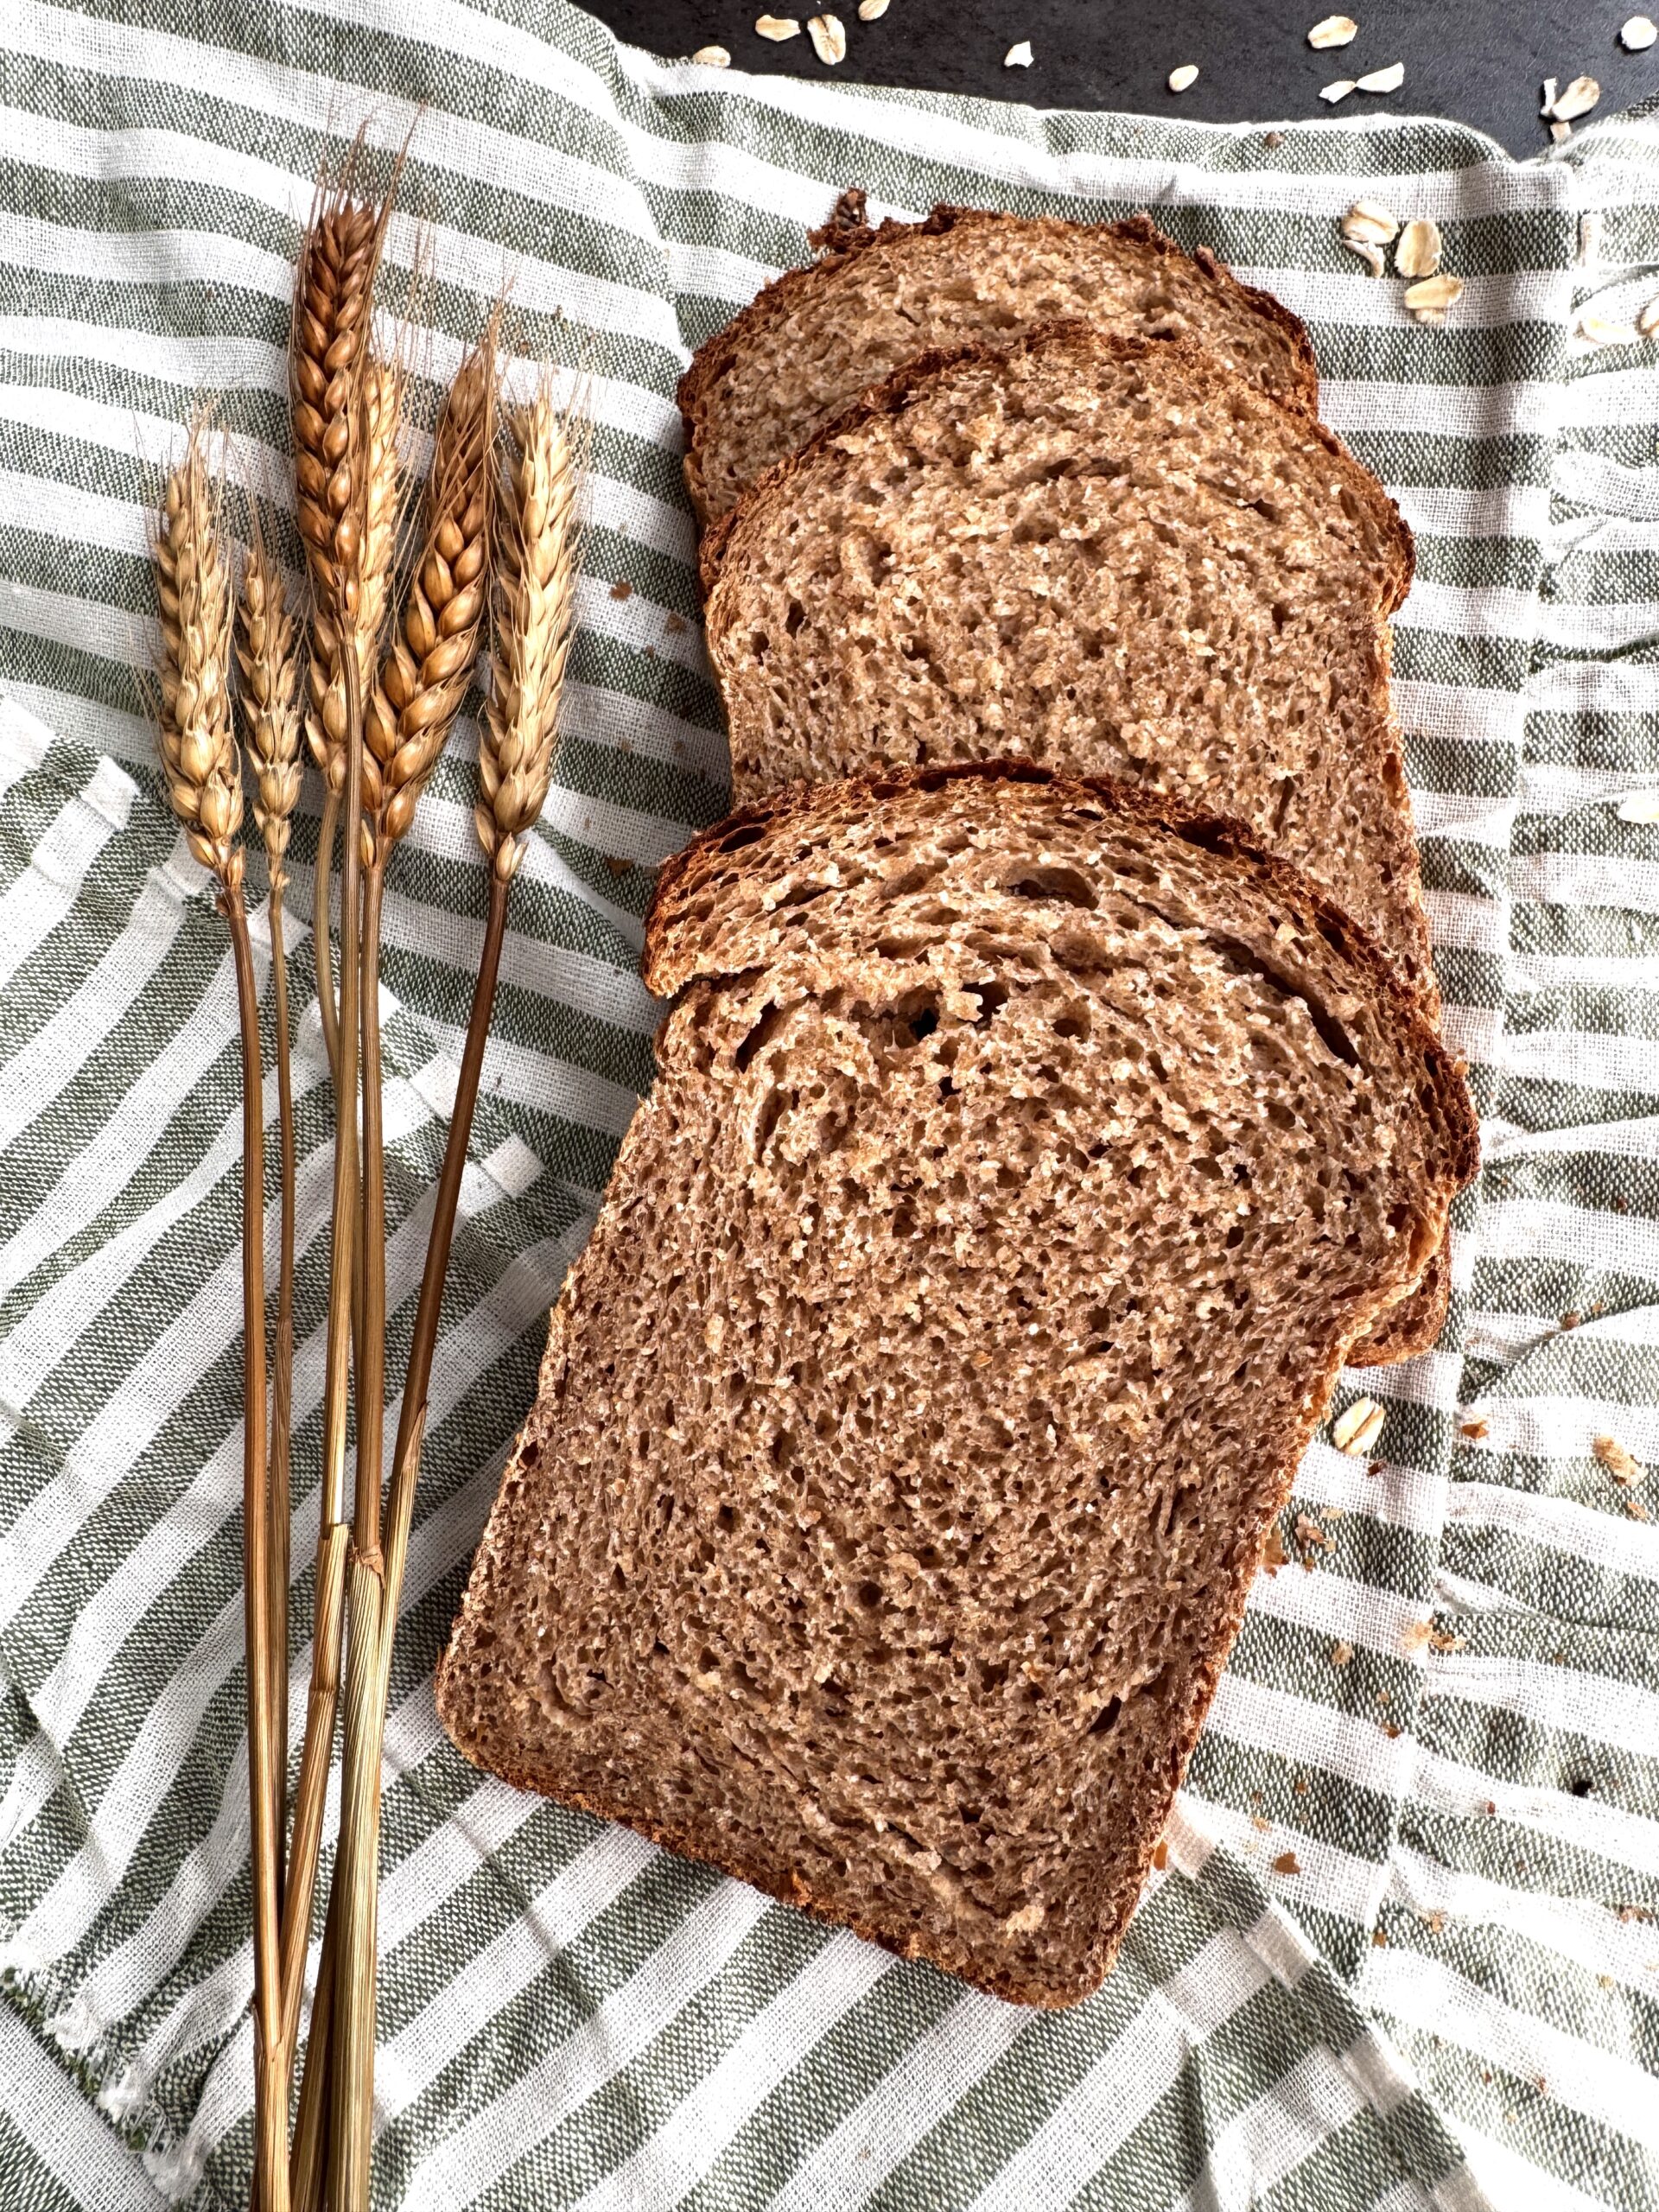
I developed this recipe because I wanted a sandwich loaf that didn’t ask me to choose between “wholesome” and “actually good.” So many 100% whole wheat sourdough loaves turn out dense, dry, or a little too virtuous-tasting. This one doesn’t. Between the honey, the neutral oil, and — the real secret — an oat porridge soaker stirred into the dough, this bread comes out unbelievably soft, moist, and tender, with just enough nutty whole grain flavor and gentle sourdough tang to keep things interesting. It slices beautifully, it toasts like a dream, and it holds up to a sandwich without falling apart.
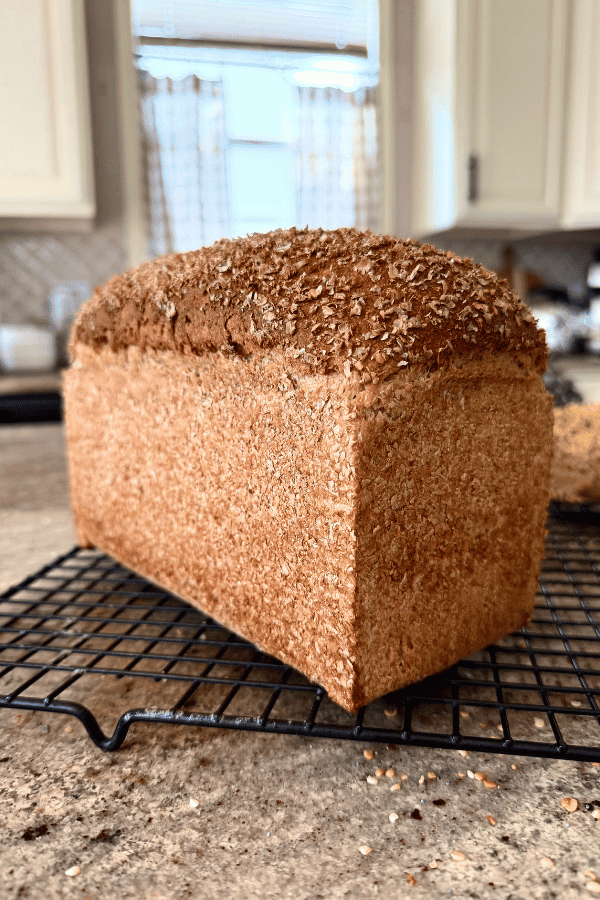
What Is Honey Oat Whole Wheat Sourdough Sandwich Bread
This is a 100% whole wheat sourdough sandwich loaf, naturally leavened with a sweet stiff starter, sweetened gently with honey, and enriched with a small amount of neutral oil and a cooked oat porridge that gets folded right into the dough. Unlike a rustic, open-crumb sourdough loaf baked free-form on a stone, this bread is baked in a loaf pan, which gives it that classic, uniform sandwich-bread shape with a soft crust instead of a crackly one.
What Is a Sweet Stiff Starter, and Why Use One?
Most sourdough recipes have you feed your starter with equal parts flour and water — what bakers call a 100%-hydration feed. This recipe does something a little different: it uses a sweet stiff starter (or levain), and it’s worth understanding what that means, because it’s a deliberate choice, not just a different ratio.
A “stiff” levain is simply a starter feed with less water relative to flour — here, 20g starter, 25g water, and 60g bread flour makes a firm, dense little dough rather than a loose, pourable batter. A stiffer levain ferments a bit more slowly and mildly than a loose one, which means it builds strength and rising power without the sharp, vinegary sourness that a very active, loose starter can sometimes bring to an enriched dough. For a soft, honey-sweetened sandwich loaf like this one, that gentler flavor is exactly what you want.
The “sweet” part comes from stirring a small amount of honey or sugar right into the levain feed itself alongside the bread flour. Bread flour’s higher protein content gives the levain more structural strength to work with, and that touch of honey gives the yeast and bacteria in your starter some easy, available food to fuel an active, vigorous overnight rise — priming your levain to be strong and ready by morning, which matters when it’s about to be asked to lift a heavy, enriched, 100% whole wheat dough.
What Is a Soaker, and Why Does It Matter?
The other technique that makes this loaf special is the oat soaker, and it’s worth understanding exactly what a soaker is and what it’s doing in your dough, because it’s not just a swap-in-the-oats step — it’s a real bread-baking technique with a purpose.
A soaker, in baking terms, is any grain, seed, or cereal that’s been pre-hydrated — soaked or cooked in liquid — before it’s added to the dough. You’ll see soakers used with oats, cracked wheat, rye berries, flaxseed, and all kinds of whole and multigrain add-ins. The reason bakers use them comes down to a simple problem: dry grains are thirsty. If you toss dry rolled oats straight into a dough, those oats will keep pulling moisture out of the surrounding crumb as the bread bakes and even after it cools, competing with your flour for water and leaving you with a drier, denser, less tender loaf.
A soaker solves that problem by hydrating the grain before it ever meets your dough, so instead of stealing moisture, it contributes it. In this recipe, pouring boiling water over rolled oats does two things at once: the heat gently gelatinizes the starches in the oats (essentially turning them into a soft porridge), and the oats fully absorb all that water so they arrive in your dough already saturated. The result is a soaker that adds extra moisture, a subtle sweetness, and a soft, almost cake-like tenderness to the finished crumb — rather than dry, chewy flecks of oat scattered through your bread. It’s the same underlying principle behind a tangzhong or yudane just built around whole oats instead of a slurry of flour and water.
This is also part of why a soaker-enriched loaf like this one stays soft on the counter for longer than a plain sourdough sandwich bread — that extra bound moisture doesn’t evaporate or stale out as quickly as the moisture in a lean dough does.
Combine that soaker and sweet stiff levain with 100% whole wheat flour (which needs and deserves more hydration than most recipes give it), a touch of honey for sweetness and shelf life, and a slow overnight cold fermentation, and you get a loaf that’s soft enough for a five-year-old’s sandwich and flavorful enough that you’ll want a slice plain, still warm, with butter melting into it.
Why You’ll Love This Recipe
- Genuinely soft, 100% whole wheat. No blending in white bread flour into the final dough to fake the texture — this loaf gets its softness honestly, from the oat soaker and a well-hydrated dough.
- Naturally sweetened, not sugary. The honey rounds out the tang of the sourdough without turning this into dessert bread.
- A schedule that works with your life, not against it. Build your levain the night before, mix the dough the next morning, and let the fridge do the following overnight babysitting. You’re never up in the middle of the night tending dough.
- Genuine gut-friendly nutrition. Whole wheat flour and oats bring fiber, B vitamins, and minerals to the table, and the long, slow fermentation gives the sourdough culture time to work on the starches and gluten in ways a fast-rise loaf simply can’t.
- A crumb sturdy enough for sandwiches, soft enough for toast. This loaf holds a swipe of peanut butter and jam just as well as it holds up to a thick layer of butter and honey straight out of the toaster.
- Majority of the work is done in the mixer. You can mix by hand, but if you have a stand mixer, this loaf is a breeze to put together.
The Health Benefits of This Loaf, Explained
I don’t like throwing around vague words like “healthy” without backing them up, so let’s actually talk about what’s going on nutritionally in this bread — because between the oats, the 100% whole wheat flour, and the long fermentation, there’s a lot working in your favor here.
Oats bring a specific kind of fiber called beta-glucan, a soluble fiber that’s been well studied for its role in supporting healthy cholesterol levels and steadying blood sugar response. They’re also a solid source of manganese, phosphorus, magnesium, and B vitamins, plus a modest amount of plant-based protein. In this recipe, the oats aren’t just a topping for looks — a full 65g of them are cooked into the soaker and folded into every bite of the dough, so you’re getting that fiber and nutrition baked all the way through the loaf, not just sprinkled on top.
100% whole grain wheat flour keeps the entire wheat kernel intact — the bran, the germ, and the endosperm — instead of stripping away the bran and germ the way refined white flour does. That matters nutritionally: the bran is where most of the fiber lives, and the germ is where you’ll find B vitamins, vitamin E, healthy fats, and minerals like iron, zinc, and selenium. Refined flour loses the majority of that nutrition in the milling process. Baking with 100% whole wheat in the final dough, with no white flour blended in to soften things, means every slice of this bread is carrying that full nutritional package — which is also exactly why the oat soaker and extra hydration matter so much here, since whole wheat needs that support to bake up soft instead of dense.
Long, slow fermentation is the piece that ties it all together, and it’s the part I get the most excited about teaching. When dough ferments slowly over many hours — from the overnight levain build, through bulk rise and an overnight cold fermentation — the wild yeast and bacteria in your starter have real time to work. That extended fermentation partially breaks down the gluten structure and starts pre-digesting some of the starches and phytic acid naturally present in whole wheat flour, which is part of why traditionally fermented sourdough tends to sit easier in the stomach than bread made with a quick commercial yeast rise. Phytic acid, in particular, is known to bind to certain minerals like iron, zinc, and magnesium and make them harder for your body to absorb — a slow fermentation reduces phytic acid levels significantly compared to a fast-rise bread, which means more of the good minerals already present in that whole wheat flour and those oats are actually available for your body to use. On top of the digestive and nutritional benefits, that long ferment is also where all of this bread’s flavor complexity comes from — you genuinely can’t rush your way to the same result.
Sourdough Tools you’ll want
Ingredient Breakdown
I’m breaking this recipe into its three stages — the night before, the next morning, and the following morning — because that’s exactly how you’ll build it over the course of about two days. Every ingredient here is doing a specific job, so let’s talk through what and why.
Night Before: Sweet Stiff Levain & Oat Soaker
Sourdough starter (for levain) — 20g (about 1 tablespoon + 1 teaspoon)
This is your refrigerated starter. If you bake with Phoebe, my 170-year-old starter, you already know she’s a strong, reliable little culture — a small amount goes a long way in a levain build like this one.
Water (for levain) — 25g (about 1 tablespoon + 2 teaspoons)
Room temperature, unchlorinated if possible. Because this is a stiff levain, you’ll notice this is a lower ratio of water to flour than a typical starter feed.
Honey (for levain) — 10g (about 1½ teaspoons), or sugar
This is what makes the levain “sweet” — a small amount of readily available food for the yeast and bacteria in your starter, helping it build strength overnight. Granulated sugar works as a substitute if that’s what you have on hand.
Bread flour (for levain) — 60g (about ½ cup)
Bread flour’s higher protein content gives this levain more structural muscle than whole wheat flour would, which is exactly what you want from a levain that’s about to be asked to lift a heavy, enriched dough.
Rolled oats (for soaker) — 65g (about ¾ cup)
Rolled oats, not instant, old fashioned rolled Oats. Instant oats turn gummy and don’t give you the same texture; old fashioned will work in a pinch, but rolled oats give the best chew and structure.
Boiling water (for soaker) — 320g (about 1⅓ cups)
This fully hydrates and essentially “cooks” the oats into a soft porridge before they ever go into your dough — this is the step that makes this loaf so soft, so don’t skip it or substitute with any water that isn’t at rolling boil.
Next Morning: The Dough
Whole wheat flour — 400g (about 3 cups)
The backbone of the loaf. I recommend a good quality, finely milled whole wheat flour like Sunrise Organic Heritage Whole Wheat flour here — a coarser stone-ground flour will absorb liquid differently and may need slightly more hydration. If your flour is on the coarser side, you may find your dough wants an extra splash of water; whole wheat flour’s absorbency varies more than white flour’s, so trust what you see and feel in the bowl over what’s written on the page.
Water — 65g (about ¼ cup + 1 tablespoon)
This is on top of the water already locked up in your oat soaker and levain — together, all three sources give this dough its full hydration.
Avocado oil — 35g (about 2½ tablespoons)
Any neutral, mild-flavored oil works beautifully here — avocado, canola, sunflower, or a light olive oil. The oil tenderizes the crumb and helps this loaf stay soft for days rather than staling quickly, which is especially important in a 100% whole wheat loaf.
Honey — 50g (about 2 tablespoons + 1 teaspoon)
Honey brings sweetness, yes, but it’s also doing quiet structural work — it’s hygroscopic, meaning it draws in and holds moisture, which is part of why this bread stays soft on the counter for so long. If you’d rather use maple syrup, you can swap it in at the same weight, though the flavor will be a touch less floral.
Oat soaker — all of it, from the night before, cooled to at least room temperature before it meets the levain and salt.
Sweet stiff levain — all of it from the night before, risen, domed, and smelling pleasantly sweet-tangy rather than sharp.
Salt — 10g (about 1¾ teaspoons fine sea salt)
Salt does more than season — it tightens gluten structure and slows fermentation just enough to keep things from running away from you overnight. If you bake with Diamond Crystal kosher salt, you’ll want closer to 2½ teaspoons by volume, since it’s a coarser, lighter crystal; when in doubt, weigh it.
Step-by-Step Directions with Tips
Step 1: Build Your Sweet Stiff Levain (Night Before)
In a small jar or container, combine 20g starter, 25g water, 10g honey (or sugar), mix that well then and 60g bread flour. Mix for a bit then dump out on a counter and knead until no dry flour remains and you have a smooth piece of dough — place back in the jar, cover loosely and leave it at room temperature overnight.
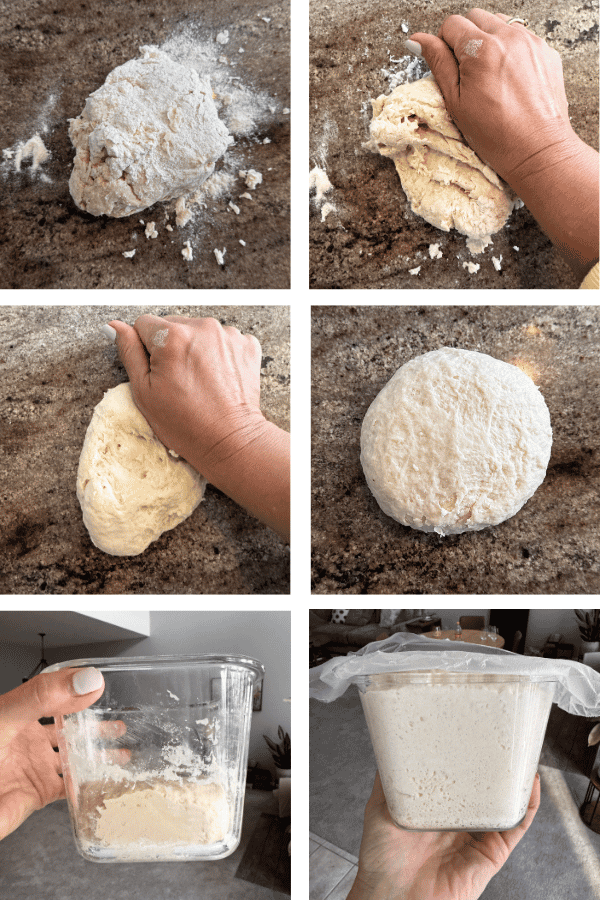
💡 Pro Tip: A stiff levain like this one is more forgiving of a longer overnight rise than a loose, 100%-hydration starter feed would be, since it ferments more slowly and mildly. That’s part of why this build works so well as an overnight step rather than a same-day one — though you can skip cold fermentation, but I wouldn’t recommend it.
Step 2: Make the Oat Soaker (Night Before)
In a glass measuring, 2qt bowl, pour 320g boiling water over 65g rolled oats. Stir to combine, cover, and set aside at room temperature overnight.
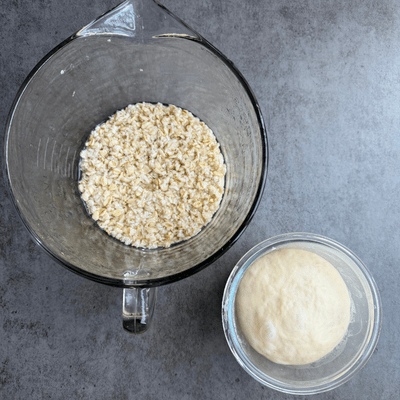
Step 3: Autolyse (Next Morning)
To the bowl with the oat soaker, add 65g water and 400g whole wheat flour. Mix/knead by hand until everything is just combined and no dry flour is visible — you’re not developing gluten yet, just bringing things together and letting the flour begin to hydrate. This resting step is called an autolyse, and it’s what allows your whole wheat flour to fully absorb its liquid and begin relaxing on its own before you start building gluten.
Cover the bowl and let it rest for 1 hour at room temperature.
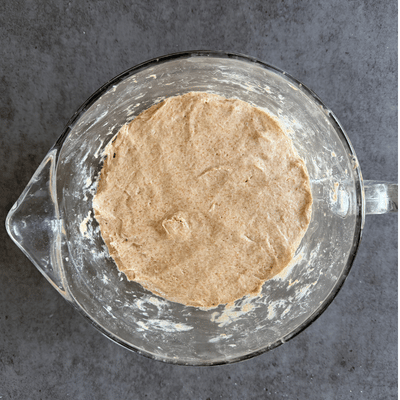
Step 4: Mix the Dough, Levain, Honey, and Salt
Uncover the dough, scrape it out and place into your stand mixer bowl. Add your sweet stiff levain, 50g honey, and 10g salt, attach the paddle attachment, then start the mixer on low and mix for 3–5 minutes, until everything is well combined and the levain is fully worked into the dough.
💡 Pro Tip: Because the levain is stiff rather than loose, it can take a minute or two longer to fully disperse through the dough than a wetter starter would — don’t rush this step, and scrape down the bowl if you notice small unincorporated bits clinging to the sides.
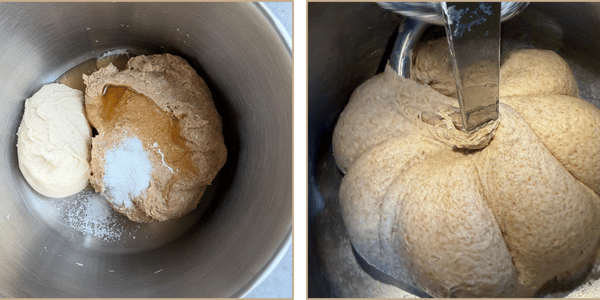
Step 5: Add the Oil
With the mixer still on the paddle attachment, add the 35g avocado oil and mix on speed 3 for 3 minutes, until the oil is fully incorporated and the dough looks glossy and cohesive rather than greasy or separated.
Step 6: Develop the Gluten
Switch to the dough hook, scrape down the sides and bottom of the bowl, and mix on speed 4 or 5 for 5 minutes. This is where your dough transforms — you’re looking for a smooth, elastic dough that pulls cleanly away from the sides of the bowl and feels tacky but not sticky when you touch it. Because this is 100% whole wheat, don’t expect the same glossy, windowpane-strong gluten you’d see in an all-purpose flour dough — whole wheat’s bran naturally cuts and interrupts gluten strands, so a slightly shaggier, denser feel here is completely normal.
Step 7: First Rest and Coil Folds
Transfer the dough to a lightly oiled glass bowl (you can use the same 2qt measuring bowl you used to mix your oat soaker). Cover and let it rest for 30 minutes.
Perform a coil fold: with wet or oiled hands, lift the center of the dough up and let the ends fold gently underneath themselves, rotate the bowl a quarter turn, and repeat around all sides. This strengthens the dough’s structure without deflating it the way a hard punch-down would.
Cover and rest another 30 minutes, then repeat the coil fold once more.
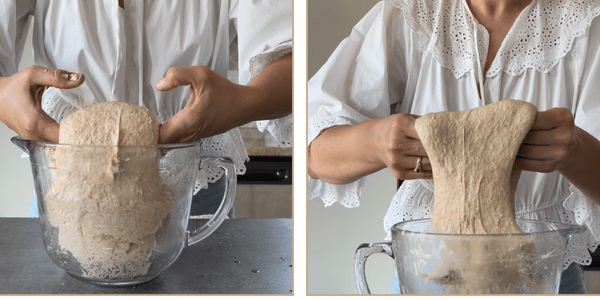
Step 8: Bulk Fermentation and Overnight Cold Rest
Cover the bowl and let the dough bulk ferment at room temperature — this is where using that glass bowl really pays off, since you can watch the dough rise itself rather than the clock.
💡 Pro Tip: This is one of the biggest lessons I teach in my classes — bulk fermentation should be judged by how much your dough has actually risen, not by how many hours have passed. For this recipe specifically, let your kitchen temperature guide your target: if it’s warmer than 75°F, aim for about a 30% rise before moving the dough to the fridge, since fermentation is already moving quickly and the dough will continue developing overnight. If your kitchen is cooler than that, let it rise closer to 50% before retarding it, since a cooler dough needs a bit more of a head start. Watching the dough’s volume — and factoring in your kitchen’s temperature — is far more reliable than following a fixed number of hours.
Once your dough has reached its target rise, cover it well and transfer the bowl directly to the refrigerator overnight. This cold rest slows fermentation to a crawl, develops deeper flavor, and — very practically — means you can go to bed instead of waiting up for your dough.
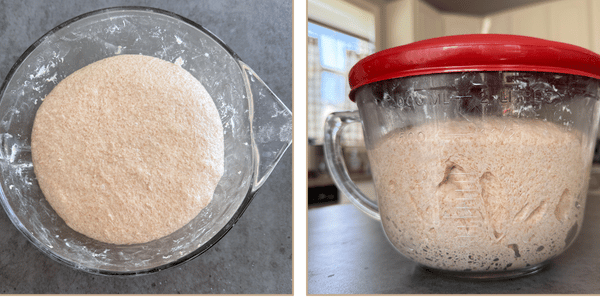
Step 9: Shape the Loaf (Following Morning)
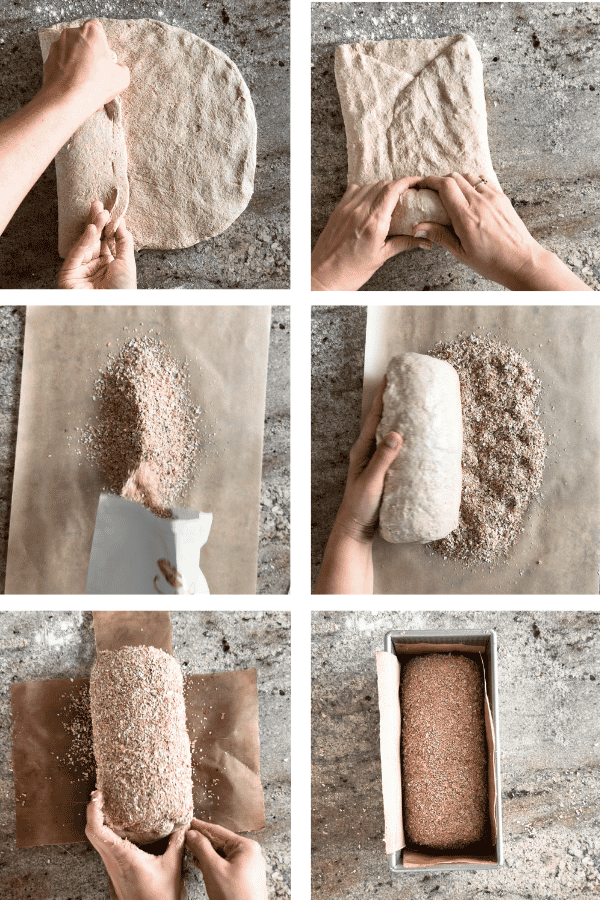
Turn the cold dough out onto a lightly floured surface. Shape it into a tight log or batard shape to fit your loaf pan — press it into a rectangle roughly the width of your pan, then roll it up firmly from the short end, sealing the seam as you go.
Lightly mist the shaped loaf with water, then roll it in rolled oats (or oat bran) to coat the top and sides. I used a piece of parchment paper, sprinkled on some oat bran and once I rolled the loaf in it, easily transferred the remaining bran back in it’s packaging. This is what gives the finished loaf that rustic, bakery-style crust.
Place the loaf, seam-side down, into a well-greased and lined 9x4x4-inch loaf pan.
Step 10: Final Proof
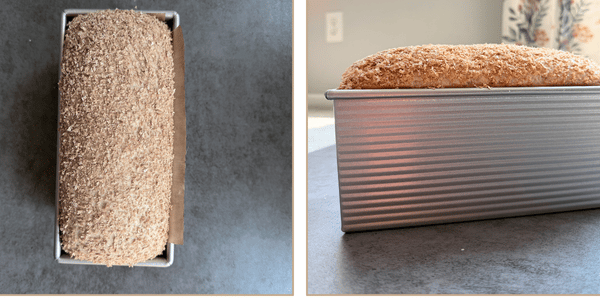
Cover the pan loosely and let the dough proof at room temperature until it has roughly doubled in size — you’re looking for the dough to just crown half an inch or so above the rim of the pan.
⚠️ Watch Out: Because this dough is coming straight out of a cold, sluggish overnight rest, it can take longer to fully proof than you expect — sometimes 3 to 6 hours depending on your kitchen. Resist the urge to rush this step; an underproofed loaf will be dense and gummy in the center, even after a full bake.
Step 11: Bake
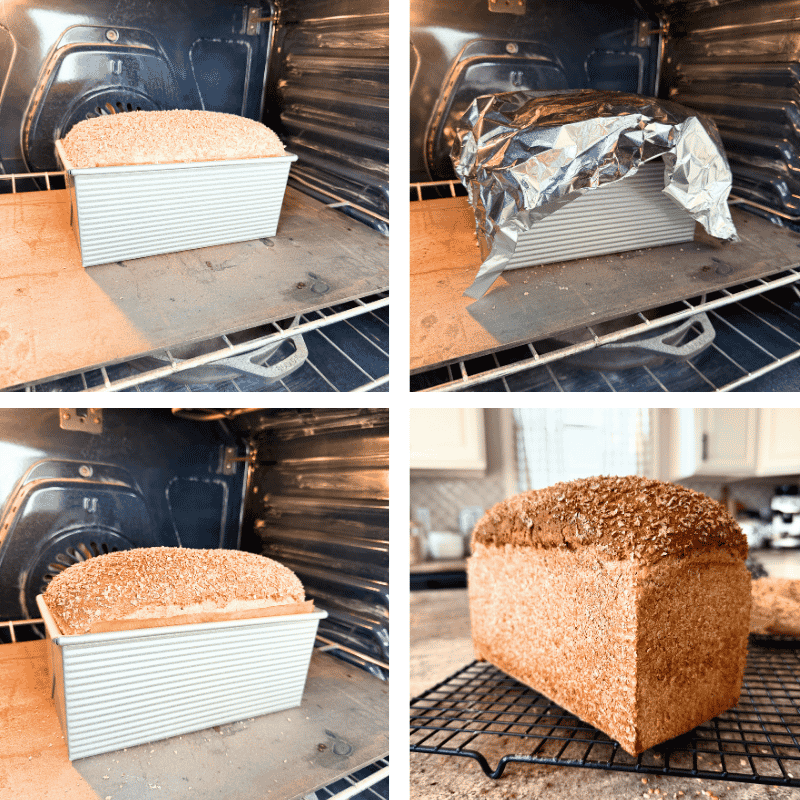
Preheat your oven to 375°F (190°C). Bake the loaf for 35–45 minutes, until it’s deeply golden on top and the oats are toasty, not scorched. If the top starts to darken before the loaf is finished baking, loosely tent it with foil for the remaining bake time. Check for doneness with an instant-read thermometer inserted into the center of the loaf — you’re looking for an internal temperature of at least 200°F.
Let the loaf cool in the pan for about 5 minutes, then turn it out onto a wire rack. As tempting as it is, let it cool the rest of the way on a wire rack — at least an hour — before slicing. The crumb is still setting as it cools, and cutting in too early will give you a gummier slice than this loaf deserves.
How to Store & Freeze
Room temperature: Once fully cooled, store this loaf in a plastic bag, beeswax wrap, or an airtight container at room temperature for up to 3-4 days. The honey in this recipe genuinely helps it stay soft for longer than a plain sourdough loaf would.
Refrigerator: I don’t recommend refrigerating this bread once it’s baked — like most breads, cold storage actually speeds up staling and dries the crumb out faster than leaving it at room temperature. The fridge is wonderful for the dough during fermentation, but not for the finished loaf.
Freezer: This loaf freezes beautifully. Slice it first, then freeze the slices in a single layer on a tray before transferring them to a freezer bag — this way you can pull out exactly as many slices as you need. It will keep well in the freezer for up to 3 months. Thaw slices at room temperature, or pop them straight into the toaster from frozen. To re-crisp a whole thawed loaf, wrap it in foil and warm it in a 300°F oven for about 10–15 minutes.
Troubleshooting
Problem: My loaf turned out dense and gummy in the middle.
Why it happened: This is almost always a sign of underproofing — either the bulk ferment or the final proof (or both) didn’t go far enough before baking.
How to fix it: Lean into the percentage-rise method for your bulk ferment, adjusting your target rise (30% vs. 50%) based on your kitchen’s temperature, and for your final proof, wait until the dough crowns well above the pan and springs back slowly when poked. When in doubt, give it more time rather than less — a slightly overproofed whole wheat loaf is much easier to recover from than an underproofed one.
Problem: My dough felt way too sticky to shape.
Why it happened: Whole wheat flour absorbency varies quite a bit from bag to bag and brand to brand, and a humid kitchen can also add extra moisture to your dough as it rests.
How to fix it: Keep a little extra flour on your work surface for shaping, and work with lightly oiled hands instead of adding a lot of extra flour into the dough itself, which can throw off your hydration and toughen the crumb.
Problem: The oats on top burned before the loaf finished baking.
Why it happened: Ovens vary, and the exposed oat topping is more delicate than a plain crust.
How to fix it: Loosely tent the loaf with foil once the top has reached a deep golden color, and keep baking until the internal temperature reaches 195–200°F.
Problem: My levain didn’t seem active enough by morning.
Why it happened: A stiff levain ferments more slowly than a loose one by nature, and it’s also sensitive to kitchen temperature, flour freshness, and your starter’s overall strength.
How to fix it: A stiff levain that’s simply doubled and domed, with a pleasant sweet-tangy smell, is ready even if it looks less bubbly than a loose starter feed. If it genuinely looks unchanged after a full overnight rest, your kitchen may be too cold — try finding a slightly warmer spot, like the top of the fridge or inside an oven with just the light on, next time.
Problem: My finished loaf is dry or crumbly instead of soft.
Why it happened: This is usually a sign the oat soaker wasn’t fully hydrated before going into the dough, or that the dough was slightly underhydrated overall.
How to fix it: Make sure your soaker sits long enough to fully absorb all 320g of boiling water into a soft porridge, and if your specific bag of whole wheat flour tends to run thirsty, don’t be afraid to add an extra tablespoon or two of water during mixing.
FAQ
Can I make this bread with active dry yeast instead of sourdough starter?
This recipe is built specifically around a sourdough starter’s flavor and fermentation timeline, so I don’t recommend a direct yeast swap without significant changes to hydration and timing. If you’re new to sourdough and want to build a starter of your own, Sourdough Starter from Scratch Guide is a great place to begin.
What’s the difference between a stiff levain and a regular starter feed?
A stiff levain uses less water relative to flour than a typical 100%-hydration starter feed, which makes it ferment more slowly and mildly. That gentler fermentation is especially useful in enriched, sweet doughs like this one, where you want rising power without an overly sour flavor.
Why is my whole wheat sourdough bread so dense?
Dense whole wheat sourdough is almost always the result of underproofing, an underdeveloped levain, or not enough hydration in the dough. Whole wheat flour’s bran naturally interferes with gluten development more than white flour does, so it needs both extra hydration and patience during fermentation to rise properly.
Can I use quick oats instead of rolled oats?
Yes, quick oats will work in the soaker, though they’ll break down a bit more and give you a slightly softer, less textured crumb. I’d still recommend old-fashioned rolled oats for the topping, since they hold their shape and give the crust its signature look.
Do I have to use a stand mixer for this recipe?
A stand mixer makes quick work of developing gluten in a heavily hydrated, enriched whole wheat dough, but you can absolutely mix this by hand using the slap-and-fold or stretch-and-fold method — just expect to spend more time and a bit more elbow grease getting the same gluten development.
Can I skip the overnight cold bulk fermentation and bake the same day?
You can, though the overnight cold rest is where a lot of this bread’s flavor and digestibility come from. If you’re short on time, let the dough finish bulk fermentation at room temperature to your target rise percentage, then move straight to shaping and a same-day final proof.
Ingredients
Method
- In a wide jar or container, combine 20g starter, 25g water, 10g honey (or sugar), and 60g bread flour. Mix until it is too stiff to mix, dump it out on the counter and knead by hand until no dry flour remains — the result will be a firm, dense little dough, place back in the jar, cover loosely and leave it at room temperature overnight.
- In a 2 qt glass measuring bowl, pour 320g boiling water over 65g rolled oats. Stir to combine, cover, and set aside at room temperature overnight.
- To the bowl with the oat soaker, add 65g water and 400g whole wheat flour. Mix/knead by hand just until everything is combined and no dry flour is visible — you're not developing gluten yet, just bringing things together and letting the flour begin to hydrate. This resting step is called an autolyse, and it's what allows your whole wheat flour to fully absorb its liquid and begin relaxing on its own before you start building gluten.
- Cover the bowl and let it rest for 1 hour at room temperature.
- To a bowl of a stand mixer, add the autolyse dough, your sweet stiff levain, 50g honey, and 10g salt, then start the mixer on low and mix for 3–5 minutes, until everything is well combined and the levain is fully worked into the dough.
- 💡 Pro Tip: Because the levain is stiff rather than loose, it can take a minute or two longer to fully disperse through the dough than a wetter starter would — don’t rush this step, and scrape down the bowl if you notice small unincorporated bits clinging to the sides.
- With the mixer still on the paddle attachment, add the 35g avocado oil and mix on speed 3 for 3 minutes, until the oil is fully incorporated and the dough looks glossy and cohesive rather than greasy or separated.
- Switch to the dough hook, scrape down the sides and bottom of the bowl, and mix on speed 4 or 5 for 5 minutes. This is where your dough transforms — you’re looking for a smooth, elastic dough that pulls cleanly away from the sides of the bowl and feels tacky but not sticky when you touch it. Because this is 100% whole wheat, don’t expect the same glossy, windowpane-strong gluten you’d see in an all-purpose flour dough — whole wheat’s bran naturally cuts and interrupts gluten strands, so a slightly shaggier, denser feel here is completely normal.
- Transfer the dough back to a lightly oiled glass measuring bowl, cover and let it rest for 30 minutes.
- Perform a coil fold: with wet or oiled hands, lift the center of the dough up and let the ends fold gently underneath themselves, rotate the bowl a quarter turn, and repeat around all sides. This strengthens the dough’s structure without deflating it the way a hard punch-down would.
- Cover and rest another 30 minutes, then repeat the coil fold once more.
- Cover the bowl and let the dough bulk ferment at room temperature — this is where using that glass bowl really pays off, since you can watch the dough itself rather than the clock. Once you place your dough in the bowl, flatten the top and note where the level measures on the bowl. Calculate 30-50% rise from there based on your temperature and wait until your dough rise hits the desired rise.
- 💡 Pro Tip: This is one of the biggest lessons I teach in my classes — bulk fermentation should be judged by how much your dough has actually risen, not by how many hours have passed. For this recipe specifically, let your kitchen temperature guide your target: if it’s warmer than 75°F, aim for about a 30% rise before moving the dough to the fridge, since fermentation is already moving quickly and the dough will continue developing overnight. If your kitchen is cooler than that, let it rise closer to 50% before retarding it, since a cooler dough needs a bit more of a head start. Watching the dough’s volume — and factoring in your kitchen’s temperature — is far more reliable than following a fixed number of hours.
- Once your dough has reached its target rise, cover it well and transfer the bowl directly to the refrigerator until next morning. This cold rest slows fermentation to a crawl, develops deeper flavor, and — very practically — means you can go to bed instead of waiting up for your dough.You can definitely skip the cold fermentation, shape your dough as soon as it hit the desired rise, place in a loaf pan – allow it to double in size and bake same night.
- Turn the cold dough out onto a lightly floured surface. Shape it into a tight log or batard shape to fit your loaf pan — press it into a rectangle roughly the width of your pan, then roll it up firmly from the short end, sealing the seam as you go.
- Lightly mist the shaped loaf with water or roll it in a bowl of water, then roll it in a shallow dish of rolled oats (or oat bran) to coat the top and sides. This is what gives the finished loaf that rustic, bakery-style crust.
- Place the loaf, seam-side down, into a well-greased and lined 9x4x4-inch loaf pan.
- Cover the pan loosely and let the dough proof at room temperature until it has roughly doubled in size — you're looking for the dough to crown a half inch or so above the rim of the pan.
- ⚠️ Watch Out: Because this dough is coming straight out of a cold, sluggish overnight rest, it can take longer to fully proof than you expect — sometimes 3 to 5 hours depending on your kitchen. Resist the urge to rush this step; an underproofed loaf will be dense and gummy in the center, even after a full bake.
- Preheat your oven to 375°F (190°C). Bake the loaf for 35–45 minutes, until it's deeply golden on top and the oats are toasty, not scorched. If the top starts to darken before the loaf is finished baking, loosely tent it with foil for the remaining bake time. Check for doneness with an instant-read thermometer inserted into the center of the loaf — you're looking for an internal temperature of at least 198°F.
- Let the loaf cool in the pan for about 5 minutes, then turn it out onto a wire rack. As tempting as it is, let it cool the rest of the way — at least an hour — before slicing. The crumb is still setting as it cools, and cutting in too early will give you a gummier slice than this loaf deserves.
