The Fluffiest Pumpkin Sourdough Donuts with Cheesecake Filling
There’s a moment every October when the kitchen smells exactly right. Butter browning, cinnamon and nutmeg in the air, and a pot of oil quietly heating on the back burner while a tray of puffy, pillowy dough rounds waits its turn. That moment is why I make these pumpkin sourdough donuts every single fall, and why my family has learned to hover near the stove the minute they hear the first one hit the oil.
Growing up, donuts were a special-occasion thing. A paper bag from the bakery after church, sugar all over the car seat, a fight over who got the filled one. When I started baking with sourdough, I wanted to bring that same feeling home, but with a dough that had real flavor and a crumb so soft it practically sighs when you tear it open.
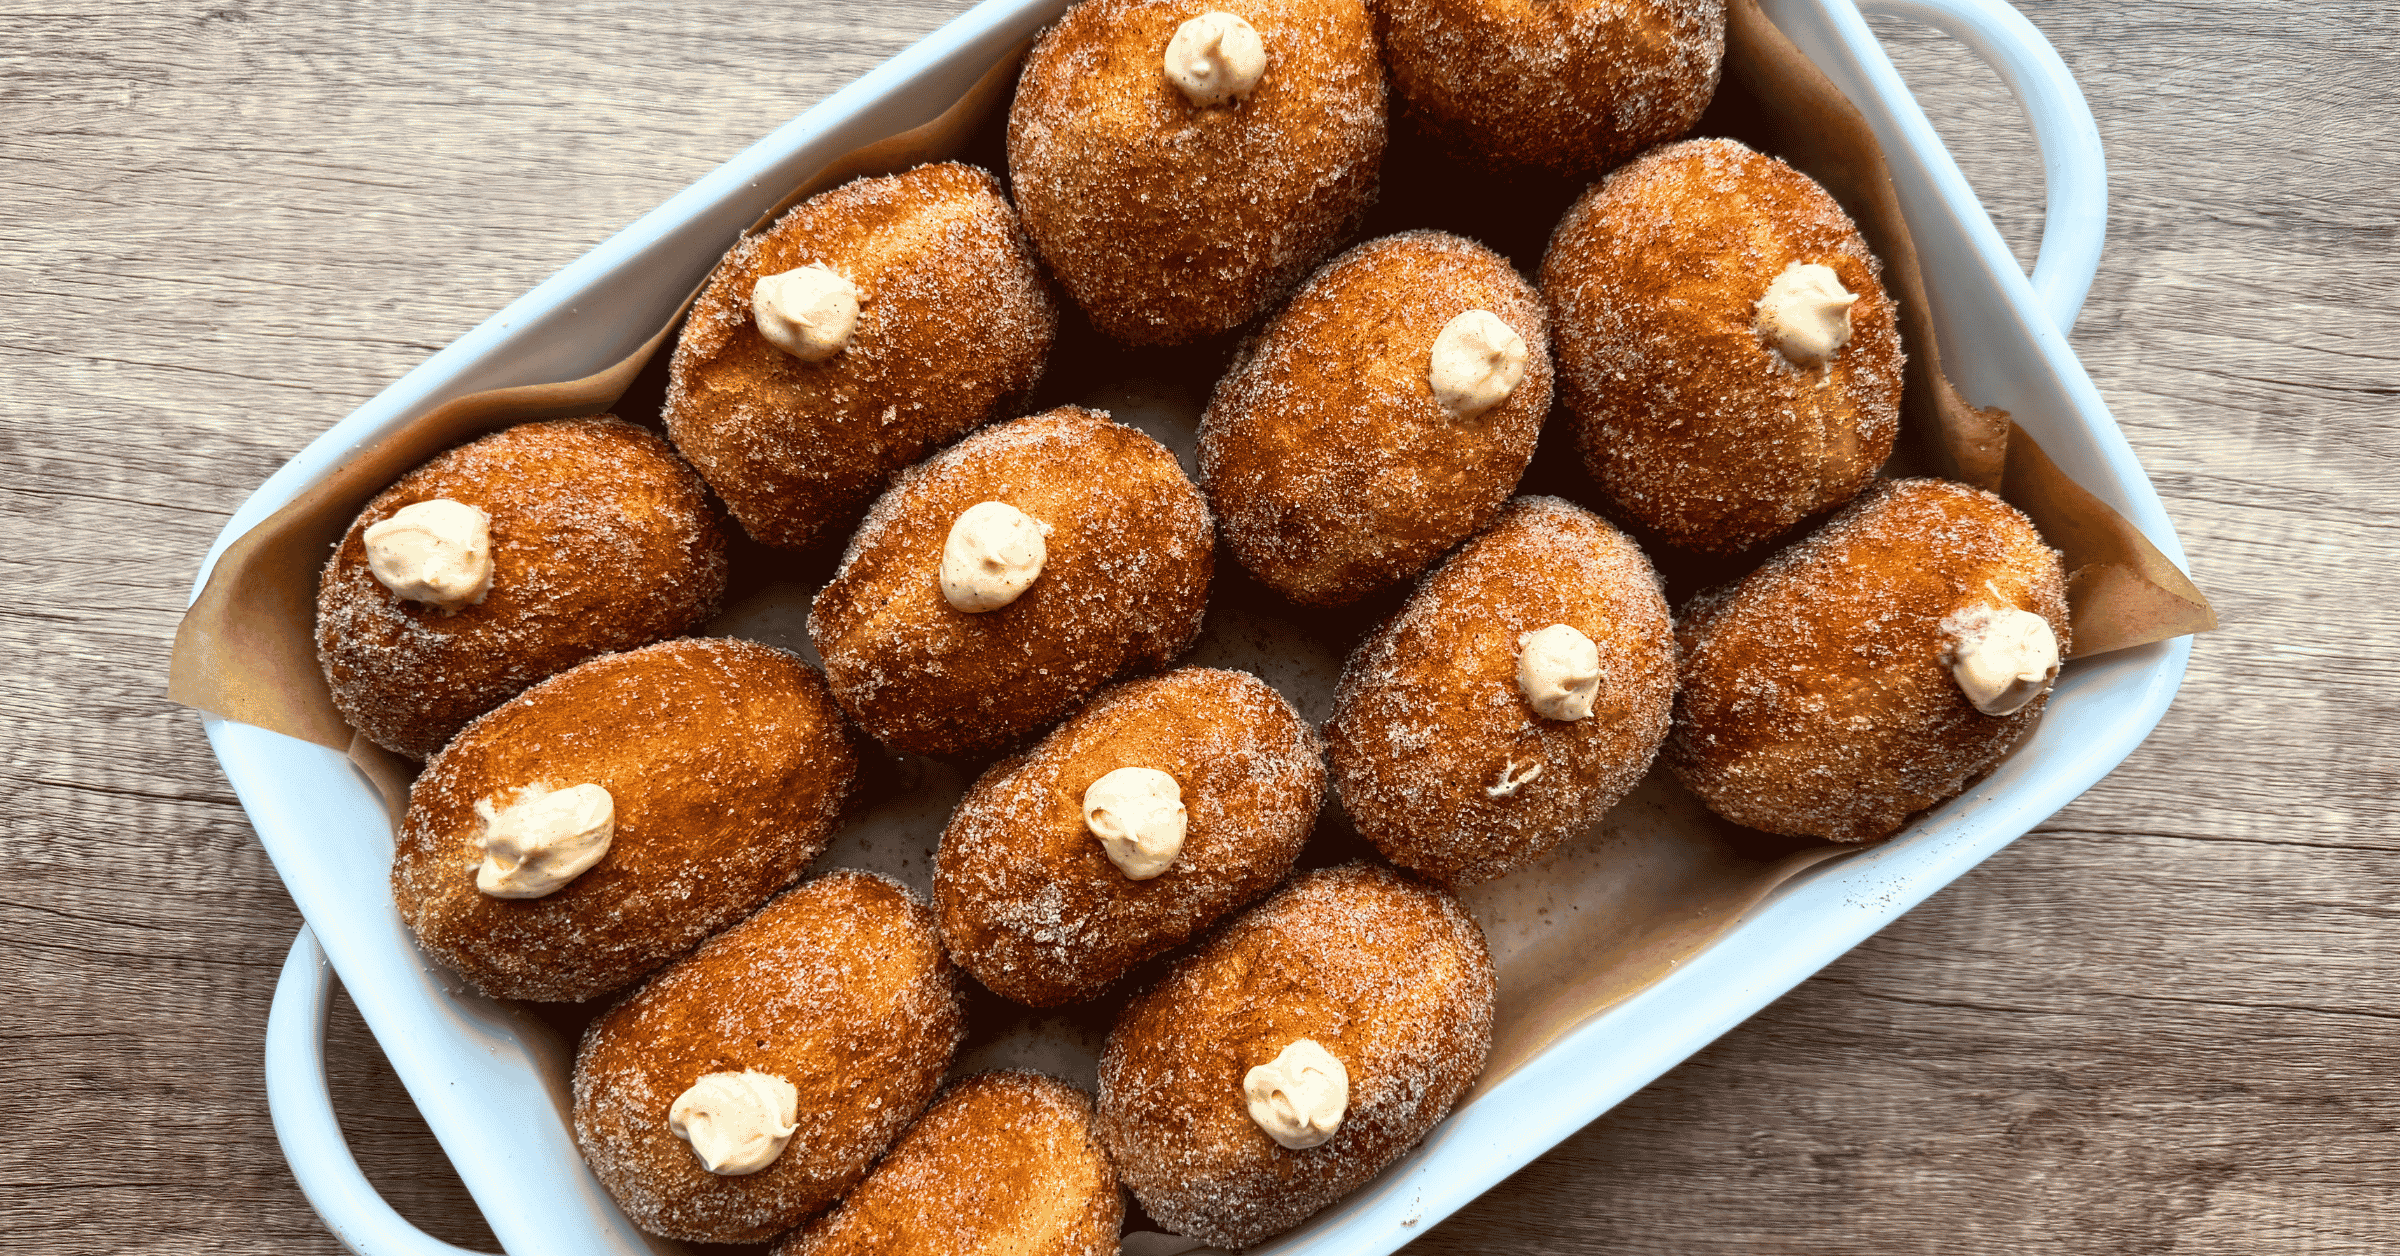
These are that donut. A tender, golden pumpkin dough raised with a sweet stiff starter, tossed warm in pumpkin spice sugar, and piped full of a silky pumpkin cream cheese filling that tastes like the best bite of cheesecake. In my house we call them sourdoughnuts, and they don’t last past lunch.
If you’ve never fried a donut before, I promise this is more approachable than it sounds. I’ll walk you through every stage, from building the starter the night before to knowing exactly when your oil is ready, so you can make these with confidence. Let’s bake (well, fry) together.

What Are Pumpkin Sourdough Donuts?
Pumpkin sourdough donuts are yeast-style donuts, the soft, pull-apart kind you’d find filled at a bakery, made with a naturally leavened dough enriched with real pumpkin purée, milk, egg, and butter. They’re not the cakey, cut-out kind. This dough is closer to a pumpkin brioche: rich, golden orange, and stretchy enough to hold its shape in the fryer while staying feather-light inside.
What sets this version apart is the sweet stiff starter. Instead of adding your regular starter straight to the dough, we build a small, low-hydration levain the night before with a spoonful of sugar mixed in. A stiff, sweetened starter favors yeast activity over the bacteria that create sourness, so you get a big, lively rise and a mild, buttery flavor. Nobody biting into one of these will guess it’s sourdough unless you tell them.
Then comes the fun part. Each fried donut is rolled in pumpkin spice sugar while still warm and filled with a whipped pumpkin cream cheese filling. You get crackly spiced sugar on the outside, a pillowy crumb, and a cool, tangy center that tastes like pumpkin cheesecake.
Why You’ll Love These Pumpkin Spice Sourdough Donuts
- Bakery-level texture at home. A soft, cloud-like crumb with a thin golden shell, thanks to an enriched dough and a properly strong starter.
- All the fall flavors in one bite. Pumpkin in the dough, pumpkin spice in the sugar, pumpkin cheesecake in the center, and the golden color of fall’s most beautiful leaves.
- Mild, not sour. The sweet stiff starter keeps the tang in check, so these taste like a classic filled donut with more depth.
- Your schedule, not the recipe’s. Fry the same day you mix, or let the dough rest in the fridge overnight and fry fresh in the morning.
- Flexible leavening. Make them 100% sourdough, add a pinch of instant yeast for insurance, or use discard when you didn’t plan ahead.
- A real technique builder. You’ll learn to read an enriched dough, judge a proof by touch, and fry with confidence. Those skills carry over to brioche, cinnamon rolls, and beyond.
Ingredients for Pumpkin Sourdough Donuts
⚖️ A note on measurements: I HIGHLY recommend a digital kitchen scale for this recipe and every sourdough recipe. I stand fully behind the gram weights below; they’re exactly what I use in my kitchen. The cup and spoon measurements in parentheses are rough estimates provided for convenience, and I can’t guarantee your results with them. Flour alone can vary by 20g or more per cup depending on how you scoop it.
Sweet Stiff Starter (Night Before)
- 30g sourdough starter (2 Tbsp). Your everyday refrigerated starter, healthy and fed within a week.
- 50g water (3½ Tbsp). Lukewarm water helps the starter dissolve and get moving.
- 15g granulated sugar (1 Tbsp). Just enough sweetness to feed the yeast and soften any sour notes.
- 90g all-purpose or bread flour (¾ cup). This makes a firm, kneadable little dough rather than a loose starter. That stiffness is the point: low hydration slows acid production, which keeps the donuts mild.
Pumpkin Donut Dough
- All of the sweet stiff starter (about 185g).
- 350g all-purpose or bread flour (about 2¾ cups). Bread flour gives a slightly chewier, more structured donut. All-purpose gives a softer, more tender bite. Both work beautifully.
- 150g canned pumpkin purée (⅔ cup, scant). Use 100% pure pumpkin, not pumpkin pie filling, which is already sweetened and spiced. Pumpkin brings color, moisture, and a soft, tender crumb that stays fresh longer.
- 100g whole milk (⅓ cup + 1½ Tbsp). Adds richness and softness. Any dairy or unsweetened plant milk works in a pinch.
- 1 large egg (about 50g). Structure, richness, and that gorgeous golden color.
- 70g granulated sugar (⅓ cup). Sweetens the dough and helps it brown evenly in the oil.
- 43g unsalted butter, softened (3 Tbsp). Added slowly after the dough develops some strength, for that melt-in-your-mouth brioche texture.
- 3g fine salt (½ tsp). Balances the sweetness and strengthens the gluten.
- 8g pure vanilla extract (2 tsp).
- 1g instant yeast (¼ tsp), optional. A small safety net that speeds up the rise and takes away the sour tang. Leave it out for 100% naturally leavened donuts (see the FAQ).
Pumpkin Spice Sugar
- 100g granulated sugar (½ cup).
- 8g pumpkin pie spice (1 Tbsp). Or swap in cinnamon for a classic cinnamon-sugar coating.
Pumpkin Spice Cream Cheese Filling
- 226g full-fat cream cheese, softened (8 oz / 1 block). Use block cream cheese, not the whipped spreadable kind in a tub. Tub cream cheese has added air and water, which leads to a loose, runny filling.
- 60g canned pumpkin purée (¼ cup).
- 80g powdered sugar (⅔ cup). Sweetens without any grittiness.
- 4g pure vanilla extract (1 tsp).
- 1g pumpkin pie spice (½ tsp).
- 60g heavy whipping cream (¼ cup). Whipped in last to lighten the filling into something silky and pipeable.
- Pinch of salt. Makes every other flavor pop.
For Frying
- 1.5–2 L neutral oil (6–8 cups). Canola or peanut oil, enough for 2–3 inches (5–8 cm) of depth in your pot. Both have a high smoke point and a clean flavor.
Tools for Making Sourdough Donuts
Frying is the one place where a couple of specific tools make a real difference.
- Digital kitchen scale. Non-negotiable for consistent results, and the most useful tool for dividing the dough into even donuts.
- Deep-fry or candy thermometer. Oil temperature is everything here. Guessing is how you get donuts that are dark outside and raw inside.
- Heavy-bottomed frying pan. A cast iron pot or enameled Dutch oven holds heat steadily as donuts go in. (Your Dutch oven finally gets a job that isn’t bread!) A countertop deep fryer works too.
- Stand mixer with a dough hook. Highly recommended for this enriched dough, though kneading by hand is absolutely doable with some patience.
- Cookie sheet size plastic covers. Great way to keep your doughnut dough from drying out while proofing on a cookie sheet.
- Piping bag with a long filling tip. For neat, generous filling. A zip-top bag with the corner snipped works in a pinch.
How to Make Pumpkin Sourdough Donuts, Step by Step
Here’s the big-picture timeline: build the sweet stiff starter the night before, mix the dough in the morning, then either fry the same day or let the dough rest in the fridge overnight and fry them next day. Read through once before you start, because the visual cues matter more than any time on the clock.
Step 1: Build the Sweet Stiff Starter (Night Before)
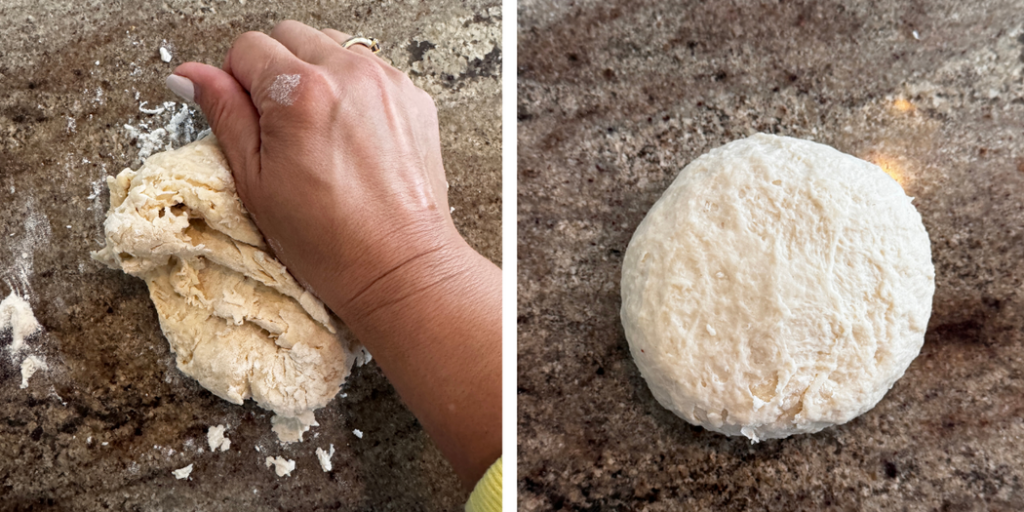
In a small bowl, whisk 30g (2 Tbsp) active starter into 50g (3½ Tbsp) lukewarm water until it’s mostly dissolved. Whisk in 15g (1 Tbsp) sugar, then add 90g (¾ cup) flour. It will be too stiff to stir, so get in there with your hands and knead it into a smooth little ball of dough, about a minute or two.
Transfer it to a tall jar or container with plenty of headroom. This little ball needs room to triple or even quadruple overnight. Cover and leave it somewhere warm, ideally 75–78°F (24–26°C).
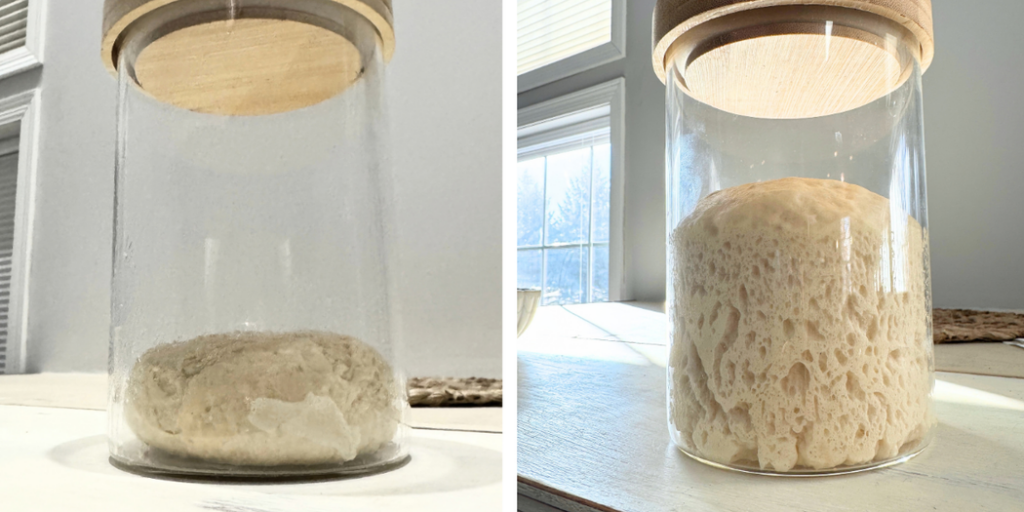
How do you know it’s ready? By morning, it should have at least tripled in size. Look at the top: at peak, the dome surface is just starting to dimple, with little craters forming across the top. Inside, it’ll smell sweet and yeasty, almost like bread dough, with very little sourness. That’s your green light.
⚠️ Watch Out: If your starter has been sitting neglected in the fridge for more than a week, give it a two-feed strengthening first. In the morning, feed it 1:1:1 (starter:water:flour) and let it reach peak. Then build this sweet stiff starter from that refreshed starter in the evening. A sluggish starter is the number one reason enriched doughs refuse to rise.
💡 Pro Tip: Season matters. In warm summer and early-fall kitchens, a stiff starter can race to peak and start sinking before you wake up. Use slightly cooler water or tuck it somewhere a little cooler. In cold months, it may take later into the morning to rise to peak unless you have a temperature controlled proofer box.
Step 2: Mix the Donut Dough
In the bowl of a stand mixer fitted with the dough hook, add all of the sweet stiff starter (about 185g), 100g (⅓ cup + 1½ Tbsp) milk, 150g (⅔ cup, scant) pumpkin purée, 1 egg (about 50g), 70g (⅓ cup) sugar, 8g (2 tsp) vanilla, 1g (¼ tsp) instant yeast if using, and 350g (about 2¾ cups) flour.
Tear the stiff starter into a few pieces as you add it. It’ll disperse into the dough much faster. Mix on low until everything comes together into a shaggy, sticky dough, then bump the speed up one notch and mix for one minute.
Turn off the mixer and let the dough rest for 15 minutes. This short rest gives the flour time to fully hydrate, which makes the next stage of kneading quicker and smoother.
Step 3: Add the Salt and Butter
Add 3g (½ tsp) salt and mix on medium speed (speed 3 on a KitchenAid) for about 3 minutes. The dough will start looking smoother and pulling into a rough ball.
Now add the 43g (3 Tbsp) softened butter one tablespoon at a time, letting each piece fully disappear before adding the next. The dough will look like it’s falling apart when butter goes in. It gets slick, separates, and slaps around the bowl. That’s normal. Keep mixing and it’ll pull itself back together.
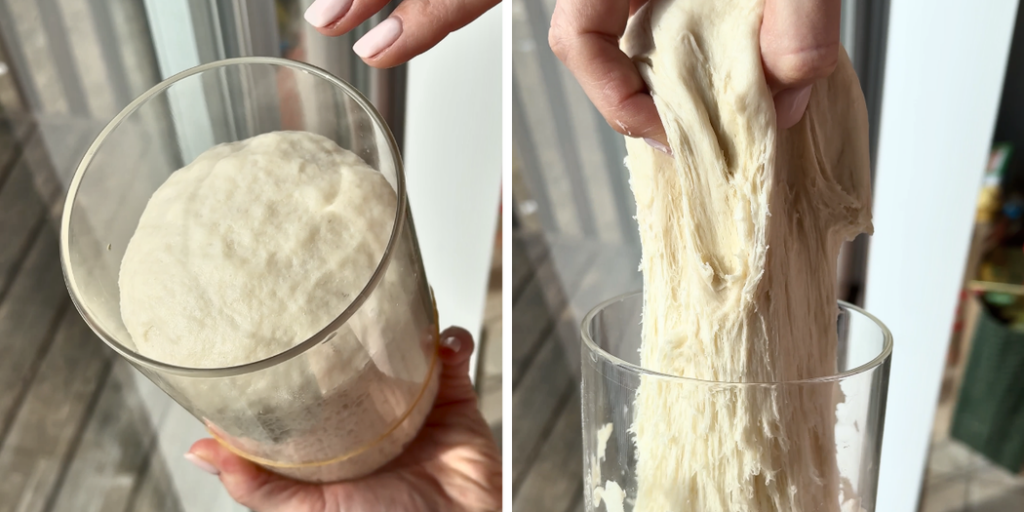
Once all the butter is in, keep mixing until the dough is smooth, glossy, elastic, and clearing the sides of the bowl. Total mixing time is usually 10–15 minutes. Gently stretch a small piece between your fingers. It should stretch thin enough to let light through before it tears.
⚠️ Watch Out: Pumpkin purée varies in moisture from brand to brand. If after 15 minutes the dough is still soupy and won’t clear the bowl at all, add flour 1 Tbsp (about 8g) at a time. Go slowly, though. This dough is meant to be soft and slightly tacky, and too much flour makes dense donuts.
No stand mixer? Knead by hand on the counter instead, working the butter in a little at a time. Expect 15–20 minutes of kneading, and resist the urge to add lots of flour. A bench scraper is your best friend here.
Step 4: Bulk Ferment — Watch the Rise, Not the Clock
Scrape the dough into a straight-sided container or a large glass measuring bowl, smooth the top, and mark the starting level with a piece of tape or a dry-erase marker. Cover and let it rise somewhere warm.
This is where I want you to set the timer aside. The single biggest mistake I see in my classes is following a recipe’s bulk time to the minute. Your kitchen temperature, your starter’s strength, and whether you added that pinch of yeast all change how fast this dough moves. Instead, use the percentage rise method and watch the dough itself: for this enriched pumpkin dough, you’re waiting for it to double in size, a full 100% rise.
Temperature changes how long that takes, not the target. In a warm kitchen, with dough above 75°F (24°C), it may double in just a few hours. In a cooler kitchen, with dough below 70°F (21°C), it can take considerably longer. A probe thermometer in the center of the dough tells you which pace to expect.
Want donuts tomorrow instead? Let the dough rest at room temperature for 2–3 hours to get fermentation going, then cover and refrigerate it overnight. It will finish rising slowly in the fridge, and cold dough is noticeably easier to divide and shape. Just know the shaped donuts will take longer to proof the next day.
Step 5: Divide and Pre-Shape
Turn the dough out onto a well-floured counter. Weigh the whole batch and divide it into equal portions of about 75g each. You’ll get 12 donuts. Your scale is what makes them fry evenly.
Cut 12–14 parchment paper squares, about 3 x 3 inches (8 x 8 cm). Lay them out across two baking sheets and give them a light spray of oil.
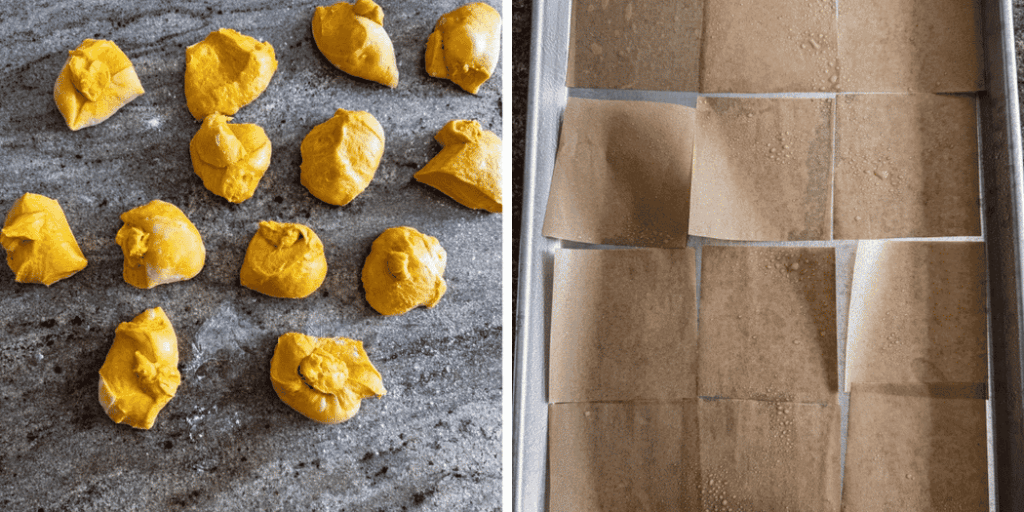
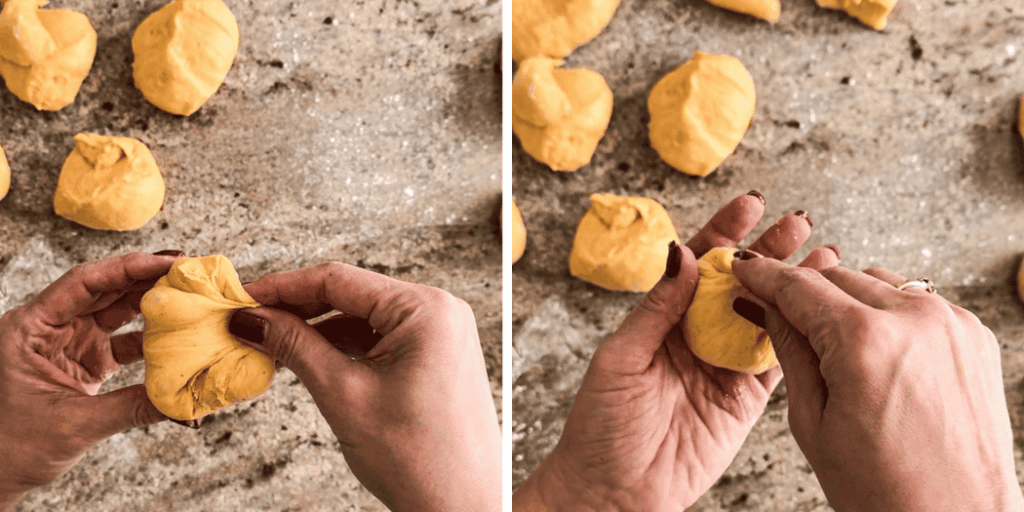
Shape each portion into a tight ball by pinching it together from both sides into the center. Let the balls rest on the counter for 30 minutes so the gluten relaxes.
Step 6: Shape and Final Proof
Roll each ball by cupping your hand over it and moving it in small circles against the counter. You’ll feel the surface tighten up.
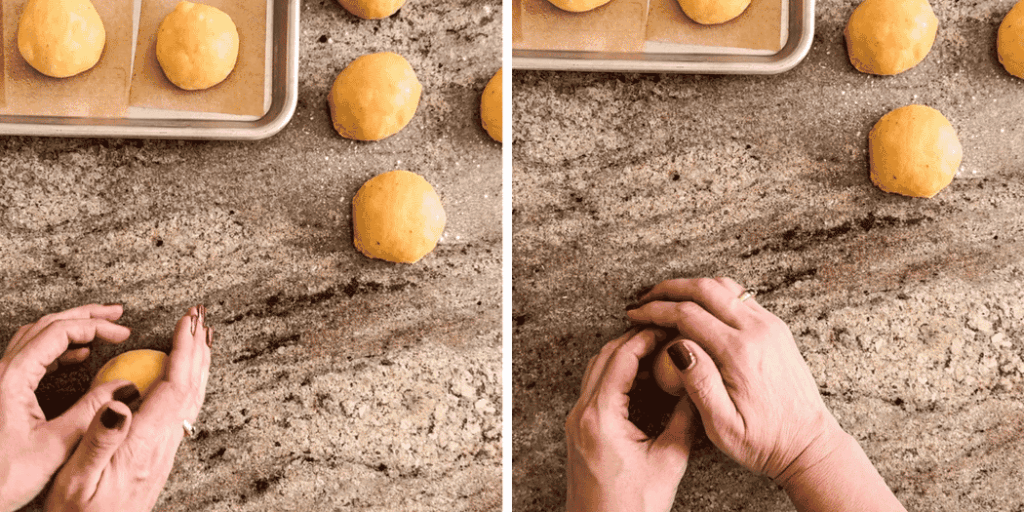
Place each one on its own parchment square, spacing them well apart, and cover loosely with plastic wrap or lid.
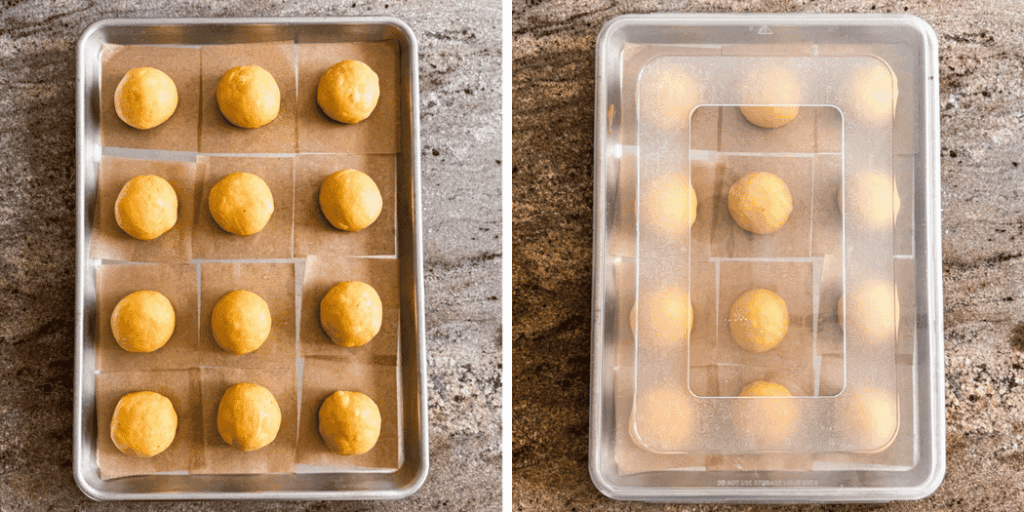
Let the donuts proof until roughly doubled in size, puffy, and visibly airy. If your dough came straight from the fridge, this will take a good while longer while it warms up. Be patient.
How to tell they’re ready: lightly flour a fingertip and press gently into the side of one donut. If the dent springs back slowly and leaves a small indentation, they’re ready to fry. If it springs back right away, give them more time. If the dent stays put and the donut sighs and deflates, they’ve gone a bit too far, so fry them right away.
💡 Pro Tip: The parchment squares are your secret weapon. You’ll lower each donut into the oil on its paper, so you never have to pick up a delicate, fully proofed donut with your fingers and squash all that air out.
Step 7: Make the Pumpkin Cream Cheese Filling and Spice Sugar
While the donuts proof, make the filling. In a medium bowl, beat 226g (8 oz / 1 block) softened cream cheese with a hand mixer until smooth and creamy. Add 60g (¼ cup) pumpkin purée, 4g (1 tsp) vanilla, 1g (½ tsp) pumpkin pie spice, a pinch of salt, and 80g (⅔ cup) powdered sugar. Beat until completely smooth.
Pour in 60g (¼ cup) heavy cream and beat for another 1–2 minutes, until the filling looks fluffy and lightened, like a soft cheesecake mousse. Cover and refrigerate it until you’re ready to fill.
For the spice sugar, whisk 100g (½ cup) sugar with 8g (1 Tbsp) pumpkin pie spice in a wide, shallow bowl until it’s evenly speckled. Set it next to your frying station.
Step 8: Fry the Donuts
When the donuts are nearly proofed, pour 1.5–2 L (6–8 cups) oil into your heavy pot, enough for 2–3 inches of depth, and clip on your thermometer. Heat to 350°F (180°C). Line a baking sheet with a double layer of paper towels and set a cooling rack nearby.
Pick up a donut by its parchment square and gently lower it, paper and all, into the oil. Within a few seconds the paper will release; pluck it out with tongs. Fry 3–4 donuts at a time. Crowding the pot drops the oil temperature fast.
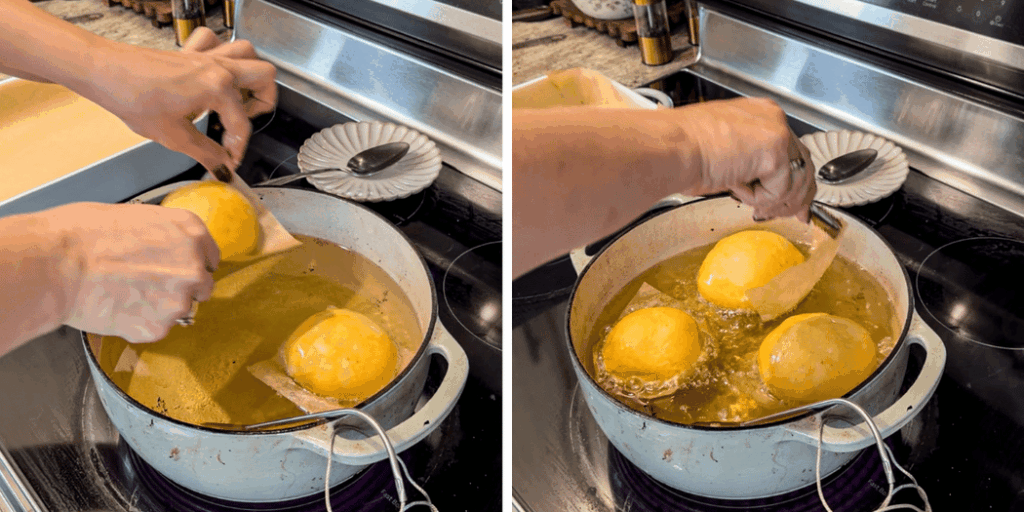
Fry for 2–3 minutes until the underside is a deep golden brown, then carefully flip and fry the other side for another 2–3 minutes. You’ll see that classic pale ring around the middle, the sign of a well-proofed donut. Lift them out with a slotted spoon or spider and drain on the paper towels.
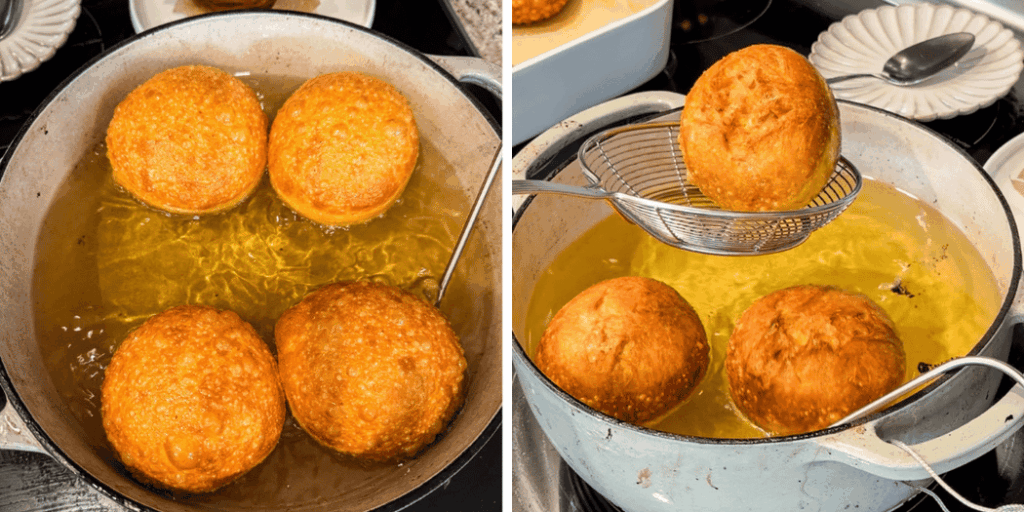
💡 Pro Tip: Treat your first donut as the test donut. Let it cool for a minute, then tear it open. The inside should be fluffy and fully set, with no gummy streak in the center. If it’s doughy, lower your heat slightly and fry a little longer per side.
⚠️ Watch Out: Check the thermometer between every batch and adjust the burner as you go. Oil that’s too hot browns the outside before the center cooks; oil that’s too cool soaks into the dough and makes greasy donuts. Never leave hot oil unattended.
Step 9: Toss in Pumpkin Spice Sugar
While the donuts are still very warm, but cool enough to handle, roll each one in the pumpkin spice sugar to coat it completely. The faint film of oil on a warm donut is what makes the sugar cling. Set them on the cooling rack and let them cool completely, about 30 minutes. Meanwhile, spoon the chilled filling into a piping bag fitted with a long filling tip.
Step 10: Fill and Serve
Poke a hole into the side of each donut with a chopstick or the tip of a butter knife, wiggling it gently to open up a pocket in the center. Insert the piping tip and squeeze until you feel the donut grow heavy in your hand and a little filling peeks back out of the hole.
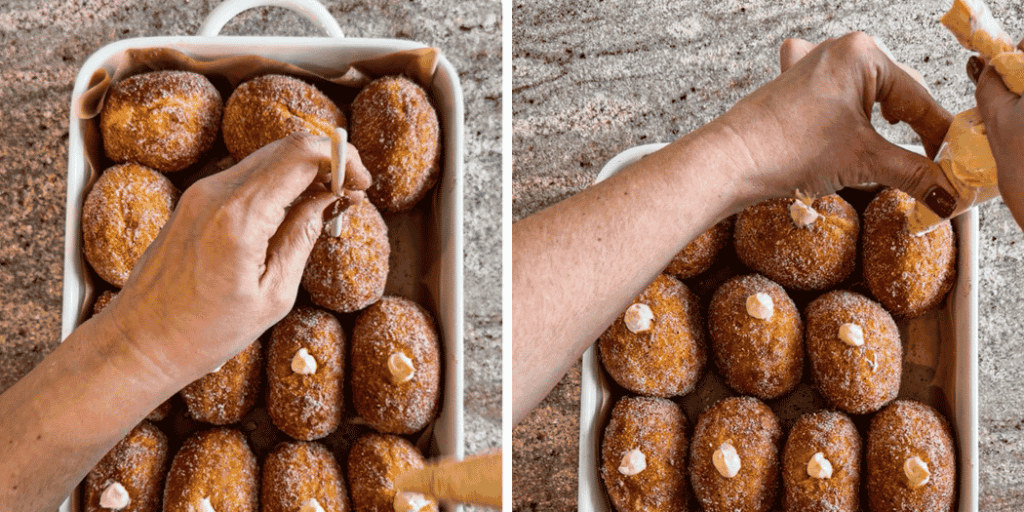
Serve right away. Filled donuts are at their absolute best the day they’re made, when the sugar is crisp and the crumb is still pillowy soft.
How to Store and Freeze Sourdough Donuts
Honestly, the best storage plan for filled donuts is a kitchen full of people. But if you have leftovers, or want to get ahead, here’s how to handle them.
At Room Temperature
Unfilled sugared donuts keep in an airtight container at room temperature for 1–2 days. The pumpkin keeps the crumb moist longer than a plain donut, though the sugar coating will soften a bit by day two. Heat one of these donuts in a microwave for 15 seconds and it is delicious.
Filled donuts shouldn’t sit out more than about 2 hours, because the cream cheese filling needs to stay cold.
In the Refrigerator
Filled donuts can be refrigerated in an airtight container for up to 2 days. The tradeoff: the fridge firms up the crumb and draws moisture into the sugar, so it turns a little damp and sticky and the dough is tougher. Let them sit at room temperature for 15–20 minutes before eating to soften a little. Or if you don’t mind a warm cream cheese filling, heat them up in a microwave for 15 seconds.
The filling on its own keeps in a covered container in the fridge for 4–5 days. If you’re making donuts ahead, store the filling separately and fill just before serving.
In the Freezer
For the best results, freeze donuts after frying but before sugaring and filling. Let them cool completely, freeze in a single layer on a baking sheet until firm, then transfer to a freezer bag. They keep well for up to 1 month.
To serve, thaw at room temperature for about an hour. Warm them in a 350°F (175°C) oven for 4–5 minutes to refresh the outside, then roll in pumpkin spice sugar while warm. Let them cool before filling. They’ll taste nearly fresh-fried.
Troubleshooting Pumpkin Sourdough Donuts
Problem: The donuts are dark brown outside but raw or gummy in the middle. Why it happened: The oil was too hot, so the outside cooked long before heat reached the center. Underproofed donuts make this worse, since dense dough takes longer to cook through. How to fix it: Keep the oil right at 350°F (180°C) and check it between batches. Make sure the donuts pass the poke test before frying. If a batch is already dark, finish them in a 350°F (175°C) oven for 5 minutes.
Problem: The donuts are heavy and greasy. Why it happened: The oil was too cool, usually from adding too many donuts at once. Cool oil doesn’t seal the outside quickly, so the dough absorbs it. How to fix it: Fry only 3–4 at a time and let the oil climb back to 350°F before the next batch. Drain on paper towels right away.
Problem: The donuts deflated or wrinkled when they hit the oil. Why it happened: They were overproofed. The dough stretched past what the gluten could hold, so the structure collapsed under the heat. How to fix it: Start checking the final proof earlier, especially in a warm kitchen. The poke should spring back slowly, not leave a dent that stays. And always transfer them on their parchment squares to avoid knocking the air out.
Problem: The dough barely rose during bulk fermentation. Why it happened: Most often, the sweet stiff starter wasn’t at peak when it went in, either underdeveloped or already past it. A cold kitchen and skipping the optional yeast slow things down too. How to fix it: Move the dough somewhere warmer, around 75–78°F (24–26°C), and give it time. Next round, make sure the stiff starter has tripled with a leveled, dimpled top before mixing, and give a sleepy fridge starter the two-feed refresh first.
Problem: The filling is too runny to pipe. Why it happened: The cream cheese was too warm, whipped cream cheese from a tub was used, or the filling was overbeaten after adding the cream. How to fix it: Chill the filling for 30–60 minutes and it will firm up considerably. Next time, use full-fat block cream cheese that’s softened but still cool to the touch.
Pumpkin Sourdough Donuts FAQ
Can I make pumpkin sourdough donuts with sourdough discard?
Yes. If you don’t have time to build the sweet stiff starter, swap it for 100g (about ½ cup) of sourdough discard and increase the instant yeast to 4g (1 tsp). The yeast does the lifting, while the discard adds flavor and tenderness. The rise will be faster, so keep a close eye on the dough. Sourdough Discard Recipes
Can I make these donuts without commercial yeast?
Absolutely. Leave out the instant yeast for a 100% naturally leavened donut. It works beautifully, especially with the overnight cold rest. Just plan for both the bulk rise and the final proof to take noticeably longer, particularly if your kitchen is below 78°F (26°C).
Can you bake sourdough donuts instead of frying them?
You can, but they’ll be soft pumpkin buns rather than true donuts. Bake the proofed rounds at 350°F (175°C) for about 12–15 minutes, until golden. Brush them with melted butter while warm, roll in the spice sugar, and fill once cool. Delicious, just different.
What is the best oil for frying donuts?
Canola and peanut oil are my top picks. Both have a high smoke point and a neutral flavor that lets the pumpkin and spice shine. Vegetable or sunflower oil works too. If you’re serving guests, skip peanut oil in case of nut allergies.
Can I use homemade pumpkin purée?
Yes, but homemade purée is usually much wetter than canned unless you use baked pumpkin that was mashed. Strain it in a fine-mesh sieve or cheesecloth for an hour or two first, until it’s thick enough to hold a spoon upright. Then weigh out the 150g (⅔ cup, scant) the dough calls for.
What else can I fill pumpkin donuts with?
Apple butter is a gorgeous fall swap. Nutella, vanilla pastry cream or a spiced whipped cream work too. Or skip the filling entirely. Rolled in pumpkin spice sugar, they’re wonderful all on their own.
Still Craving Fall Baking? Try These Next
If these pumpkin sourdough donuts have you in a cozy-baking mood, here are a few more recipes from my kitchen to keep the oven (and fryer) busy:
- Same-Day Sourdough Pumpkin Pull-Apart Cinnamon Loaf — More pumpkin, more cinnamon, and sticky layers you pull apart with your fingers. Perfect for a fall weekend.
- The Sourdough Croissant Loaf That Doesn’t Leak Butter — Ready for your next enriched-dough challenge? Flaky, golden, and surprisingly achievable.
- Pumpkin Spice Sourdough Bread with Raisins (Soft Sandwich Loaf) — Beautiful loaf that makes any sandwich taste like fall.
- Sourdough Discard Chocolate Chip Cookies (Brown Butter) — the cookies that are amazing any season.
The Fluffiest Pumpkin Sourdough Donuts with Cheesecake Filling
Ingredients
Method
- In a small bowl, whisk 30g (2 Tbsp) active starter into 50g (3½ Tbsp) lukewarm water until it’s mostly dissolved. Whisk in 15g (1 Tbsp) sugar, then add 90g (¾ cup) flour. It will be too stiff to stir, so get in there with your hands and knead it into a smooth little ball of dough, about a minute or two.
- Transfer it to a tall jar or container with plenty of headroom. This little ball needs room to triple or even quadruple overnight. Cover and leave it somewhere warm, ideally 75–78°F (24–26°C).
- In the bowl of a stand mixer fitted with the dough hook, add all of the sweet stiff starter (about 185g), 100g (⅓ cup + 1½ Tbsp) milk, 150g (⅔ cup, scant) pumpkin purée, 1 egg (about 50g), 70g (⅓ cup) sugar, 8g (2 tsp) vanilla, 1g (¼ tsp) instant yeast if using, and 350g (about 2¾ cups) flour.
- Tear the stiff starter into a few pieces as you add it. It’ll disperse into the dough much faster. Mix on low until everything comes together into a shaggy, sticky dough, then bump the speed up one notch and mix for one minute.
- Turn off the mixer and let the dough rest for 15 minutes. This short rest gives the flour time to fully hydrate, which makes the next stage of kneading quicker and smoother.
- Add 3g (½ tsp) salt and mix on medium speed (speed 3 on a KitchenAid) for about 3 minutes. The dough will start looking smoother and pulling into a rough ball.
- Now add the 43g (3 Tbsp) softened butter one tablespoon at a time, letting each piece fully disappear before adding the next. The dough will look like it’s falling apart when butter goes in. It gets slick, separates, and slaps around the bowl. That’s normal. Keep mixing and it’ll pull itself back together.
- Once all the butter is in, keep mixing until the dough is smooth, glossy, elastic, and clearing the sides of the bowl. Total mixing time is usually 10–15 minutes. Gently stretch a small piece between your fingers. It should stretch thin enough to let light through before it tears.
- Scrape the dough into a straight-sided container or a large glass measuring bowl, smooth the top, and mark the starting level with a piece of tape or a dry-erase marker. Cover and let it rise somewhere warm to double its size.
- Want donuts tomorrow morning instead? Let the dough rest at room temperature for 2–3 hours to get fermentation going instead of allowing it to double in size, then cover and refrigerate it overnight.
- Turn the dough out onto a well-floured counter. Weigh the whole batch and divide it into equal portions of about 75g each. You'll get 12 donuts.
- Cut 12–14 parchment paper squares, about 3 x 3 inches (8 x 8 cm). Lay them out across two baking sheets and give them a light spray of oil.
- Shape each portion into a tight ball by pinching it together from both sides into the center. Let the balls rest on the counter for 30 minutes so the gluten relaxes.
- Roll each ball by cupping your hand over it and moving it in small circles against the counter. You’ll feel the surface tighten up. Place each one on its own parchment square, spacing them well apart, and cover loosely with plastic wrap.
- Let the donuts proof until roughly doubled in size, puffy, and visibly airy. If your dough came straight from the fridge, this will take a good while longer.
- While the donuts proof, make the filling. In a medium bowl, beat 226g (8 oz / 1 block) softened cream cheese with a hand mixer until smooth and creamy. Add 60g (¼ cup) pumpkin purée, 4g (1 tsp) vanilla, 1g (½ tsp) pumpkin pie spice, a pinch of salt, and 80g (⅔ cup) powdered sugar. Beat until completely smooth.
- Pour in up to 60g (¼ cup) heavy cream and beat for another 1–2 minutes, until the filling looks fluffy and lightened, like a soft cheesecake mousse. Cover and refrigerate it until you're ready to fill.
- For the spice sugar, whisk 100g (½ cup) sugar with 8g (1 Tbsp) pumpkin pie spice in a wide, shallow bowl until it's evenly speckled. Set it next to your frying station.
- When the donuts are nearly proofed, pour 1.5–2 L (6–8 cups) oil into your heavy pot, enough for 2–3 inches of depth, and clip on your thermometer. Heat to 350°F (180°C). Line a baking sheet with a double layer of paper towels and set a cooling rack nearby.
- Pick up a donut by its parchment square and gently lower it, paper and all, into the oil. Within a few seconds the paper will release; pluck it out with tongs. Fry 3–4 donuts at a time. Crowding the pot drops the oil temperature fast.
- Fry for 2–3 minutes until the underside is a deep golden brown, then carefully flip and fry the other side for another 2–3 minutes. You’ll see that classic pale ring around the middle, the sign of a well-proofed donut. Lift them out with a slotted spoon or spider and drain on the paper towels.
- While the donuts are still very warm, but cool enough to handle, roll each one in the pumpkin spice sugar to coat it completely. The faint film of oil on a warm donut is what makes the sugar cling. Set them on the cooling rack and let them cool completely, about 30 minutes. Meanwhile, spoon the chilled filling into a piping bag fitted with a long filling tip.
- Poke a hole into the side of each donut with a chopstick or the tip of a butter knife, wiggling it gently to open up a pocket in the center. Insert the piping tip and squeeze until you feel the donut grow heavy in your hand and a little filling peeks back out of the hole.
- Serve right away. Filled donuts are at their absolute best the day they’re made, when the sugar is crisp and the crumb is still pillowy soft.
