Real New York Style Sourdough Bagels
There’s a specific kind of quiet that happens in my kitchen at six in the morning when a pot of malt-dark water is just starting to simmer. I’m not a New Yorker — I didn’t grow up three blocks from a bagel shop with a line out the door — but I’ve spent more mornings than I can count chasing that particular bagel: the one with a shatter-crisp crust, a dense chew that makes your jaw work for it, and a faint sweetness from the malt that lingers after the last bite. My first attempt at sourdough bagels came out of the oven looking more like dinner rolls with a hole punched in the middle. Soft. Pale. Sad. It took a few batches of trial and error — and a real education in what makes a bagel a bagel and not just a boiled roll — before I landed on the method I’m sharing with you today.
If you’ve ever wondered whether you can actually get that dense, chewy, deli-style bite from your own sourdough starter, the answer is yes — and it comes down to a few things most recipes gloss over: a stiff, low-hydration dough, real barley malt, and a proper cold ferment. And if you like a softer bagel that you can make a sandwich out of, I’ll cover that too. Let’s get into it.
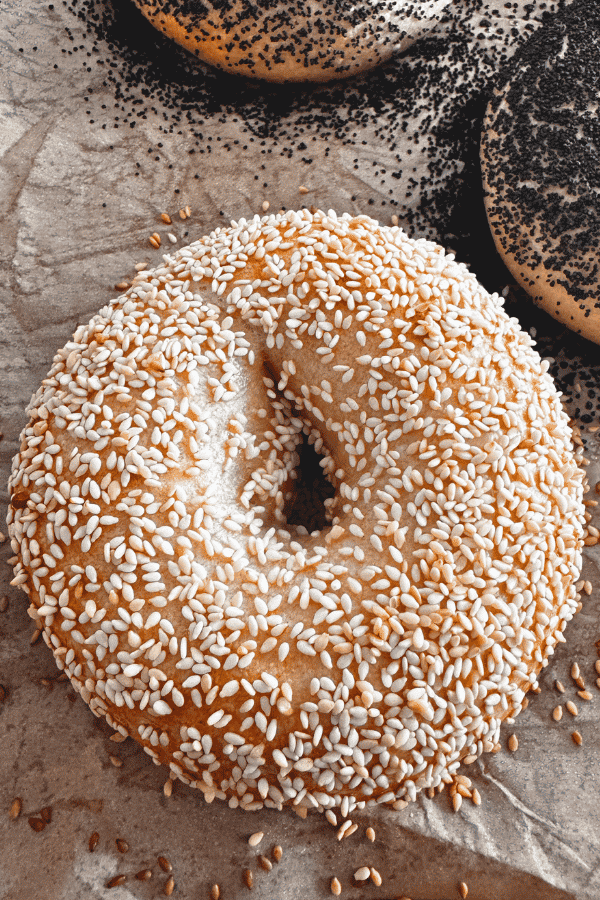
What Are New York Style Sourdough Bagels?
A New York style bagel is defined less by where it’s made and more by how it’s made. The dough is stiff and low-hydration compared to most bread doughs, which is what gives bagels their dense, chewy interior instead of an open, airy crumb. The dough is boiled briefly before baking — this is the single non-negotiable step that separates a bagel from any other bread shaped like a ring — which gelatinizes the starch on the surface and sets up that glossy, chewy crust. And traditionally, barley malt (either as a syrup in the dough and boiling water, or as diastatic malt powder – even better if both) gives the bagel its signature toasty sweetness and deep golden color.
Swapping commercial yeast for sourdough doesn’t just change the leavening — it changes the whole personality of the bagel. You get a more complex, faintly tangy flavor underneath the malt, a more digestible dough thanks to the long fermentation, and a chew that somehow feels even more substantial. This version uses a sweet stiff starter as the leaven, which is a small pre-fermented dough that’s been fed with a little extra sugar rather than your usual loose, wet starter. There’s a reason for that specific build, and it’s worth understanding before you mix:
- Traditional taste. A sweet stiff starter ferments more slowly and with less acid production than a regular sourdough starter, which means you get a clean, classic malt flavor up front instead of a pronounced sour tang fighting with it.
- Chewier texture. Lower acidity means the gluten in your dough stays stronger, and strong gluten is exactly what gives a bagel its signature dense, chewy bite. A sourer, more acidic starter would actually work against the texture you’re after here.
- Easier mixing and shaping. A stiff starter mimics the low hydration of the final bagel dough itself, so it blends in seamlessly rather than loosening things up. That keeps your dough firm, predictable, and much easier to shape into a proper bagel.
Why You’ll Love This Recipe
- That authentic deli chew. The low-hydration dough and boiling step give you the dense, toothsome bite that separates a real bagel from a glorified roll.
- Deep, malty flavor. Barley malt syrup and diastatic malt powder work together to build a toasted, subtly sweet flavor you can’t fake with sugar alone.
- A flexible schedule. Between the sweet stiff starter build, the cold ferment, and the boil-and-bake day, this recipe is built to work around your life, not the other way around.
- A genuinely educational bake. You’ll learn to read your dough’s fermentation, understand what malt actually does, and troubleshoot texture problems like a much more experienced baker.
- They freeze beautifully, which means one baking day gives you bagels for weeks.
Ingredient Breakdown
For the Sweet Stiff Starter
- 40g (about 2½ Tbsp) active sourdough starter — The sweet stiff starter build gives it structure and a slight sweetness that carries into the final dough.
- 50g (about 3½ Tbsp) water — Just enough to bring the starter and flour together into a stiff, workable mass.
- 20g (about 1½ Tbsp) granulated sugar — Feeds the wild yeast and starts building the subtle sweetness bagels are known for.
- 120g (about 1 cup) bread flour — The protein in bread flour gives this pre-ferment the same backbone as the final dough. All-purpose flour will work in a pinch, but you’ll lose a little chew.
For the Dough
- 180g (about ¾ cup) ice cold water — This dough needs a long mix in a mixer and because it is a stiff dough, the mixer will work hard creating heat that will warm the dough too much. Cold water helps regulate that temperature.
- 100g (about ¾ cup) ice — Combined with the cold water, the ice melts slowly during mixing, keeping friction heat from the long mixing time from overheating your dough.
- 500g (about 4 cups) high-gluten or bread flour — High-gluten flour (roughly 14% protein) is the traditional choice and gives you the most authentic chew. Bread flour is a completely valid substitute if that’s what you have.
- 20g (about 1½ Tbsp) granulated sugar — Rounds out the malt flavor and feeds fermentation.
- 20g (about 1 Tbsp) barley malt syrup — This is the ingredient that makes a New York bagel taste like a New York bagel. It’s thick, sticky, and worth seeking out. If you truly can’t find it, substitute 1½–2 Tbsp brown sugar plus 2 Tbsp molasses — the flavor will be close, though not identical.
- 12g (about 2 tsp) fine sea salt — Salt does double duty here: flavor, and controlling the pace of fermentation so your dough doesn’t outrun you.
- All of the sweet stiff starter — Your leaven from above, added in full.
- 12g (about 1½ Tbsp) diastatic malt powder — Diastatic malt powder is made from sprouted, dried, and ground barley, and it still contains active enzymes. Those enzymes break down starches into simple sugars the yeast can use, which improves browning, flavor, and overall texture. This is different from non-diastatic malt powder or malt syrup, which have been heat-treated and no longer contain active enzymes — diastatic is what you want here. Skipping it won’t ruin your bagels, but you will notice a real difference in color, flavor, and chew.
For Boiling and Topping
- Barley malt syrup or brown sugar and molasses, for the boiling water
- 1 egg, beaten, for egg wash
- Toppings of choice — everything bagel seasoning, sesame seeds, poppy seeds, or flaky salt all work beautifully
Step-by-Step Directions
Day 1 (night): Build the Sweet Stiff Starter
I usually build the sweet stiff starter right before I go to bed and leave it out all night to rise. Combine the starter, water, sugar, and flour in a small bowl until you have a stiff, cohesive mass — it will feel more like a dense dough than a typical loose starter, scrape it out on your counter and knead it as it is very stiff. Once kneaded, place back in your container. Cover it and let it sit in room temperature overnight. It should be visibly domed, at least triple in size, and just beginning to show dimples on top, depending on temperature this will take 7-12 hours.
💡 Pro Tip: Here’s something most bagel recipes won’t tell you — you have more flexibility with your starter prep than you think. If your schedule doesn’t line up perfectly, you can build your sweet stiff starter, allow it to triple in size and have a smooth dome and hold it in the fridge for up to 3 days before using it in your dough. Cold fermentation slows it down without stopping it, so it’s ready whenever you are. That kind of flexibility is what makes sourdough baking sustainable for a real, busy life.
Day 2 (morning): Step 1: Mix the Dough
Into the bowl of a stand mixer fitted with a spiral hook if using an Ooni stand mixer, or a dough hook with any other mixer. Add all of your wet ingredients (cold water, ice, malt syrup) first, then layer your dry ingredients on top (flour, sugar, salt) followed by your sweet stiff starter and diastatic malt powder.
Mix on speed 2 (about 35-40% on an Ooni-style mixer) until a shaggy, rough mass forms — this takes about 5 minutes. Increase to speed 3 (about 50% on an Ooni) and mix for another 10–15 minutes. You will have to help with scraping the dough helping it under the hook as it is very stiff.
This is a genuinely long mix, and that’s intentional. You’re looking for a dough that’s smooth and wrapping around the dough hook. Bagel dough is stiff, so don’t be alarmed if it looks tighter and less pliable than a typical sourdough loaf dough. That stiffness is exactly what gives you the chew.
⚠️ Watch Out: If your mixer starts to feel warm to the touch, stop. Turn it off, let the dough rest for about 15 minutes, and then resume mixing. A dough that gets too warm during this long mix will ferment unevenly and can affect your final texture.
Step 2: Check the Dough Temperature
Transfer the dough to a lightly oiled glass measuring bowl or straight-sided container. Press it flat on top and note the level — this is how you’ll track its rise later without guessing. Check the dough’s temperature. If it’s reading 85°F or warmer, pop the bowl into the fridge for about an hour to bring it back down before moving on. A dough that starts too warm will ferment too fast and lose the flavor development this recipe is built around.
Step 3: Strengthen and Bulk Rise
After the dough rests for an hour, perform a set of stretch and folds directly in the bowl — this builds additional strength without adding more mix time. Then let the dough rise at room temperature on the counter by about 50%, we are not looking for double in size as it will rise later when shaped into bagels.
Step 4: Divide and Pre-shape
Turn the dough out onto your counter and divide it into 8 pieces, roughly 125–130g each. A kitchen scale will save you a lot of guessing here and help your bagels bake evenly.
Pre-shape each piece into a tight, round ball. Cover them with plastic wrap, or place them on a half sheet pan under a lid, so they don’t dry out while you work through the rest. Let them rest for 30 minutes before shaping — this relaxes the gluten you just built and makes shaping the actual bagel shape much easier.
Step 5: Shape Your Bagels
Working with one piece at a time and keeping the rest covered, shape each ball into a bagel. My preferred method: flatten the dough slightly, roll it into a small rectangle, then roll that rectangle into a small log about 8 inches long. Wrap the ends around your hand so they overlap by a couple of inches, pinch the seam and then roll the overlapped seam against your countertop to pinch it firmly closed.
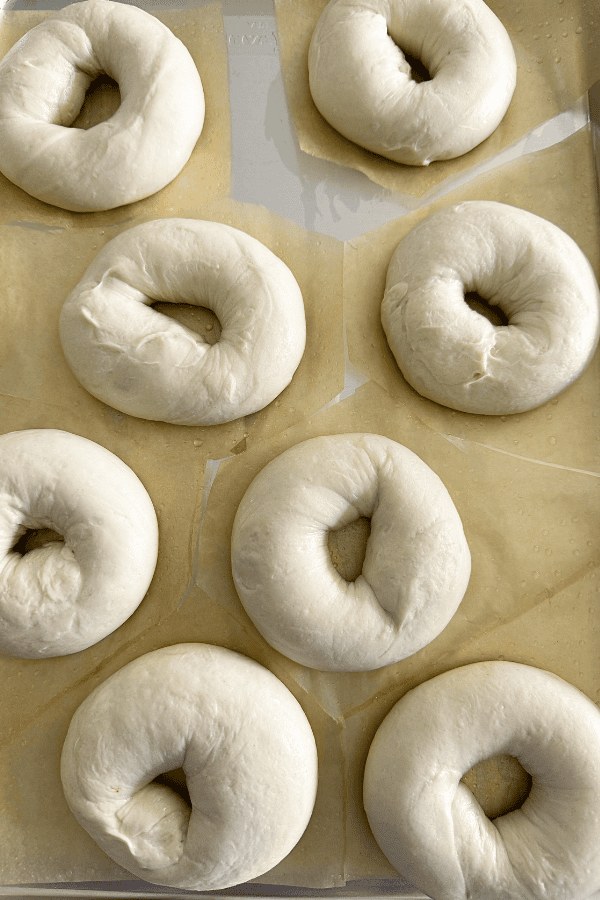
Place each shaped bagel on its own square of parchment paper that’s been lightly sprayed with oil. Once all 8 are shaped, cover the pan and let them rest at room temperature for 2 hours.
Step 6: The Cold Ferment
Transfer the covered bagels to the refrigerator and let the bagels cold ferment for 24–36 hours, I prefer 36. This long, slow, cold fermentation is where most of the flavor in a New York bagel actually develops.
Day 2: Boil and Bake
Step 7: Check for Proof
Pull your bagels from the fridge and take a good look at them before doing anything else. You’re looking for bagels that appear noticeably airy and puffed — roughly 50% larger than when they went into the fridge. If they look that way, you’re ready to move straight to boiling.
If they still look tight and dense, that’s not a failure — it just means they need more time. Let them sit out, covered, at room temperature for 2–4 hours to finish proofing before you boil.
Step 8: Preheat and Set Up Your Oven
Preheat your oven to 500°F, ideally for a full hour, with two racks set up inside. Place a cast iron pan or other metal pan on the bottom rack — this is where you’ll create steam later, and it needs to be fully preheated to do its job.
Step 9: Prepare the Boiling Water
Fill a 6–8 quart pot about halfway with water — choose a pot large enough to comfortably hold 2–4 bagels at once without crowding them. Stir in 2–3 Tbsp of barley malt syrup until it dissolves. If you can’t find barley malt syrup, substitute 1½–2 Tbsp brown sugar plus 2 Tbsp molasses.
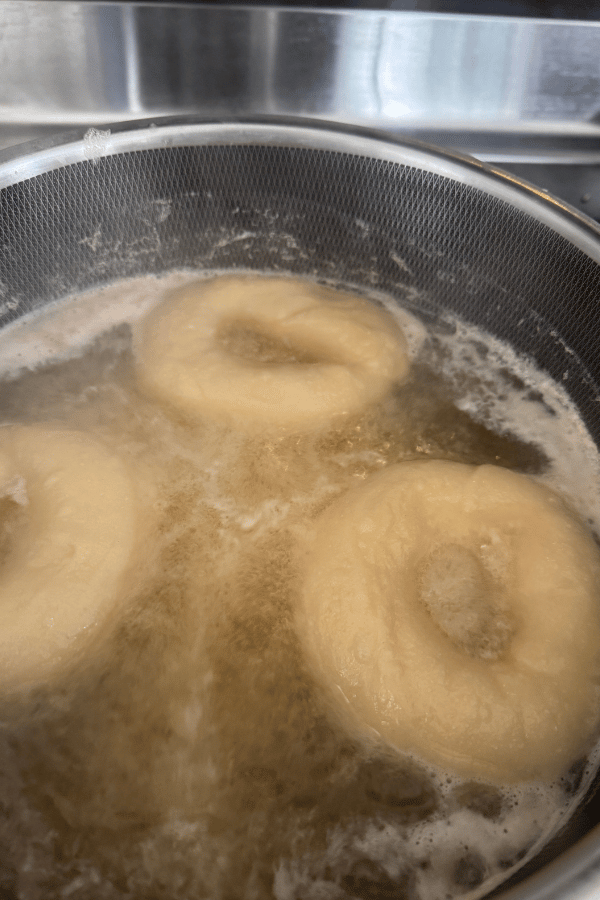
Bring the water to a full rolling boil. You’ll notice the color deepen significantly as the malt dissolves and the water heats. Keep an eye on it — if it starts foaming excessively, reduce the heat slightly or add a small drop of oil to break the surface tension. Once it’s at a full rolling boil, reduce the heat to a gentle simmer.
Step 10: Boil the Bagels
Transfer your bagels to the water top-down, parchment paper and all. Use tongs to gently bob the parchment up and down until it releases, then discard the paper. Boil each bagel for 30 seconds per side, then remove with a slotted spoon and set on a wire rack to drain any excess water.
Step 11: Top and Bake
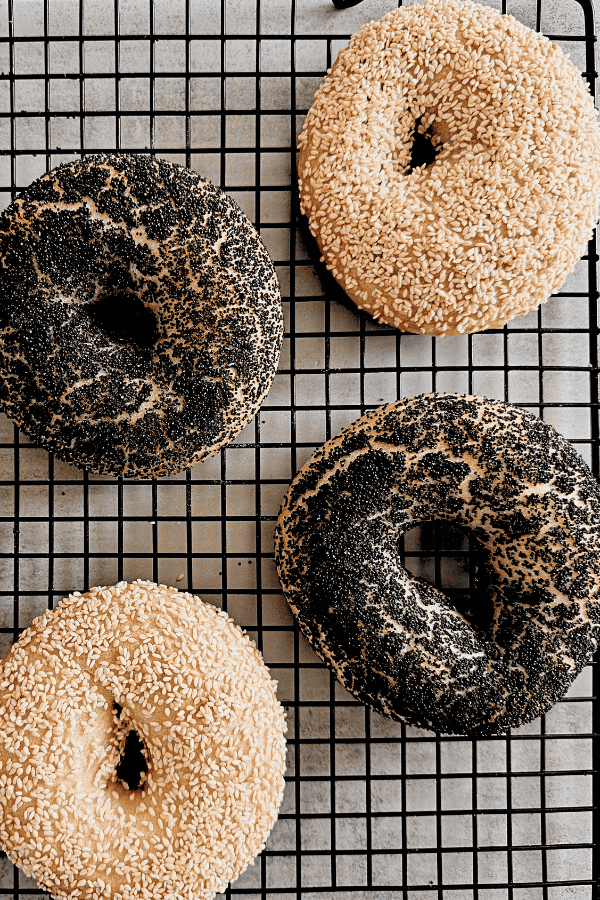
Brush each bagel with egg wash, then dip it upside down into your topping of choice, or sprinkle toppings over the top. Transfer the bagels to a baking tray lined with parchment and lightly greased with oil spray.
Place the tray on the top rack of your preheated oven. Add 2 cups of boiling water to the pan on the bottom rack to create a burst of steam. Bake for 10 minutes at 500°F, then remove the steam tray, rotate your baking sheet, and lower the oven temperature to 450°F. Continue baking for another 5 minutes, checking your toppings — if they’re browning too quickly, tent the bagels loosely with foil and bake for a final 5 minutes.
Remove the bagels from the oven and transfer them immediately to a cooling rack. You can dig in warm, or let them cool completely.
How to Store & Freeze Your Sourdough Bagels
Room temperature: Store cooled bagels in a paper bag or loosely covered container for up to 2 days. Avoid sealing them in plastic while they’re fully warm, or you’ll trap steam and soften that crust you worked so hard for.
Refrigerator: I don’t recommend refrigerating baked bagels — like most sourdough baked goods, cold storage actually speeds up staling rather than preventing it. If you need more than a couple of days, skip straight to the freezer.
Freezer: Once fully cooled, slice each bagel in half and freeze in a single layer on a tray before transferring to a freezer bag — this keeps them from fusing together and lets you grab just one or two at a time. They’ll keep well for up to 3 months. To re-crisp, toast the frozen halves directly from the freezer, or let them thaw at room temperature and warm in a 350°F oven for 5–7 minutes.
Troubleshooting
Problem: My bagels deflated after boiling, while sitting on the tray. Why it happened: This almost always comes down to overproofing, boiling too long, or underdeveloped gluten from insufficient mixing. How to fix it: Double-check your proof with the float test in Step 7 before boiling the whole batch, keep your boil to 30 seconds per side, and make sure you hit that smooth, near-windowpane stage during mixing.
Problem: My bagels are pale instead of that deep golden-brown color. Why it happened: This is usually a malt issue — either the diastatic malt powder was omitted or is no longer active, or the boiling water didn’t have enough malt syrup or sugar in it. How to fix it: Confirm your diastatic malt powder is fresh (it loses potency over time, especially if stored warm) and don’t skip the malt in your boiling water — it’s doing real work for both flavor and color.
Problem: My bagels sank when I dropped them in the boiling water. Why it happened: Cold bagels straight from the fridge, or bagels that are genuinely underproofed, will sink initially. How to fix it: If they’re cold but properly proofed, give them a gentle nudge with a spoon — they should pop right back up. If they stay sunk, pull them out, let the batch sit at room temperature a bit longer, and try again.
Problem: My dough felt impossible to knead and my mixer struggled. Why it happened: This is a genuinely stiff, low-hydration dough by design, so some resistance is normal — but if your mixer is overheating or stalling, the dough may be getting too warm. How to fix it: Pause mixing every 10–15 minutes if needed to let the dough (and your machine) cool down, and don’t skip the ice in the dough recipe — it’s there specifically to manage this.
Problem: My bagels came out dense and gummy in the center. Why it happened: This usually points to underbaking, or a boil that was too long and gelatinized more of the exterior starch than the interior could support. How to fix it: Stick close to the 30-seconds-per-side boil time, and make sure your oven is fully preheated to 500°F before the bagels go in — an underheated oven is a common hidden culprit here.
Frequently Asked Questions
Can I make sourdough bagels without diastatic malt powder? Yes, but expect a noticeably different result. Diastatic malt powder contains active enzymes that improve browning, sweetness, and texture. Without it, your bagels will still be delicious, just paler and slightly less complex in flavor. Barley malt syrup alone will still get you most of the way there.
Why is my sourdough bagel dough so much stiffer than my sourdough bread dough? That’s intentional. New York style bagels rely on a low-hydration, stiff dough to achieve their signature dense, chewy texture. If the dough felt too easy to knead, that’s usually a sign it’s too wet.
Do I have to boil sourdough bagels? Yes — boiling is what makes a bagel a bagel. It gelatinizes the starch on the surface, which is what gives you that chewy, glossy crust instead of a soft, bread-like exterior.
Can I use my discard instead of active starter for the sweet stiff starter? Not for this recipe. The sweet stiff starter needs to be built from active, recently fed starter so it can properly leaven this stiff, low-hydration dough. Save your discard for a recipe designed around it, like sourdough discard crackers or pancakes.
How long can I cold ferment sourdough bagels in the fridge? This recipe is built around a 24–36 hour cold ferment, and that window gives you real flexibility for your schedule. Going shorter can leave you with underdeveloped flavor; going meaningfully longer risks overproofing.
Can I substitute all-purpose flour for the high-gluten or bread flour? I wouldn’t recommend it, you’ll lose some chew. High-gluten and bread flour both have the protein content needed to build the strong gluten structure that gives bagels their signature bite.
Essential Tools for This Recipe
- Stand mixer with a dough hook — This dough is stiff enough that mixing by hand for the full 10–15 minutes is a real workout. A stand mixer makes this recipe far more approachable, and that stand mixer has to be heavy duty.
- Kitchen scale — Bagel dough is unforgiving of inaccurate measuring, and gram measurements will give you far more consistent results than volume alone.
- 6–8 quart pot — For the boiling step; you’ll want something roomy enough to hold a few bagels without crowding.
- Cast iron or heavy metal pan — For generating steam in your oven during the bake.
- Wire cooling rack — Essential for draining bagels after boiling and cooling them properly after baking.
Real New York Style Sourdough Bagels
Ingredients
Method
- Several hours before you plan to mix your dough, combine the starter, water, sugar, and flour in a small bowl until you have a stiff, cohesive mass — it will feel more like a dense dough than a typical loose starter. Cover it and let it sit at room temperature until it’s visibly domed and just beginning to show cracks on top, usually 4–6 hours depending on your kitchen’s temperature.
- Into the bowl of a stand mixer fitted with a dough hook, add all of your wet ingredients (cold water, ice, malt syrup) first, then layer your dry ingredients on top (flour, sugar, salt) followed by your sweet stiff starter and diastatic malt powder.
- Mix on speed 1 (about 25–30% on an Ooni-style mixer) until a shaggy, rough mass forms — this takes about 2 minutes. Increase to speed 2 (about 45–50%) and mix for another 10–15 minutes.
- This is a genuinely long mix, and that’s intentional. You’re looking for a dough that’s smooth and at or near windowpane — meaning you can stretch a small piece thin enough to see light through it without it tearing immediately. Bagel dough is stiff, so don’t be alarmed if it looks tighter and less pliable than a typical sourdough loaf dough. That stiffness is exactly what gives you the chew.
- ⚠️ Watch Out: If your mixer starts to feel too warm to the touch, stop. Turn it off, let the dough rest for about 15 minutes, and then resume mixing. A dough that gets too warm during this long mix will ferment unevenly and can affect your final texture.
- Transfer the dough to a lightly oiled glass measuring bowl or straight-sided container. Press it flat on top and note the level — this is how you’ll track its rise later without guessing. Check the dough’s temperature. If it’s reading 85°F or warmer, pop the bowl into the fridge for about an hour to bring it back down before moving on. A dough that starts too warm will ferment too fast and lose the flavor development this recipe is built around.
- After the dough rests for an hour, perform a set of stretch and folds directly in the bowl — this builds additional strength without adding more mix time. Then let the dough rise at room temperature on the counter.
- 💡 Pro Tip: This is where I want you to unlearn the habit of watching the clock. Because this is a stiff, low-hydration dough, you’re not looking for it to double — you’re watching for it to rise no more than 50% in volume. This is the same percentage-rise method I teach for every sourdough recipe, just calibrated differently for this stiffer dough: the visual cue matters far more than the number of minutes on a timer. Room temperature, starter strength, and even the season will all change how long this takes, so trust the mark you made in Step 2, not a stopwatch.
- Turn the dough out onto your counter and divide it into 8 pieces, roughly 125–130g each. A kitchen scale will save you a lot of guessing here and help your bagels bake evenly.
- Pre-shape each piece into a tight, round ball. Cover them with plastic wrap, or place them on a half sheet pan under a lid, so they don’t dry out while you work through the rest. Let them rest for 30 minutes before shaping — this relaxes the gluten you just built and makes shaping the actual bagel shape much easier.
- Working with one piece at a time and keeping the rest covered, shape each ball into a bagel. My preferred method: flatten the dough slightly, roll it into a small rectangle, then roll that rectangle into a rope about 14 inches long. Wrap the rope around your hand so the ends overlap by a couple of inches, and roll the overlapped seam against your countertop to pinch it firmly closed.
- Place each shaped bagel on its own square of parchment paper that’s been lightly sprayed with oil. Once all 8 are shaped, cover the pan and let them rest at room temperature for 2 hours.
- Transfer the pan to the refrigerator and let the bagels cold ferment for 24–36 hours. This long, slow, cold rise is where most of the flavor in a New York bagel actually develops — it’s not a step to rush or shorten.
- Pull your bagels from the fridge and take a good look at them before doing anything else. You’re looking for bagels that appear noticeably airy and puffed — roughly 50% larger than when they went into the fridge. If they look that way, you’re ready to move straight to boiling.
- If they still look tight and dense, that’s not a failure — it just means they need more time. Let them sit out, covered, at room temperature for 2–4 hours to finish proofing before you boil.
- Preheat your oven to 500°F, ideally for a full hour, with two racks set up inside. Place a cast iron pan or other metal pan on the bottom rack — this is where you’ll create steam later, and it needs to be fully preheated to do its job.
- Fill a 6–8 quart pot about halfway with water — choose a pot large enough to comfortably hold 2–4 bagels at once without crowding them. Stir in 2–3 Tbsp of barley malt syrup until it dissolves. If you can’t find barley malt syrup, substitute 1½–2 Tbsp brown sugar plus 2 Tbsp molasses.
- Bring the water to a full rolling boil. You’ll notice the color deepen significantly as the malt dissolves and the water heats. Keep an eye on it — if it starts foaming excessively, reduce the heat slightly or add a small drop of oil to break the surface tension. Once it’s at a full rolling boil, reduce the heat to a gentle simmer.
- Transfer your bagels to the water top-down, parchment paper and all. Use tongs to gently bob the parchment up and down until it releases, then discard the paper. Boil each bagel for 30 seconds per side, then remove with a slotted spoon and set on a wire rack to drain any excess water.
- Brush each bagel with egg wash, then dip it upside down into your topping of choice, or sprinkle toppings over the top. Transfer the bagels to a baking tray lined with parchment and lightly greased with oil spray.
- Place the tray on the top rack of your preheated oven. Add 2 cups of boiling water to the pan on the bottom rack to create a burst of steam. Bake for 10 minutes at 500°F, then remove the steam tray, rotate your baking sheet, and lower the oven temperature to 450°F. Continue baking for another 5 minutes, checking your toppings — if they’re browning too quickly, tent the bagels loosely with foil and bake for a final 5 minutes.
- Remove the bagels from the oven and transfer them immediately to a cooling rack. You can dig in warm, or let them cool completely — both are correct.
