Easy Sourdough Bread Recipe that is foolproof
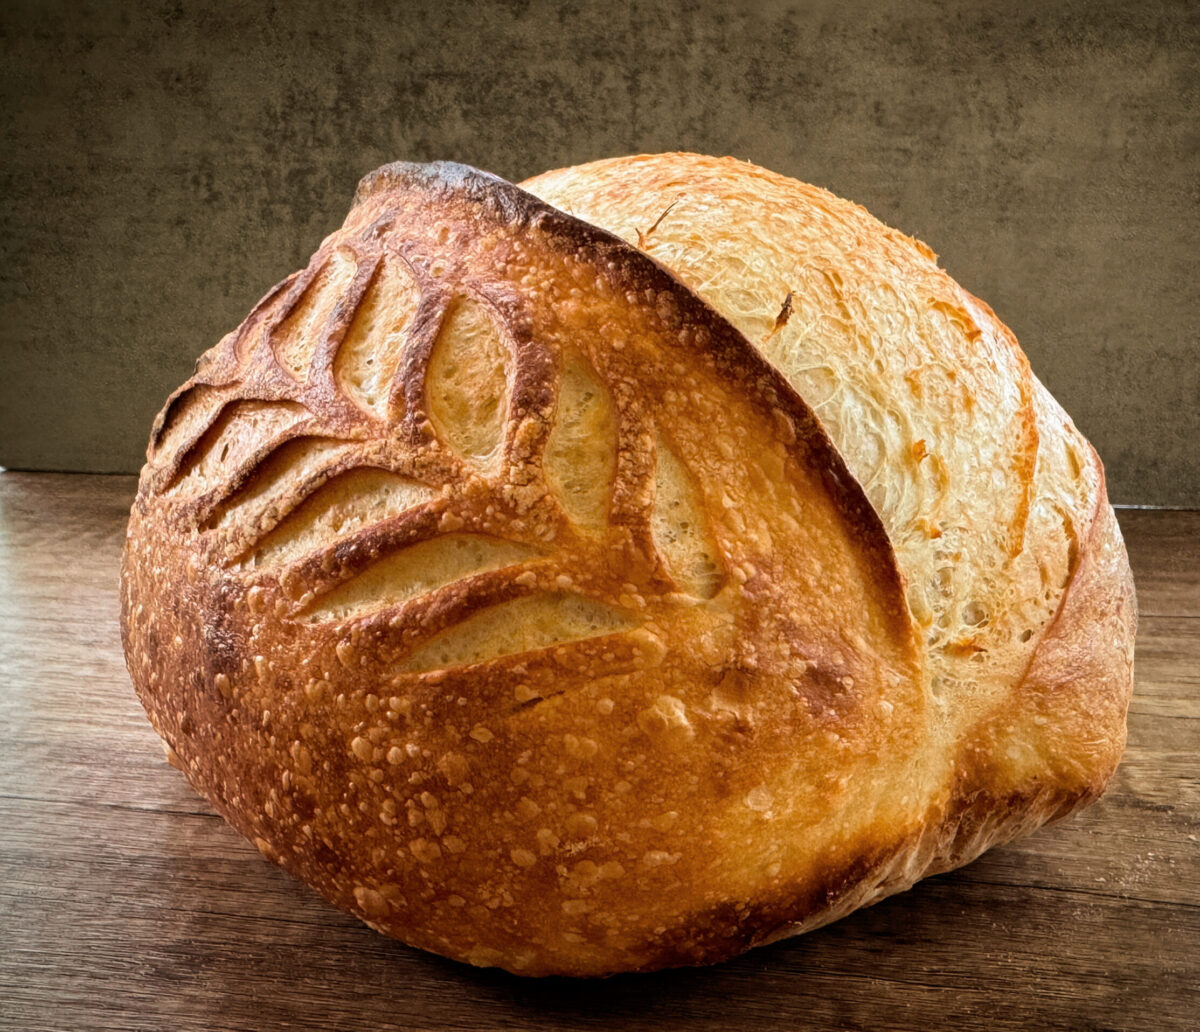
Baking sourdough bread from scratch might seem daunting, but I promise—it’s easier than you think with this easy sourdough bread recipe. Once you understand the rhythm of fermentation, stretching, and shaping, you’ll be pulling golden, crusty loaves likes this one from your oven like a pro.
This is my tried-and-true, easy sourdough bread recipe, a simple yet transformative formula that will give you a beautifully open crumb, crisp crust, and deep flavor. Whether you’re a beginner or refining your technique, this guide will walk you through every step in a way that’s approachable, practical, and stress-free.
Why You’ll Love This Recipe
- Simple, whole ingredients – Just flour, water, salt, and an active sourdough starter at peak.
- Beginner Friendly, Step-by-step instructions – This easy sourdough bread recipe is simple and my tried and true instructions along with the video are super simple to follow and get great results.
- Flexible and works around your schedule – This dough can hang out in the fridge until you are ready to bake it and can be adjusted to same day mix and bake or overnight
- Deliciously rewarding – The deep, tangy flavor of naturally fermented bread is incomparable to store-bought loaves, plus it’s gut healthy.
Sourdough Tools you’ll want
Common Sourdough Terms
Fermentolyse: The initial rest period after mixing flour, water, and starter – allowing gluten to develop naturally.
Bulk Fermentation: The first long rise where the dough ferments and bulks up in room temperature.
Stretch & Fold: A technique to strengthen the dough without kneading.
Cold Ferment: The last fermentation stage before baking, often done overnight in the fridge where the dough develops amazing flavor and firms up for easier scoring.
Scoring: Slashing the dough to control oven spring during baking.
Oven Spring: The rapid rise in the first 10-15 minutes of baking.
What is Sourdough Bread?
Sourdough bread is an ancient form of breadmaking, dating back thousands of years. Instead of using store-bought yeast, sourdough is naturally fermented with a sourdough starter—a living culture of wild yeast and beneficial bacteria that helps the bread rise while developing its signature tangy flavor.
Why Bake Sourdough Bread?
✔️ Better Flavor: A deep, complex taste with a crisp, golden crust.
✔️ Easier Digestion: Fermentation breaks down gluten and phytic acid, making it gentler on the stomach.
✔️ No Additives: Just flour, water, and salt—no preservatives or commercial yeast.
What is a Sourdough Starter & where do I get one?
A sourdough starter is a live culture made by fermenting flour and water, cultivating wild yeast and beneficial bacteria. This natural leavening agent not only helps bread rise but also imparts a distinctive tangy flavor and chewy texture.
- Create Your Own: Yes! You can make your own starter, all you need is, whole grain flour (whole wheat or rye), all purpose flour and some patience. You can get my FREE step-by-step guide that will make this process a success.
- Ask a Fellow Sourdough Baker: Many bakers are willing to share a portion of their established starter.
- Purchase one: “Phoebe” is my 170yr old starter that I dehydrate and ship with instructions to reactivate and get baking.
How to Feed and Maintain a Sourdough Starter
- Daily Use: Feed once per day (depending on room temperature, you’ll feed a 1:10:10 ratio of starter, flour, and water and see if it needs a higher or lower feeding ratio).
- Weekly Use: Store covered in the fridge and feed once a week.
- Before Baking: Feed it 6-12 hours before baking, so it’s bubbly, active, and more than doubled in size.
- Back up: Dehydrate some of your active starter by spreading thin on parchment paper, let completely dry for 48 hrs, then break up the dried flakes and store in an airtight jar in your pantry for years.
- Traveling: If you’re going to be away, feed your starter stiffer (1:1:1.5 ratio, ex: 10g starter, 10g water, 15g flour), and store in fridge for up to 2 weeks without additional maintenance needed.
💡 What are ratios? Ratios are all the ingredients by weight. For example: 1:1:1 means 1 part starter, 1 part water, and 1 part flour by weight. (40g starter, 40g water, 40g flour).
When is the Starter Ready to Use?
- It doubles in size within 4-8 hours after feeding.
- It is at peak – the top dome leveled off.
- It has a bubbly, aerated texture and a mild tangy smell.
Sourdough Baking Timeline
Since sourdough baking is all about timing and temperature, for a beginner it can be tough to plan ahead and figure out when to feed your starter or mix your dough – and when you’ll enjoy that fresh baked slice of sourdough bread. Here are two timelines (with dough temperatures of 75F) that should give you a starting point, just keep in mind you will end up adjusting based on temperatures you’re working in.
Weekend (Day off) mixing and baking
| Day 1 (Friday Evening) | Feed Your Starter |
| Before bedtime | For an overnight feed, depending on your house temperature, feed a higher ratio. Example: 1:4:4 (15g fridge starter: 60g water: 60g flour) |
| Day 2 (Saturday Morning) | Mix Dough, Bulk Fermentation |
| 9:00 am | Mix your dough ingredients, rest 1 hr. |
| 10:00 am | 1st set of Stretch & Folds |
| 10:30am | 2nd set of Stretch & Folds |
| 11:00am | 3rd set of Stretch & Folds |
| 11:30am | 4th set of Stretch & Folds |
| Day 2 (Saturday Afternoon/Evening) | Shaping, Cold Fermentation (Baking) |
| 3:30pm-4:30pm | This timeframe will vary depending on temperature and a few other factors. Based on a 75F dough temp, you want to aim for a 75%-80% rise. If temps are cooler, go for dough doubling in size which means it will take longer before it is time to shape. Pre-shape your dough, let rest 20 min. |
| 3:50pm-4:50pm | Final Shape. 1) If you want to cold ferment your dough and bake next day, simply place your shaped loaf into a proofing basket, cover and pop in the fridge for an overnight cold proof. 2) If you want to bake same day, after the final shape, preheat your oven, and bake your loaf. (I would recommend to place your loaf in a proofing basket and pop in the freezer for 40 min while the oven is preheating to firm up the shape before scoring & baking) |
Weekday (work day) mixing and baking
| Day 1 (Thursday morning) | Feed Your Starter |
| In the morning before heading out to work | For an 8 hr roughly starter activation time, you would feed a lower ratio depending on how warm your house is. Example: 1:2:2 (15g fridge starter: 30g water: 30g flour. You will only need 50g of starter for your dough) |
| Day 1 (Thursday Evening) | Mix Dough, Bulk Fermentation |
| 7:00pm | Mix your dough ingredients, (use only 50g of starter vs 100g) rest 1 hr. |
| 7:30pm | 1st set of Stretch & Folds |
| 8:00pm | 2nd set of Stretch & Folds |
| 8:30pm | 3rd set of Stretch & Folds |
| 9:00pm | 4th set of Stretch & Folds Cover and let your dough sit on the kitchen counter over night to finish bulk fermenting. For this overnight bulk fermentation, this is why we cut our starter amount at least in half when mixing dough, because we don’t want to over ferment due to a lengthy room temp fermentation. |
| Day 2 (Friday Morning) | Shaping, Cold Fermentation |
| 7:00 am | Your dough should be double in size, Pre-shape your dough, let rest 20 min. |
| 7:20am | Final Shape, place in proofing basket, cover and refrigerate. |
| Day 2 (Friday Evening) | Scoring & Baking |
| 5:00pm-6:00pm | Preheat Oven |
| 6:00pm-7:00pm | Score & Bake |
Easy Sourdough Bread Recipe Ingredients
- 350g (1 1/2 cups) water (lukewarm)
- 50g – 100g (1/4 – 1/2 cup) active sourdough starter* (100g of starter is used if you’re mixing your dough, and completing all the steps including bulk rise during the day, 50g of starter is used if you’re mixing your dough in the evening and your bulk rise will be overnight)
- 500g (3 1/2 cups) bread flour (unbleached all-purpose flour can work too!)
- 10g (1 1/2 tsp) salt
Step 1: Mix & Rest – Bulk Fermentation
- Mix. Combine filtered, lukewarm water and starter (*If you are mixing your dough for daytime bulk rise, use 100g of starter. If you are bulk fermenting your dough overnight, use 50g of starter) in a medium bowl, whisk to dissolve. Add flour then sprinkle salt on top, mix until no dry flour remains. You can use a dough whisk or mix by hand. The dough will look shaggy, sticky, and kind of rough—this is all good. Use a dough scraper to clean the sides of the bowl and gather the dough to the middle. The Bulk Fermentation has begun.
- Let the dough rest. Cover the bowl with plastic wrap, wet towel, a lid, or a shower cap and let the dough rest for 1 hour. This helps the flour hydrate and starts gluten development without the need for excessive kneading.

💡 TIP: I highly recommend using a digital kitchen scale for the most consistent results. I also found that using a measuring bowl helped me tremendously in monitoring dough rise size in bulk fermentation, because we are aiming at using tools that make this easy sourdough bread recipe, well… easy.
Step 2: Strengthen the Dough (Stretch & Folds)
- 1st Stretch & Fold. After the dough has rested for 1 hour, perform a set of stretch & folds. Wet your hands slightly, grab a section of the dough with your fingers from the outside, stretch it upward about 4-6 inches, and fold it over itself to the other side of the bowl. Grab another section of the dough and repeat the process going around the bowl until everything comes into a rough ball and the dough starts to resist being stretched and tugged. Cover the bowl and set aside for 30 minutes.
- 2nd Stretch & Fold. After a 30 min rest, the dough has relaxed and is ready to be stretched and folded again. Repeat the process as in the 1st set. Cover and set aside for another 30 minutes.
- 3rd & 4th set. Repeat the process for the 3rd and the 4th set of stretch and folds, 30 minutes apart. By the 4th set, the dough should come together better, look and feel more elastic and smooth and become more resistant to stretching. Cover and set aside.

💡 TIP: Don’t stress if you missed a set of stretch & folds or if they are not perfectly timed 30 minutes apart. Some bakers skip them entirely, but I highly recommend working in a few sets to work the gluten which will result in a better rise during baking and an airier crumb (interior).
Step 3: Rest and Rise
After all the stretch and folds, the dough sits in room temperature until the desired rise is achieved.
Signs to look for that your dough is proofed:
The timing of how long this will take greatly depends on temperature. (If you used 100g of starter for a daytime bulk rise, this should take from 6.5-9 hours from time of mixing the dough depending on temperature. If you used 50g of starter for an overnight rise, 10-13 hours from the time the dough was mixed) If you used a measuring bowl and marked your dough level when it was first mixed, you will be able to gauge where your dough has to bulk up to at the desired percentage of rise. For example: If the temperature is roughly 71F I allow my dough to double in size, or achieve 100% rise. When I mixed my dough, it was level at 800ml on my measuring bowl, double that would be 1600ml, that’s when I know my dough is ready to be shaped. If you’re aiming for a 75% rise due to much warmer temperature – dough leveled at 800ml in your measuring bowl x 175% =1400ml.

💡 TIP: This is where I highly recommend using a measuring bowl. Once you initially mix your dough, flatten it in your bowl and mark where it is, then you can calculate depending on whether you need the dough to double in size or rise by 75% and watch until the dough rises to that point.
Step 4: Pre-Shape & Final Shape
- Lightly flour your surface and turn the dough out.
- Shape it into a rough ball by going around, gathering the ends and gently folding them into the middle. Flip the dough over with seam side down and let it rest for 20 minutes, uncovered. This helps the gluten relax before final shaping.
- To shape an oval loaf, or a batard, stretch out the dough gently into a rough rectangle. Fold in like a letter by thirds and then roll up.
- Tighten the dough into a round or oval shape by cupping your hands and dragging the dough towards you in circular motion while tucking the dough under with your pinky fingers, you’ll see the surface of the dough getting smooth and taut.
- Place the dough upside down (smooth side down) into a floured proofing basket (or a bowl lined with a towel).

💡 TIP: If you’re struggling with shaping into a fairly taut loaf, place it in a proofing basket (banneton), let it rest 10 min and stitch up the dough instead by taking two pieces of dough from each end and pinching towards the middle.
Step 5: Cold Proof / Cold Ferment
Cover with a shower cap or plastic wrap and refrigerate overnight for 8-16 hours. This step is the most flexible one of all the steps in the sourdough process. You can skip it entirely and bake your loaf as soon as it is shaped or you can cold ferment for up to 2 days. I have actually baked a loaf once that sat in the refrigerator for 5 days because I forgot about it, and it still baked up decent enough. Make sure the refrigerated loaf is not rising in the fridge, the temperature has to be low to stall the rise, 38F or lower. If your dough continually rises significantly when in the refrigerator, you may have to do short cold fermentation or cut off room temp bulk rise at 50% rise.
Cold fermentation develops incredible flavor and firms up the dough for easier scoring.

Step 6: Score and Bake
Score:
During baking, the dough undergoes “oven spring,” a rapid rise due to gas expansion. Scoring directs this expansion, allowing the bread to open at the slashes rather than bursting unpredictably for a controlled expansion.

Dutch Oven Baking:
- Preheat your oven to 500°F (260°C) for 30-60 minutes with the empty Dutch oven and lid inside.
- Once oven is preheated, take your dough out of the refrigerator. Remove the plastic cover and dust lightly with flour, flip the dough onto a piece of parchment paper (large enough to grab by the ends with the dough on it and lower inside the hot dutch oven pot), score the top using a bread lame razor , you can do one slit about 1/4″ deep slightly off center or add some wheat stalk design as well. Take the dutch oven out of the oven, open the lid, lift the parchment with the dough on it and carefully lower it into the Dutch oven.
- Place the dutch oven with the lid on into the oven, lower the heat to 450°F (232°C) and bake for 20 minutes, remove the lid and bake an additional 15-20 minutes.
Open Baking:
- Preheat your oven to 500°F (260°C) for 30-60 minutes with a baking steel or pizza stone inside on the middle rack AND an empty metal or cast iron pan on a lower rack.
- Once oven is preheated, take your dough out of the refrigerator. Remove the plastic cover and dust lightly with flour, flip the dough onto a small piece of parchment paper, score the top using a bread lame razor, you can do one slit about 1/4″ deep slightly off center or add some wheat stalk design as well. Using a pizza peel, slide the loaf inside the oven on the steel/stone, then pour about 2 cups of boiling water or ice cubes into the metal pan below (to create steam) and shut the oven.
- Lower the temperature and bake at 450°F (232°C) for 35-40 minutes.
Note on Preheating for an hour: You can skip preheating the oven and bake from a cold start, I personally prefer baking in a preheated oven, but you can get great results this way as well. Here’s how: place your loaf into a cold dutch oven, cover it and place in a cold oven. Turn the oven temperature on to 425°F (220°C) and bake for 55 minutes covered (no opening the lid and peeking during the 55 minutes). Once time is up, take the loaf out and remove from the dutch oven, if the loaf is pale, place it on a rack in the oven and let bake another 5-10 minutes to get a nice dark golden crust.
Step 7: Cool, Slice, & Enjoy
Remove from the oven and let the bread cool for at least 1 hour before slicing.
I broke this rule many times, trust me.. resting time allows the crumb to set and prevents a gummy texture.
Use a serrated knife to slice your bread, slather some butter on it and you’re this close to heaven.
Sourdough Success Tips
- Use an active starter: Your starter should be bubbly and at peak activity before mixing the dough.
- Watch the dough, not the clock: Bulk fermentation times vary based on temperature—aim for the right dough consistency.
- Cold proof for better results: The overnight chill enhances flavor and makes shaping easier.
- Don’t rush the cooling: Cutting too soon leads to a sticky crumb—let it rest!
Health Benefits of Sourdough
Sourdough bread isn’t just a treat for your taste buds; it also offers several health advantages, thanks to its unique fermentation process.
Enhanced Digestibility: The natural fermentation involved in making sourdough breaks down proteins, including gluten, and certain carbohydrates and sugars. This breakdown can make sourdough easier to digest for individuals with mild gluten sensitivities or those who experience digestive discomfort with regular bread.
Lower Glycemic Index: Sourdough bread typically has a lower glycemic index compared to other breads. The organic acids produced during fermentation alter the structure of carbohydrates, leading to a more gradual release of sugars into the bloodstream. This can help in maintaining stable blood sugar levels, benefiting those managing diabetes or aiming for sustained energy. Health
Improved Nutrient Absorption: The lactic acid bacteria present in sourdough fermentation help degrade phytic acid, an anti-nutrient that binds to minerals like iron, zinc, and magnesium. By reducing phytic acid levels, sourdough enhances the bioavailability of these essential minerals, making them more accessible for absorption by the body.
Potential Prebiotic Effects: While the baking process eliminates live probiotics, sourdough bread may still offer prebiotic benefits. The fermentation process produces compounds that can nourish beneficial gut bacteria, supporting overall digestive health.
Frequently Asked Questions
1. Can I use all-purpose flour instead of bread flour?
Yes! While bread flour gives a slightly chewier texture, all-purpose flour works too—just avoid bleached flour.
2. What if my dough is too sticky?
Lightly wet your hands when handling it, and avoid adding too much extra flour. Stickiness is normal and reduces as gluten develops during all the stretch and folds.
3. How do I know if my sourdough is fully baked?
Tap the bottom—it should sound hollow. You can also use a probe thermometer: a fully baked loaf should reach a minimum of 198°F (92°C) inside.
Time Breakdown
- Mixing & Rest: 1 hour
- Stretch & Folds: 2 hours (with breaks)
- Rest & Rise: 3-13 hours (depending on temperature and amount of starter used in recipe)
- Shaping: 20-30 minutes
- Cold Proof: 8-24 hours
- Baking: 40 minutes
- Cooling: at least 1 hour
💡 Total time: 12-24 hours (but most of it is hands-off!)
Final Thoughts
Sourdough baking is a process, not just a recipe. Every loaf teaches you something new—so enjoy the process! It helps to keep a notepad and take notes with each loaf, adjusting as needed with each loaf. Best advice I can give you is stick to one “recipe” like this easy sourdough bread recipe, until you have the desired loaf before changing things up. Once you get comfortable, you can experiment with different flours, hydration levels, and scoring designs.
Easy Sourdough Bread Recipe that is Foolproof
Ingredients
Method
- Mix. Combine filtered, lukewarm water and starter (*If you are mixing your dough for daytime bulk rise, use 100g of starter. If you are bulk fermenting your dough overnight, use 50g of starter) in a medium bowl, whisk to dissolve. Add flour then sprinkle salt on top, mix until no dry flour remains. You can use a dough whisk or mix by hand. The dough will look shaggy, sticky, and kind of rough—this is all good. Use a dough scraper to clean the sides of the bowl and gather the dough to the middle. The Bulk Fermentation has begun.
- Let the dough rest. Cover the bowl with plastic wrap, wet towel, a lid, or a shower cap and let the dough rest for 1 hour. This helps the flour hydrate and starts gluten development without the need for excessive kneading.
- 1st Stretch & Fold. After the dough has rested for 1 hour, perform a set of stretch & folds. Wet your hands slightly, grab a section of the dough with your fingers from the outside, stretch it upward about 4-6 inches, and fold it over itself to the other side of the bowl. Grab another section of the dough and repeat the process going around the bowl until everything comes into a rough ball and the dough starts to resist being stretched and tugged. Cover the bowl and set aside for 30 minutes.
- 2nd Stretch & Fold. After a 30 min rest, the dough has relaxed and is ready to be stretched and folded again. Repeat the process as in the 1st set. Cover and set aside for another 30 minutes.
- 3rd & 4th set. Repeat the process for the 3rd and the 4th set of stretch and folds, 30 minutes apart. By the 4th set, the dough should come together better, look and feel more elastic and smooth and become more resistant to stretching. Cover and set aside.
- After all the stretch and folds, the dough sits in room temperature until the desired rise is achieved. (Double in size or 100% rise if temperatures are below 73F, 75% rise if temperatures are between 73F-78F, 50% rise if temperatures are above 78F)**
- The timing of how long this will take greatly depend on temperature. (If you used 100g of starter for a daytime bulk rise, this should take from 6.5-9 hours from time of mixing the dough depending on temperature. If you used 50g of starter for an overnight rise, 10-13 hours from the time the dough was mixed)
- Lightly flour your surface and turn the dough out.
- Shape it into a rough ball by going around, gathering the ends and gently folding them into the middle. Flip the dough over with seam side down and let it rest for 20 minutes, uncovered. This helps the gluten relax before final shaping.
- To shape an oval loaf, or a batard, stretch out the dough gently into a rough rectangle. Fold in like a letter by thirds and then roll up.
- Tighten the dough into a round or oval shape by cupping your hands and dragging the dough towards you in circular motion while tucking the dough under with your pinky fingers, you’ll see the surface of the dough getting smooth and taut.
- Place the dough upside down (smooth side down) into a floured proofing basket (or a bowl lined with a towel).
- Cover with a shower cap or plastic wrap and refrigerate overnight for 8-16 hours.
- Cold fermentation develops incredible flavor and firms up the dough for easier scoring.
- Using a bread lame (razor), make a 1/4″ slash or an expansion score. If you want to add a wheat stalk design or anything other than an expansion score, go for it.
- Preheat your oven to 500°F (260°C) for 30-60 minutes with the empty Dutch oven and lid inside.
- Once oven is preheated, take your dough out of the refrigerator. Remove the plastic cover and dust lightly with flour, flip the dough onto a piece of parchment paper (large enough to grab by the ends with the dough on it and lower inside the hot dutch oven pot), score the top using a bread lame razor , you can do one slit about 1/4″ deep slightly off center or add some wheat stalk design as well. Take the dutch oven out of the oven, open the lid, lift the parchment with the dough on it and carefully lower it into the Dutch oven.
- Place the dutch oven with the lid on into the oven, lower the heat to 450°F (232°C) and bake for 20 minutes, remove the lid and bake an additional 15-20 minutes.
- Preheat your oven to 500°F (260°C) for 30-60 minutes with a baking steel or pizza stone inside on the middle rack AND an empty metal or cast iron pan on a lower rack.
- Once oven is preheated, take your dough out of the refrigerator. Remove the plastic cover and dust lightly with flour, flip the dough onto a small piece of parchment paper, score the top using a bread lame razor, you can do one slit about 1/4″ deep slightly off center or add some wheat stalk design as well. Using a pizza peel, slide the loaf inside the oven on the steel/stone, then pour about 2 cups of boiling water or ice cubes into the metal pan below (to create steam) and shut the oven.
- Lower the temperature and bake at 450°F (232°C) for 35-40 minutes***
- Remove from the oven and let the bread cool for at least 1 hour before slicing.
Video
Notes
*(100g of starter is used if you’re mixing your dough, and completing all the steps including bulk rise during the day, 50g of starter is used if you’re mixing your dough in the evening and your bulk rise will be overnight) **Signs to look for that your dough is properly proofed or bulk fermentation is complete: Smooth, glossy surface, Slightly domed, Some bubbles, big or small, Jiggly, When touched, not too sticky. ***Ovens vary in temperature and humidity levels when baking, your baking temperature and time may vary from what is on this recipe, keep an eye on your loaf, if it is browning too quickly, cover with foil. Test the inside of the loaf when baked with a probe thermometer to make sure it is fully baked. 198F temp means it’s baked through.
If you made this Easy Sourdough Bread Recipe and loved it, please leave a review!
12 responses to “Easy Sourdough Bread Recipe that is foolproof”
-

So far this recipe has given me the most reliable and beautiful loaves! I love all the tips and thorough explanation on the temps/ timing of bulk fermenting as that’s what I seem to have the most trouble with! Can’t wait until you load your whole grain and other recipes on your site! -
Great recipe, instructions and outcome for me! I watched the video about 15 times to make sure I was following. I thought my dough may have been a bit wet or sticky, but it came out perfectly!
Thank you!-
Amazing, happy to hear the end result was satisfactory!
-
-
Thank you for this recipe. I have been struggling to make a great loaf of sourdough, even when I have a wonderful starter. This recipe was easy to follow, esp. with the video.
My first loaf following this recipe was perfection!-
This makes me happy! Thank you for your feedback.
-
-
WOMEN u are the CATS MEOW!!!! i have been trying recipes and methods for a few years now and this one worked right from the get-go! Beautiful tasty loaf
THANK YOU so much for bringing so much happiness into my home…well and into my friends homes too b/c i am showing off my new talent and giving away loaves LOL 😉-
Your comment made my day! Keep baking and sharing 🙂
-
-
As a newbie, I’ve been struggling getting a decent loaf out of my efforts. My daughter – an excellent baker – sent me her Sourdough starter and once it bloomed, I wanted to bake a loaf. I wanted something easy and straightforward.
Well, I found it – success on the first attempt. It’s out of the oven cooling. Tapping the bottom it sounds hollow – not dense like all my other efforts. The crust is crunchy and I can’t wait to cut it down the middle to check out the crumb.
Thank you for guiding me to my first success – even an 80 year-old codger can learn to bake!
-
So happy to hear, thank you for your feedback. Enjoy your loaf!
-
-
Great recipe! Have a question; If I’m using 50g of starter in the evening to make bread overnight, do I still need to do the 4th stretching process?
-
Hi there, you can skip the 4th stretch and fold.
-
It is best to do all the stretch & fold sets, but if you skip one – it’s not going to ruin your bread by any means.
-
If you made this easy sourdough bread recipe and loved it, don’t forget to leave a review! It helps others find and enjoy the recipes too, and I love hearing your feedback. ❤️
Now go forth and bake your best sourdough yet! 🍞✨
Leave a Reply
You must be logged in to post a comment.