Jalapeño Cheddar Sourdough Bread: (The best way to make it)
My grown kids do not ask me for much these days. They ask for advice sometimes, they ask if I’ve seen a particular show, and about once a week, one of them texts me some version of “any chance you’re making the jalapeño cheddar loaf soon?” This was one of the first inclusion loaves I ever made — back when I was still nervous about adding anything to my dough beyond flour, water, salt, and starter — and it has never once left regular rotation since. I’ve baked this loaf well over a hundred times at this point, through every cheese combination and jalapeño variation you can imagine, and it’s become one of my most-gifted loaves — the kind of bread that gets a text back the next day asking when I’m making it again. There’s something about the way the sharp cheddar goes molten and crisps at the crust, and the way the jalapeño mellows just enough in the oven to leave warmth instead of a punch, that makes this jalapeño cheddar sourdough bread disappear fast in my house.
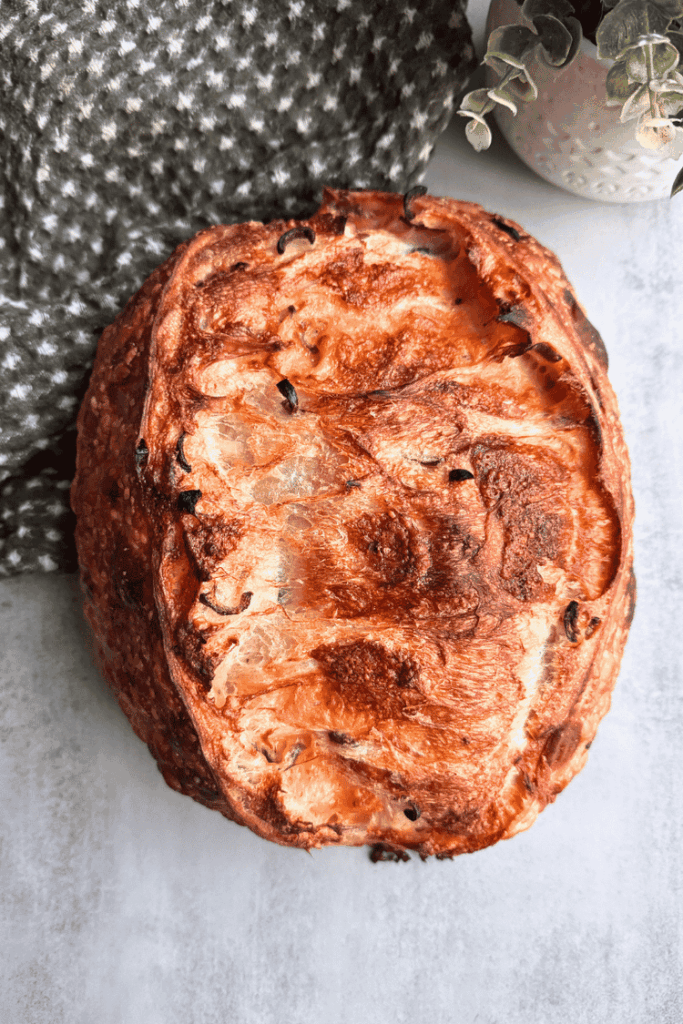
What Is This Recipe?
This is a naturally leavened sourdough loaf built on Elena’s foolproof base dough, studded throughout with cubes of sharp cheddar and slices of jalapeño. Unlike a lot of the jalapeño cheddar sourdough bread recipes floating around, this one keeps the cheese in small cubes rather than shredding it — which means you get real pockets of melted cheese scattered through the crumb instead of cheese blended evenly (and somewhat blandly) into every bite. The jalapeño brings a gentle, building heat rather than a sharp bite up front, especially if you get rid of the seeds, but by all means leave them in if you like the extra heat.
It’s a bold, savory riff on classic sourdough — crackly crust, open crumb, tangy base — but it eats more like something you’d order at a good sandwich shop than a plain artisan loaf. It’s equally at home sliced thick next to a bowl of chili, toasted under a fried egg, or set out on a board next to a cold beer on a Saturday afternoon.
I’ve made this loaf more times than I can count, and I’ve tested nearly every variation along the way — cubed cheese, shredded cheese, a combination of both, sharp cheddar on its own, and swaps with gouda and gruyère, even smoked cheese. Every version works. This recipe gives you my go-to combination along with the adjustments I’d make depending on what you have on hand.
Why You’ll Love It
- Real cheese pockets, not cheese dust. Cubing the cheddar instead of shredding it means gooey, melty bites instead of it disappearing into the dough.
- Adjustable heat. Leave the seeds in for real spice, or remove them for warmth without the burn — your loaf, your call.
- Beginner-friendly inclusion loaf. If you’ve made one plain sourdough loaf successfully, you’re ready for this one.
- A built-in variation. Turn it into a full jalapeño popper loaf with bacon and cream cheese (recipe notes below) for game day. Or get smoked cheddar instead for that smoky flavor depth.
- Freezes beautifully. Bake once, enjoy for weeks.
- The gut-health benefits of a long, slow ferment, plus all the flavor payoff that comes with it.
- Genuinely crowd-pleasing. This is the loaf that converts “I don’t really like sourdough” people.
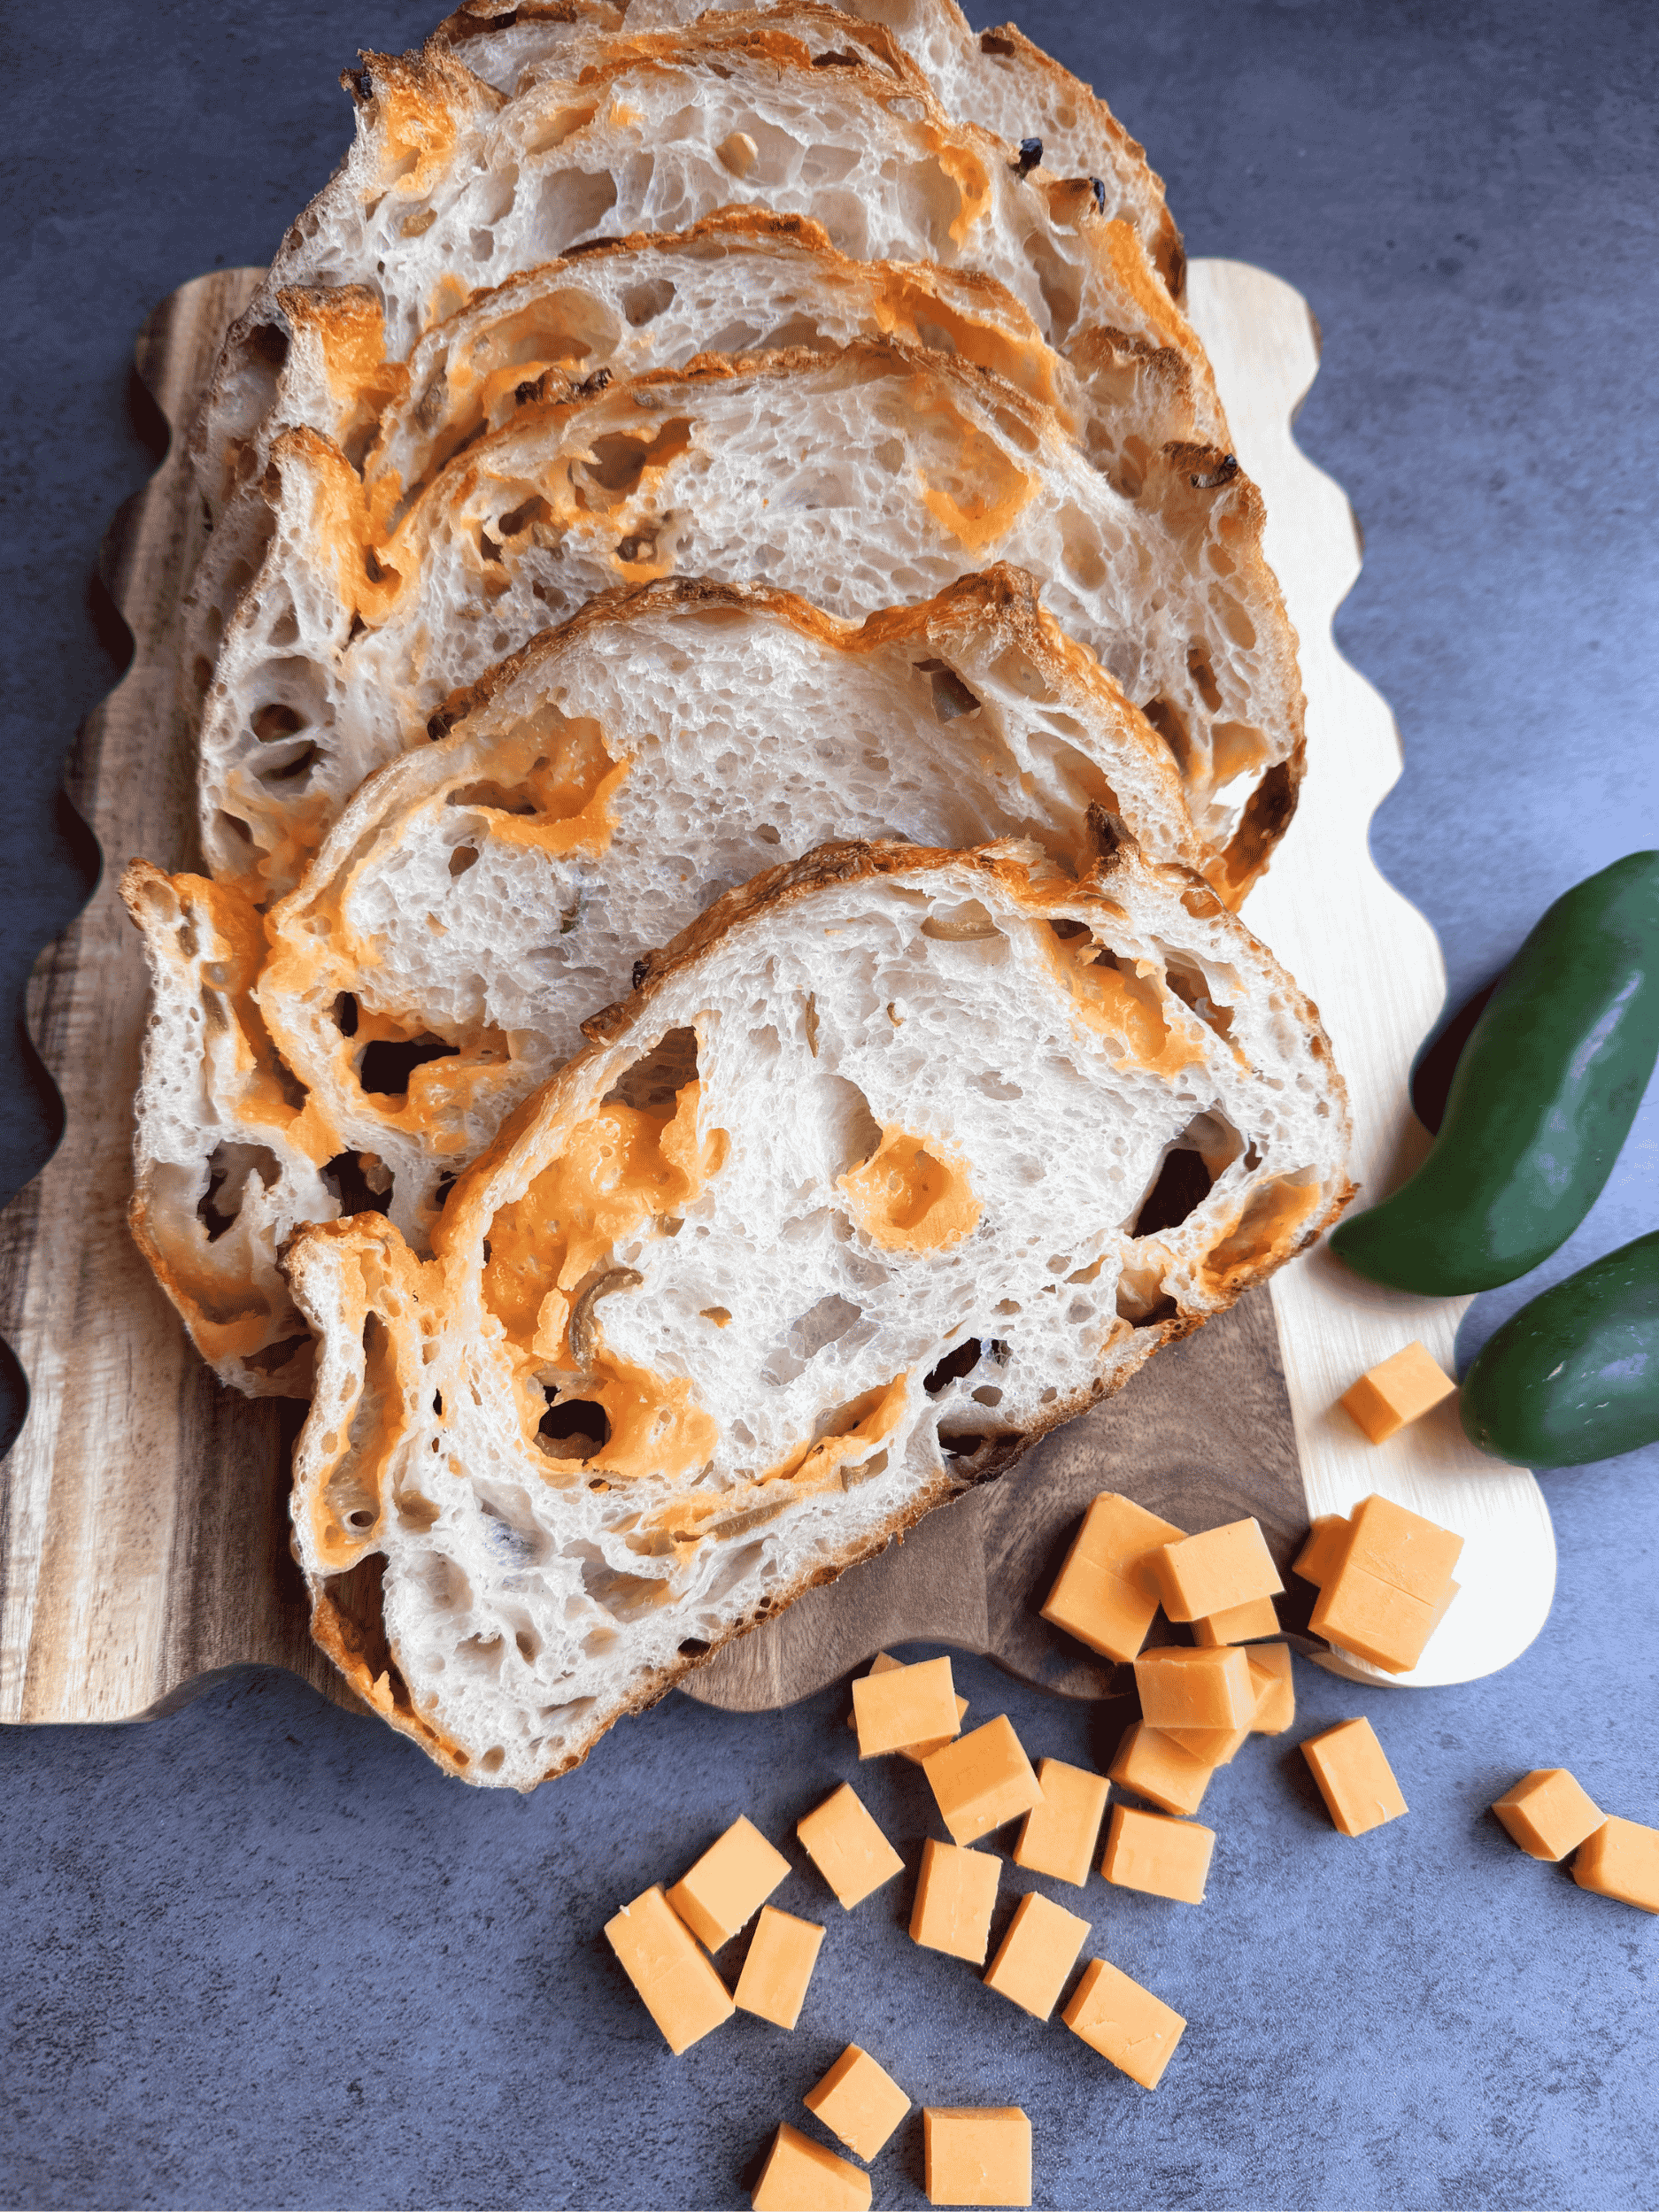
Ingredient Breakdown
- 350g (about 1½ cups) water — Hydrates the flour and activates gluten development. Room temperature is fine for most kitchens; if your house runs cold, lean slightly warm. This recipe is also forgiving if you want to play with hydration — adjust the water up or down by 25g–50g depending on your climate’s humidity or the crumb texture you’re after. More water gives you a more open, airy crumb; less gives you a tighter, easier-to-slice loaf.
- 125g (about ½ cup) active starter, fed and at peak — This is what leavens the loaf. It needs to be genuinely active, not just fed. Your starter is ready when the dome has leveled off and you see gentle dimpling on the surface — little craters forming, a sign it has plenty of strength left to lift this dough.
- 500g (about 4 cups) bread flour — Bread flour’s higher protein content gives you the structure to support all those cheese and jalapeño inclusions without the loaf collapsing on itself.
- 10g (about 1¾ tsp) fine sea salt — Controls fermentation speed and, just as important, makes the flavor of this loaf pop instead of tasting flat.
- 125g (about 1 cup) sharp cheddar, cubed or shredded — I prefer cubing mine into small pieces rather than shredding, so you get distinct pockets of melted cheese instead of cheese that blends invisibly into the crumb. When you’re cutting your cubes, go small — smaller than the pre-cubed cheese you’ll find in the grocery store deli case. Those store-bought cubes are sized for snacking trays, not for folding evenly into dough, and they’re too large for this recipe. Regular sharp cheddar is fantastic here, but smoked sharp cheddar takes this loaf to another level. If you can’t find smoked cheddar, mix any smoked cheese with regular sharp cheddar, or sprinkle a couple of teaspoons of smoked paprika over your cheese before folding it in — it adds a subtle smokiness that mimics the real thing. Over a hundred bakes of this loaf, I’ve also had great results swapping in gouda, gruyère, or a combination of two or three cheeses along with the cheddar — this is a very forgiving recipe for experimenting with what’s in your fridge.
- 2 medium fresh jalapeños, quartered and sliced — Fresh is my strong preference here; the flavor is brighter and the texture holds up better through baking. Remove the seeds and ribs for a milder loaf, or leave them in if you want real heat. If you only have pickled jalapeños on hand (canned pickled jalapeños work well), they’ll work too — just drain them and pat them dry thoroughly on paper towels first, since the extra brine can throw off your hydration and leave your dough slack.
Step-by-Step Directions
Step 1: Feed Your Starter – Night before
Feed your starter and let it come to peak — that leveled-off dome with gentle dimpling I mentioned above. It is always my recommendation to feed your starter the night before a higher ratio that will take all night to peak and is ready to go int he morning. You want to mix your dough in the morning so that you have the whole day to watch that dough percentage rise, especially when temperatures are cooler.
In my kitchen where it is 70F overnight, I feed my starter a 1:3:3 ratio night before. I take 25g refrigerated starter, add 75g warm water, and 75g flour. Mix and let sit overnight. Next day you’ll have 175g of peaked starter. Use 125g for the loaf and there’s still 50g left over to put back in the fridge.
Step 2: Mix the Dough – Next morning
In a glass measuring bowl, combine your water and active (at peak) starter and stir until the starter is mostly dissolved. Add your bread flour and salt, and mix by hand until no dry flour remains and you have a shaggy, cohesive dough. Cover and let it rest for 1 hour. Bulk Fermentation has started.
While the dough is resting, cube your cheese and slice your jalapenos and set them aside.
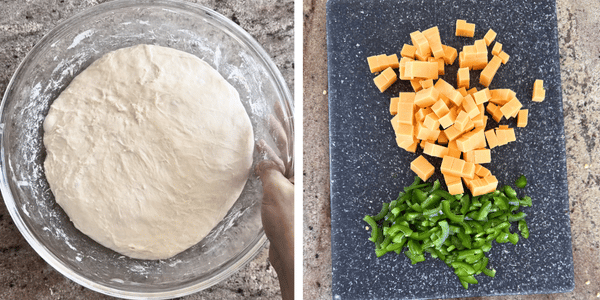
Step 3: Stretch and Fold, Round One
After 1 hour of dough resting, do your first set of stretch and folds — grab one side of the dough, stretch it up and over to the opposite side, rotate the bowl, and repeat on all four sides. This builds strength before we introduce inclusions. Cover and let rest 30 minutes.
Step 4: Add Your Inclusions, Stretch and Fold Round Two
It’s time to add your cheese and jalapeños.
Option 1: Scatter about a third of your cheese and jalapeños over the dough, stretch & fold, rotate, add another third, stretch & fold fold, rotate, and finish with the last third. Perform a couple more stretch and folds, cover and let rest 40 minutes this time. (Because we added cold ingredients to the dough, cold dough takes longer to relax, so we will give it a longer rest time before performing the next round of stretch and folds).
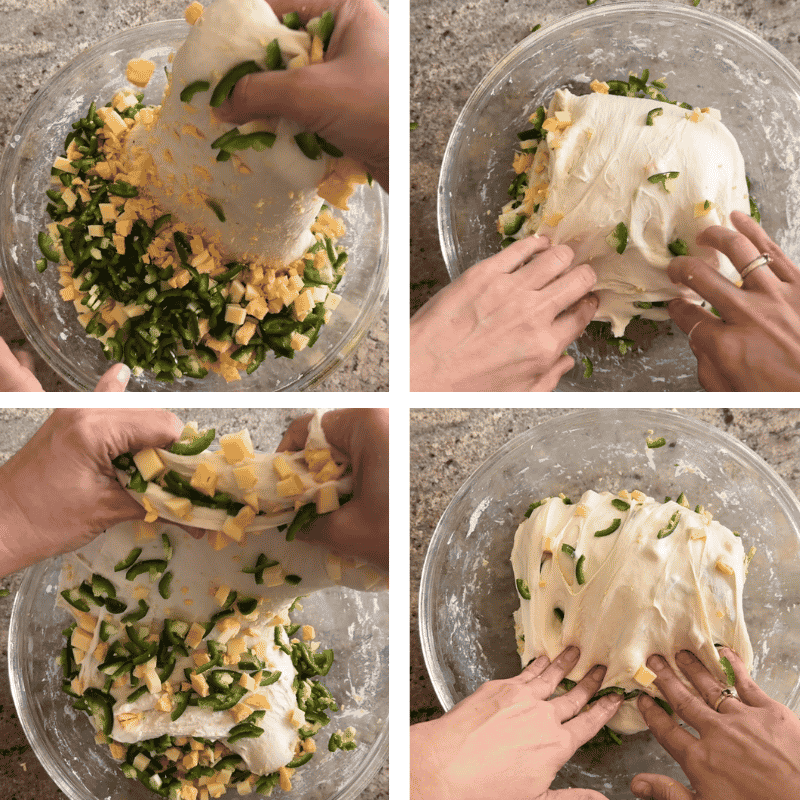
Option 2: Laminate the inclusions: very lightly spray the counter with water, scrape your dough out of the bowl onto the counter. Spray some water on your hands and gently stretch the dough out as thin as it will go without tearing. Sprinkle the cheese and jalapenos all over the top, fold the dough like a letter first and then again from top to bottom until you have a square. Round it into a circle with your hands and place back in the bowl. Flatten it in the bowl and make note of the level where the dough sits in your measuring bowl. Cover, let rest 40-45 minutes.
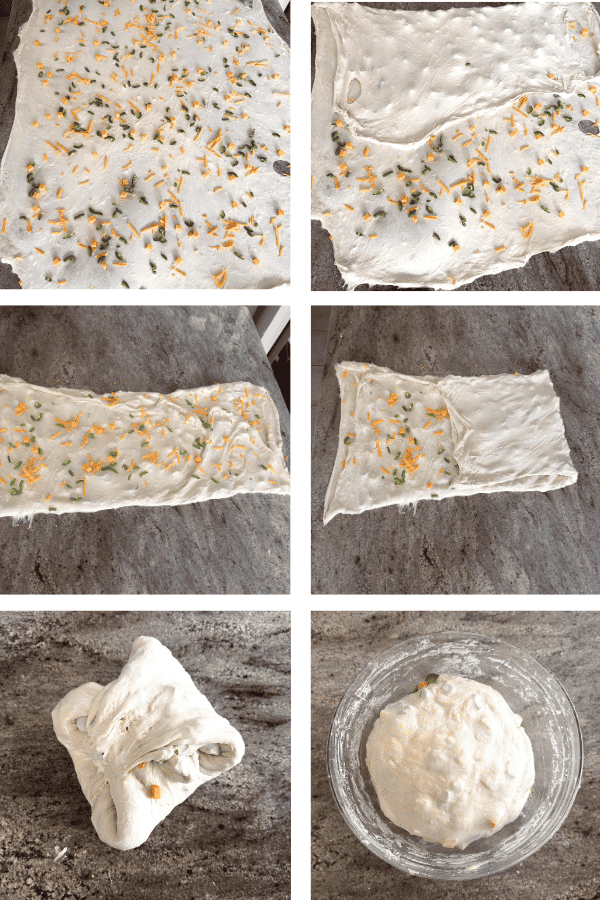
💡 Pro Tip: Lamination serves multiple purposes, not only does it help with even distribution of inclusions, but it also strengthens the dough and works the gluten in a way that would take 2 sets of stretch and folds to achieve. It truly helps to achieve that open crumb.
⚠️ Keep in mind: Your cheese and jalapeños are coming straight from the fridge, and adding that much cold mass into your dough will noticeably drop its overall temperature. This means your bulk fermentation is going to take longer than it would for a plain dough — sometimes significantly longer. Don’t fight it, and don’t rush it. Give your dough the time it needs to reach that 80%-125% rise regardless of how long the clock says it’s been.
Step 5: Round 3 and 4 of Stretch and Folds & Bulk Rise
Do two more sets of stretch and folds at 40-minute intervals, then let it rest, covered and rise until it’s ready. This is the moment to lean on percentage rise rather than the clock. Watch for the dough to increase in volume by your desired percentage. Depending on your dough temperature, this may be anywhere from 75% rise all the way to 125% rise. If you are operating in very warm environment and with dough temps above 75F, you may want to aim at 75-80% rise, if the temperatures are cold, way below 70F, you can push that bulk rise to 100% or slightly higher. You’re looking for a dough that’s noticeably puffy, jiggles slightly when you nudge the container, and shows some bubbles at the surface and sides.
Step 6: Shape the Loaf
Turn your dough out onto a lightly floured surface. Shape it into a tight round or oval boule using your bench scraper to build surface tension — you want a smooth, taut skin on top with the seam on the bottom. Place it seam-side up in a well-floured banneton or a bowl lined with a floured kitchen towel. Rest 15 minutes. Tighten the shape by pinching the seam together a little tighter.
Step 7: Cold Proof
Cover and refrigerate your shaped loaf for 8–24 hours. This slow, cold fermentation is where a lot of the flavor complexity develops, and it also firms the dough up, which makes scoring much easier.
Step 8: Preheat and Score
About 1 hour before you’re ready to bake, preheat your oven to 500°F with your baking vessel inside. A Dutch oven works beautifully here, but it is absolutely not a requirement — a baking steel or baking stone with a separate pan of water or ice cubes underneath for steam produces a gorgeous open bake with just as much oven spring and a crackly crust. Use whichever method you already have on hand.
Turn your cold dough out onto a large sheet of parchment paper and score the top with a sharp blade or lame — a single decisive slash gives the loaf room to expand.
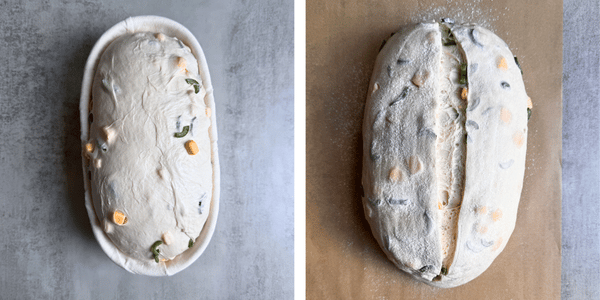
💡 Pro Tip: The large sheet of parchment paper will keep any melted cheese and grease within the paper instead of oozing out onto your dutch oven or your baking sheet – saving you scrubbing time later.
Step 9: Bake
Once the loaf goes in the oven, lower the temperature to 450F. If baking in a Dutch oven: bake covered for 20 minutes, then remove the lid and bake for another 20–25 minutes until deeply golden. If open baking on a steel or stone: bake with steam for the first 20 minutes, then remove the steam pan and continue baking for another 20–25 minutes.
⚠️ Watch Out: Check the internal temperature with a probe thermometer as adding inclusions often times requires a longer bake. You’re looking for 198F-205F.
Step 10: Cool Completely
Let the loaf cool on a wire rack for at least an hour before slicing. I know, I know — the cheese smell makes this nearly impossible. But cutting in too early lets steam escape before the crumb has finished setting, and you’ll end up with a gummier slice than you want.
Variation: Jalapeño Popper Loaf
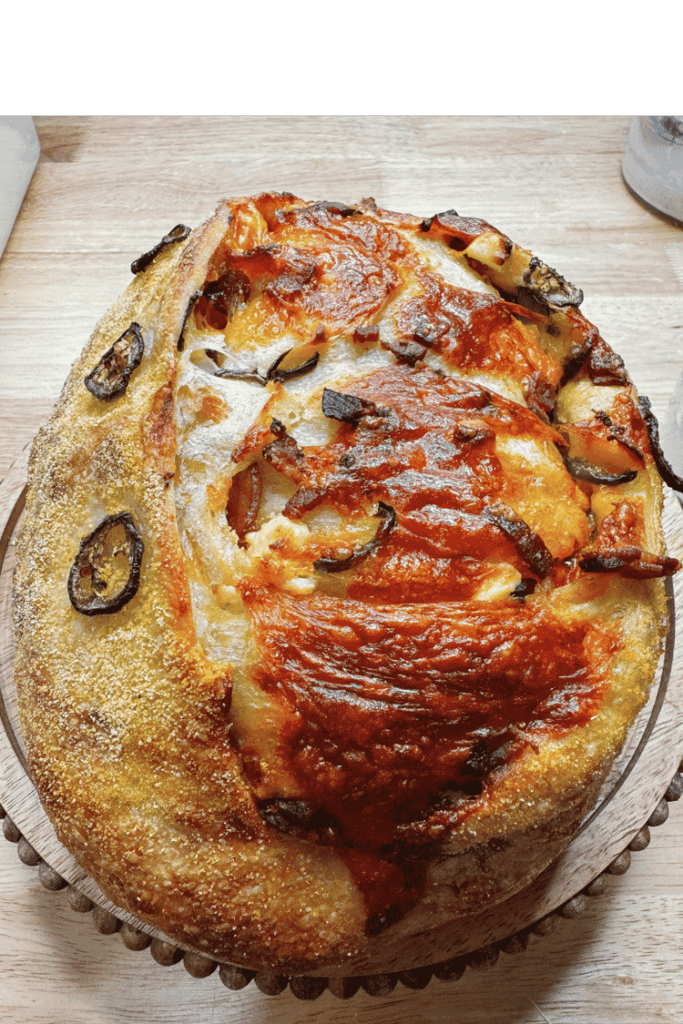
Want to take this in a full jalapeño-popper direction for game day? Along with your cheddar and jalapeños, fold in cooked bacon bits and small dollops of softened cream cheese during the inclusion stage. The cream cheese will melt into little tangy pockets throughout the bake, and the bacon adds a smoky, salty edge that makes this loaf feel like a full appetizer spread baked into one bread. Sprinkle a little cornmeal into your banneton before placing the shaped dough in — it adds a nice crunchy exterior texture that plays perfectly against the popper flavors.
How to Store & Freeze
Room Temperature: The day of the bake, store cut in half, open crumb down on a cutting board. For the next day, store in a plastic bag or beeswax bread bag with a small air hole for 2–3 days. Avoid airtight storage — it traps moisture and softens your crust.
Refrigerator: I don’t recommend refrigerating this loaf once baked. The starch in sourdough recrystallizes faster in the fridge than at room temperature or in the freezer, so you’ll end up with bread that goes stale faster, not slower.
Freezer: Slice the loaf before freezing so you can pull out only what you need. Wrap tightly in plastic wrap, then place in a freezer bag or airtight container, and freeze for up to 3 months. To thaw, let slices come to room temperature or pop them straight into the toaster from frozen.
Troubleshooting
Problem: My loaf came out dense and gummy. Why it happened: This usually points to underproofed dough — pulled out of bulk fermentation before it built enough strength, or a bake that finished before the crumb fully set. How to fix it: Next time, push bulk rise more before shaping, and bake a little longer.
Problem: The cheese leaked out and burned on the bottom of my Dutch oven or baking sheet. Why it happened: Cheese will melt and seep out during the bake. How to fix it: Use a large enough parchment paper sheet to keep everything in when baking.
Problem: My bulk fermentation is taking way longer than my last plain sourdough loaf. Why it happened: The cold cheese and jalapeños straight from the fridge lower your dough’s overall temperature significantly, which slows fermentation compared to a dough with no cold inclusions. How to fix it: This isn’t a problem to fix so much as something to expect — keep watching for that 75–80% rise rather than a specific time, and give the dough the extra time it needs.
Problem: My loaf didn’t rise much in the oven. Why it happened: All those cheese and jalapeño inclusions add real weight to the dough, so a loaf that was underproofed or under-strengthened during bulk fermentation won’t have the structure to push through that added weight. How to fix it: Build a little extra strength with lamination, or an additional stretch and fold set, and make sure your dough hits that 75–100% rise mark before it goes into the fridge to shape.
Problem: The crust turned out pale instead of deeply golden. Why it happened: Not enough steam in the early bake, or an oven that wasn’t fully preheated before the dough went in. Underproofed. How to fix it: Give your baking vessel a full 45 minutes to preheat, and if open baking, make sure your steam source (a pan of water or ice cubes) is generating real steam for those first 20 minutes. Push bulk rise a little more.
FAQ
Can I use pickled jalapeños instead of fresh? Yes. Pat them dry thoroughly with paper towels first — the brine they carry can loosen your dough more than you’d expect.
Do I need a Dutch oven to make this bread? No. A baking steel or stone with a separate pan for steam works wonderfully and gives you an equally crackly, well-risen loaf.
How spicy is jalapeño cheddar sourdough bread? That’s entirely up to you. Remove the seeds and ribs from your jalapeños for a mild, warming flavor, or leave them in for real heat.
Can I shred the cheese instead of cubing it? You can, but you’ll lose those distinct melted cheese pockets that make cubed cheddar so satisfying in this loaf. Shredded cheese distributes more evenly but tends to blend into the crumb rather than standing out.
What’s the best cheese to use in this recipe? Block of cheese that you cube or shred yourself. Sharp cheddar is the base, and smoked sharp cheddar (or regular sharp cheddar mixed with any smoked cheese, or a couple teaspoons of smoked paprika sprinkled over the cheese) brings a wonderful smokiness that pairs beautifully with the jalapeño. Beyond that, I’ve tested gouda, gruyère, and other smoked cheeses in place of or alongside the cheddar over dozens of bakes, and every combination has worked well — use whatever melty cheese you have on hand.
Can I add my starter straight from the fridge instead of feeding it same-day? Absolutely – as long as it has been fed and at peak no longer then 3 days ago. Feed your starter, let it reach peak, and it can sit in the fridge for up to three days before you use it directly in this recipe.
Sourdough Tools You’ll Want
- Digital kitchen scale — Essential for accurate flour, water, and inclusion measurements.
- Glass measuring bowl – Best way to gauge dough percentage rise during bulk fermentation
- Banneton (proofing basket) — Helps the shaped loaf hold its structure through the cold proof.
- Bench scraper — Makes shaping a strong, taut boule far more manageable.
- Bread lame or sharp blade — For a clean, confident score that lets the loaf expand properly.
- Baking steel – or – Dutch oven — Whichever method you want to use
- Instant-read or probe thermometer – A must to check internal temp when ready as well as dough temp while bulk rising to determine percentage rise.
Jalapeño Cheddar Sourdough Bread: (The best way to make it)
Ingredients
Method
- Step 1: Night before – Feed Starter
- Feed your starter and let it come to peak. It is always my recommendation to feed your starter the night before a higher ratio that will take all night to peak and is ready to go int he morning. In my kitchen where it is 70F overnight, I feed my starter a 1:3:3 ratio night before. I take 25g refrigerated starter, add 75g warm water, and 75g flour. Mix and let sit overnight. Next day you’ll have 175g of peaked starter. Use 125g for the loaf and there’s still 50g left over to put back in the fridge.
- In a glass measuring bowl, combine your water and active (at peak) starter and stir until the starter is mostly dissolved. Add your bread flour and salt, and mix by hand until no dry flour remains and you have a shaggy, cohesive dough. Cover and let it rest for 1 hour. Bulk Fermentation has started.While the dough is resting, cube your cheese and slice your jalapenos and set them aside.
- After 1 hour of dough resting, do your first set of stretch and folds — grab one side of the dough, stretch it up and over to the opposite side, rotate the bowl, and repeat on all four sides. Cover and let rest 30 minutes.
- Option 1: Scatter about a third of your cheese and jalapeños over the dough, stretch & fold, rotate, add another third, stretch & fold fold, rotate, and finish with the last third. Perform a couple more stretch and folds, cover and let rest 40 minutes this time. (Because we added cold ingredients to the dough, cold dough takes longer to relax, so we will give it a longer rest time before performing the next round of stretch and folds).
- Option 2: Laminate the inclusions: very lightly spray the counter with water, scrape your dough out of the bowl onto the counter. Spray some water on your hands and gently stretch the dough out as thin as it will go without tearing. Sprinkle the cheese and jalapenos all over the top, fold the dough like a letter first and then again from top to bottom until you have a square. Round it into a circle with your hands and place back in the bowl. Cover, let rest 40-45 minutes.
- First, flatten the dough in the measuring bowl and make note of the level where the dough sits (for example 1000ml), this will help you determine where the dough needs be based on the dough percentage rise you are aiming for. If I am going for double in size, I'll wait until the dough rises to 2000ml before shaping.
- Do two more sets of stretch and folds at 40-minute intervals, then let it rest, covered and rise to your desired bulk percentage rise. Depending on your dough temperature, this may be anywhere from 75% rise all the way to 125% rise. If your dough temp is above 75F, you may want to aim at 75-80% rise, if the dough temp is way below 70F, you can push that bulk rise to 100% or up to 125%.
- Turn your dough out onto a lightly floured surface. Shape it into a tight round or oval boule. Place it seam-side up in a well-floured banneton or a bowl lined with a floured kitchen towel. Rest 15 minutes. Tighten the shape by pinching the seam together a little tighter if it came apart.
- Cover and refrigerate your shaped loaf for 8–24 hours. This slow, cold fermentation is where a lot of the flavor complexity develops, and it also firms the dough up, which makes scoring much easier.
- About 1 hour before you’re ready to bake, preheat your oven to 500°F with your baking vessel inside. A Dutch oven works beautifully here, but it is absolutely not a requirement — a baking steel or baking stone with a separate pan of water or ice cubes underneath for steam.Turn your cold dough out onto a large sheet of parchment paper and score the top with a sharp blade or lame.
- Once the loaf goes in the oven, lower the temperature to 450F. If baking in a Dutch oven: bake covered for 20 minutes, then remove the lid and bake for another 20–25 minutes until deeply golden. If open baking on a steel or stone: bake with steam for the first 20 minutes, then remove the steam pan and continue baking for another 20–25 minutes.
- Cool for an hour or so before slicing.
