Blueberry Lemon Sourdough Loaf: The Fresh-Fruit Method That Actually Works
The first loaf with inclusions I ever baked was this one. I remember scrolling through Facebook and stumbling on a photo from a micro-baker selling blueberry lemon sourdough loaves — those little violet bursts peeking through a golden crumb, flecked with lemon zest. I didn’t even think twice. I had to make one. That’s the thing about this blueberry lemon sourdough loaf — it has a way of grabbing you before you’ve even tasted it.
I made my first version with fresh blueberries, the zest of two lemons, and about a quarter cup of sugar folded in during lamination. It was delicious. But it wasn’t perfect, and it took me a few bakes to figure out why. Every so often, that sugar would meet the moisture in the dough and turn into syrup — seeping out during the cold ferment, and again in the oven, leaving sticky purple trails on my banneton liner and my parchment. It didn’t happen every single time, which made it even more maddening. Just often enough that I knew something needed to change.
So I changed it. I pulled the sugar completely, upped my lemon zest from two lemons to three, and adjusted exactly when and how I folded the blueberries into the dough. What came out of the oven was, hands down, a better loaf — cleaner bake, more even fruit distribution, and a lemon flavor that actually holds its own against the blueberries instead of hiding behind sugar. This is that recipe.
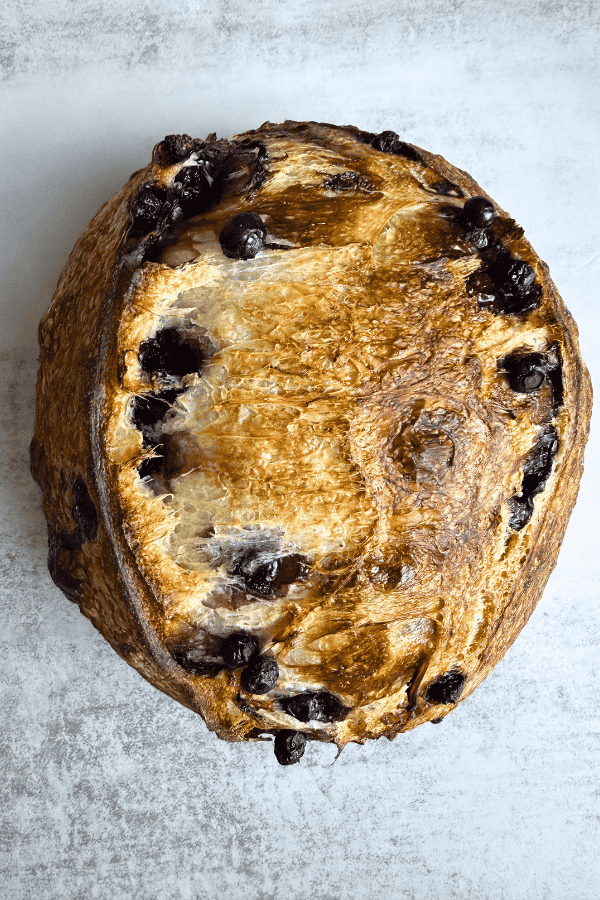
What Is a Blueberry Lemon Sourdough Loaf?
A blueberry lemon sourdough loaf is a naturally leavened artisan bread built on the same fermentation process as a classic sourdough loaf, with fresh blueberries and lemon zest folded into the dough during bulk fermentation. The wild yeast and bacteria in your starter do all the leavening work — no commercial yeast, no shortcuts — while the blueberries burst gently throughout the crumb and the lemon zest perfumes every bite.
What makes this version different from a lot of what you’ll find online is what’s not in it. Many recipes call for sugar rubbed into the lemon zest, or lemon juice added directly to the dough, to boost sweetness and citrus flavor. I tried both. The sugar caused the syrup-seepage problem I mentioned above, and the lemon juice altered my hydration and gave me a denser, gummier crumb — not the open, airy texture I was after. This loaf skips both of those and instead leans on fresh fruit and a generous amount of zest to do the flavor work honestly. The result is a loaf that tastes bright and fruity without feeling engineered.
This is also a smaller loaf than my classic recipe — I scaled it down because inclusion loaves tend to be a “some people in the house love them, some don’t” situation. If you’re the only fruit-and-zest fan under your roof like I am, this size means you’re not stuck eating (or freezing) an entire large loaf by yourself.
Why You’ll Love This Blueberry Lemon Sourdough Loaf
- No syrupy mess. Removing the sugar means no sticky seepage during cold ferment or baking — your banneton, parchment, and Dutch oven stay clean.
- Real lemon flavor. Triple lemon zest means the citrus actually comes through in every slice, rather than getting lost.
- Even fruit distribution. Adding blueberries during the second stretch and fold (rather than laminating after bulk rise) spreads them through the dough far more evenly.
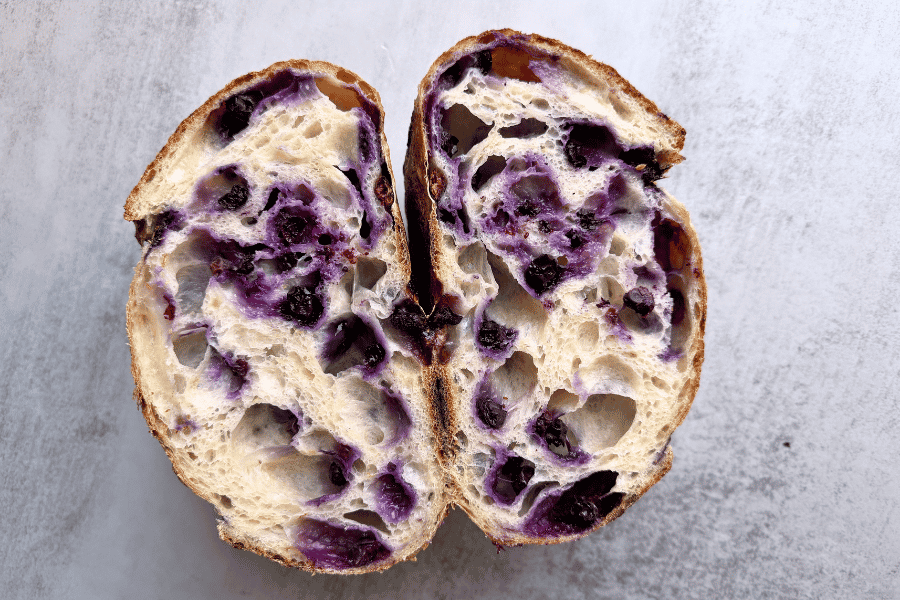
- Beautiful color and crumb. Those violet blueberry bursts against a golden interior make this one of the prettiest loaves you’ll pull out of your oven.
- Naturally fermented, gut-friendly. Like all sourdough, this loaf benefits from the digestive perks of long fermentation — no shortcuts, just time and a healthy starter.
- A true seasonal showstopper. This loaf is summer in bread form — bright, fruity, and the kind of thing people ask about the second they see it.
Ingredient Breakdown
Water — 300g (1¼ cups + 1 tablespoon), lukewarm Water is what activates your flour’s gluten network and keeps the dough hydrated enough to trap all that gas your starter is producing. This loaf actually runs at a slightly higher hydration than my classic sourdough loaf, and that’s intentional — the extra water gives the dough more give, so it stretches around the blueberries during folding instead of resisting and crushing them. That added flexibility is also part of why this loaf bakes up with such an open, airy crumb.
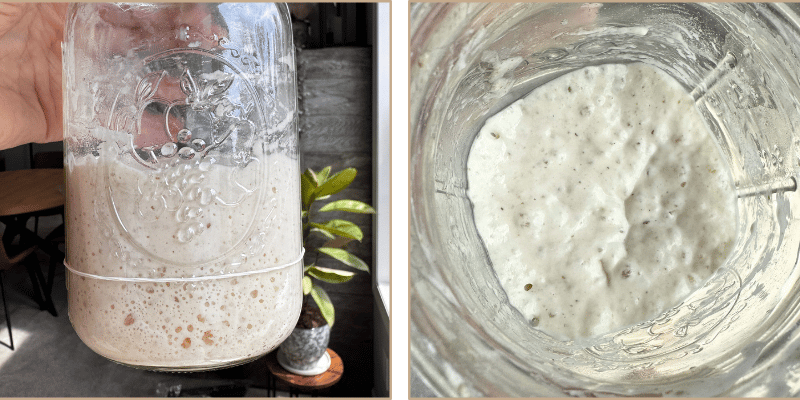
Active sourdough starter — 100g (about 1/2 cup), at peak This needs to be bubbly, more than doubled, and the dome on top leveled off, starting to dimple as if ready to recede. And remember: your starter doesn’t have to be fed the same morning you bake. Feed it, let it peak, then pop it in the fridge for up to three days and pull it straight out when you’re ready to mix. Life doesn’t always cooperate with a same-day bake, and your starter shouldn’t have to either.
Bread flour — 400g (about 3¼ cups) Bread flour’s higher protein content builds the stronger gluten structure this loaf needs to support the weight of the blueberries without collapsing. If you only have all-purpose on hand, it will work in a pinch, but expect a slightly less open crumb.
Salt — 8g (about 1½ teaspoons) Salt does more than season the loaf — it strengthens gluten structure and slows fermentation just enough to keep things from running away from you. Don’t skip it, and don’t eyeball it; weigh it if you can.
Fresh blueberries — approximately 1 cup (about 150g) Fresh is non-negotiable here, and I say that as someone who tried every alternative. Frozen blueberries — even patted dry after thawing on paper towels — release too much moisture into the dough and lead to a wet, hard-to-shape loaf with color bleeding everywhere. I also experimented with dehydrated blueberries hoping for a shortcut, but the flavor just isn’t the same — it reads more like a raisin than a blueberry. Fresh, whole, unwashed-until-right-before-use blueberries give you the best texture, the truest flavor, and the most control over how much they burst during folding.
Pro Tip: Handle your blueberries gently. The goal is folding them into the dough, not squeezing them. A burst berry here and there is fine and even pretty in the crumb, but a heavy hand will streak your whole dough purple before it even hits the banneton.
Lemon zest — from 3 medium lemons This is where the flavor really lives. I started at two lemons in my earliest version and kept increasing until I landed on three, which gives the loaf enough brightness to stand up to the blueberries rather than being an afterthought. Zest only the outer yellow layer — avoid the white pith underneath, which is bitter. No sugar rubbing needed here; the zest alone, folded straight into the dough, is plenty aromatic on its own.
⚠️ Watch Out: Skip the lemon juice, and skip the lemonade some recipes call for. I tested both, and while they sound appealing on paper, they add extra liquid that throws off your hydration and can leave you with a denser, slightly gummy crumb. Zest gives you all the lemon oil and fragrance without the moisture problem.
Step-by-Step Directions
Step 1: Prep Your Starter
Feed your starter and let it reach peak activity — bubbly, more then doubled in size, with the dome on top leveled off and showing signs of dimples as if ready to start receding. The timing of this will depend on your kitchen’s temperature and the ratio you fed your starter. If your schedule doesn’t line up with a same-day bake, feed your starter, let it peak, then transfer it to the fridge for up to three days and use it straight from there when you’re ready to mix. It doesn’t need to be fed again right before baking.
Step 2: Mix the Dough
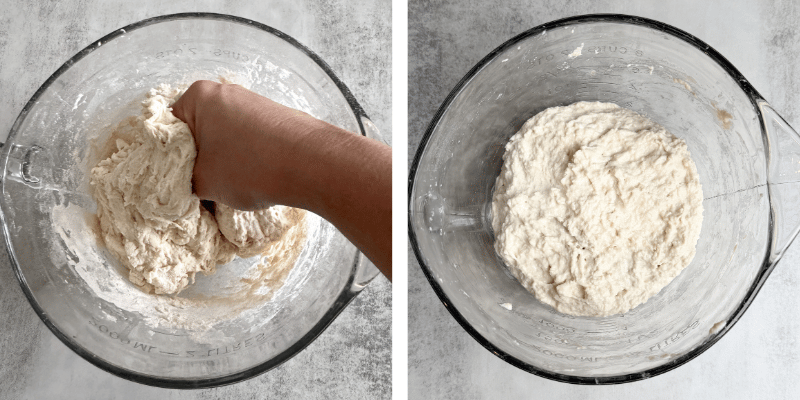
In a large bowl, combine the water and starter, whisking until the starter is mostly dissolved. Add the bread flour and salt, and mix everything together well — I like to actually knead this dough for about 2 minutes right in the bowl, rather than just stirring until combined. You want a shaggy but cohesive dough with no dry patches of flour left. Cover and let it rest for 1 hour.
💡 Pro Tip: This short knead at the start gives the gluten a head start, which matters more in an inclusion loaf — you’re going to be asking this dough to hold onto blueberries and stay structured, so a little extra development early on pays off later.
Step 3: First Stretch & Fold
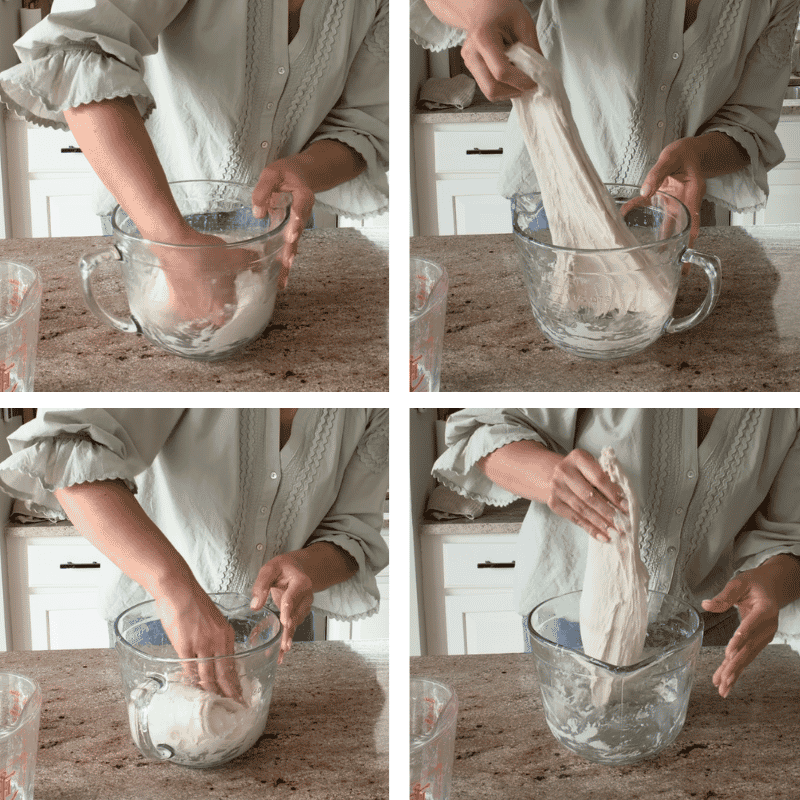
After the dough has rested for an hour, perform your first set of stretch and folds. Wet your hands slightly, grab the dough from underneath, stretch it upward, and fold it over itself. Rotate the bowl and repeat around all sides until the dough resists a bit and starts to come together. Cover and let rest for 30 minutes.
Step 4: Second Stretch & Fold — Add the Blueberries and Zest
This is the step that makes this loaf what it is. There are two good ways to get the blueberries and zest into the dough, and both happen during this same window — the second set of stretch and folds.
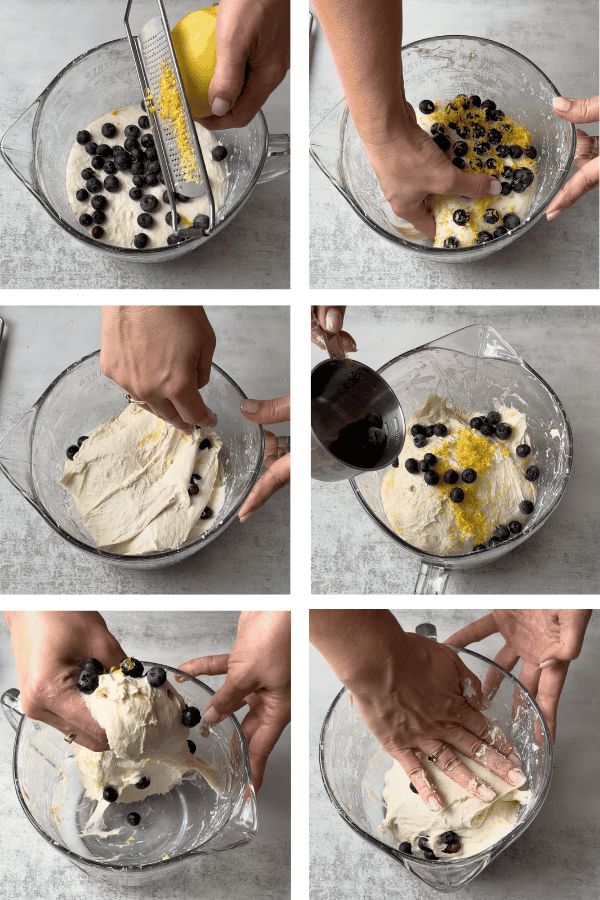
Method 1 — Fold them in. Sprinkle in the blueberries gradually with each stretch and fold, along with the zest from all three lemons, folding gently as you go. You’re distributing fruit, not deflating structure or smashing berries.
Method 2 — Laminate them in. Spray the counter lightly with water. Gently stretch the dough out into a thin, even sheet, scatter the blueberries and lemon zest evenly across the surface. Fold the dough in half, sprinkle more blueberries and lemon zest and fold again, repeat and roll up the dough. Place back in the bowl.
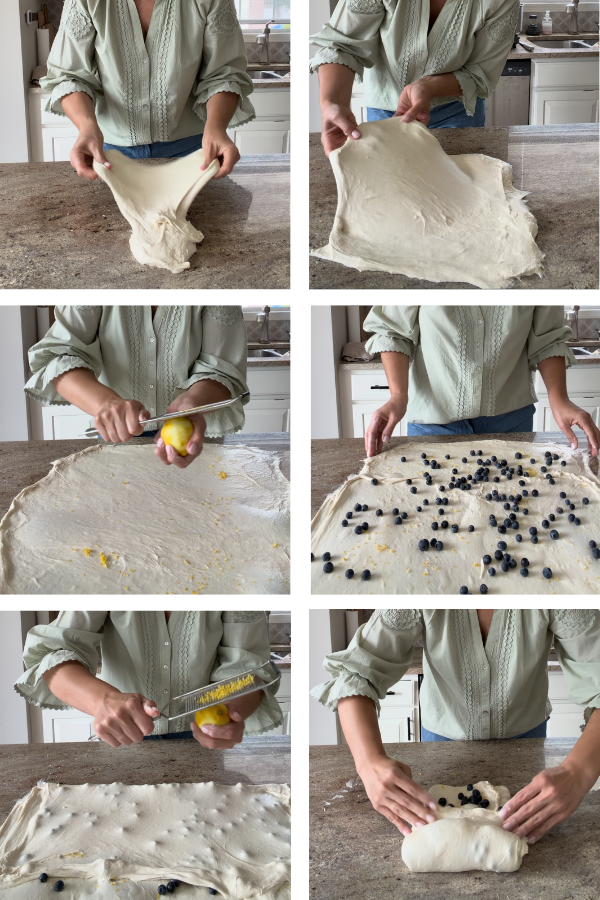
I’ve tested both, right in this same second stretch and fold timeframe, and they each give a nice, even distribution of fruit throughout the loaf. What I don’t recommend is waiting until after bulk rise to laminate your inclusions in — by that point the dough has already built most of its strength and structure, and I found it much harder to get the blueberries evenly distributed without deflating the dough.
💡 Pro Tip: Wet your hand and gently pat the top of the dough level after this fold. If you’re using a measuring bowl (highly recommend for bulk percentage rise ease), note exactly where your dough level sits right now — this is your baseline for tracking rise by percentage rather than guessing by the clock.
Step 5: Two Coil Folds
Perform two coil folds, spaced 45 minutes apart. To coil fold, wet your hands, lift the center of the dough straight up, letting the ends fold gently underneath themselves as gravity pulls them down, then rotate the bowl and repeat. This is a gentler technique than a traditional stretch and fold and is especially good for inclusion doughs, since it strengthens the dough without disturbing all those blueberries you just folded in.
Step 6: Bulk Rise — Watch the Dough, Not the Clock
This is where the biggest beginner mistake in sourdough baking happens, and I want to save you from it: don’t set a timer and walk away assuming your dough is done at some fixed hour. Watch the dough itself.
Using your measuring bowl and the baseline level you marked after Step 4, track your dough’s rise by percentage, not by a stopwatch. In my kitchen at 73°F, I let this dough double in size — a full 100% rise. If your kitchen runs warmer, above 77°F, dial that back to a 75% rise instead, since warmer temperatures ferment faster and pushing all the way to double can tip you into overproofed territory. For example, if your dough measured 800ml after folding in your inclusions, you’re watching for it to reach 1600ml for a 100% rise, or roughly 1400ml for a 75% rise. With cooler temperatures that are below 71°F, allow the dough to rise past 100%.
⚠️ Watch Out: Temperature swings the timeline more than almost anything else. A dough that takes 6 hours to double at 75°F might take 10+ hours at 68°F. Trust what you see in the bowl over what the clock says.
Step 7: Shape
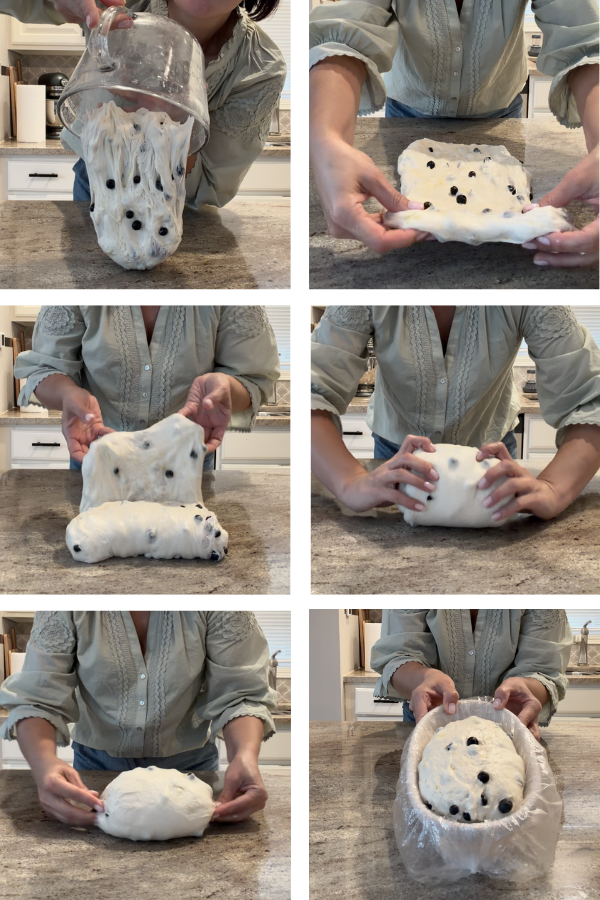
Once your dough has reached the right percentage rise, turn it out onto a lightly floured surface. Gently pre-shape it into a round, let it rest uncovered for 20 minutes, then do your final shape — cupping and dragging the dough toward you to build surface tension, tucking the seam underneath. Place the dough seam-side up into a floured banneton.
💡 Pro Tip: Notice in the below picture I lined my proofing basket/banneton with a plastic shower cap, then floured it and placed the shaped loaf smooth side down into it. The reason for that is so that if any blueberry bleeds, it will not stain my bamboo basket.
Step 8: Cold Ferment
Cover your banneton and refrigerate for 8-24 hours. Cold fermentation deepens the flavor of this loaf beautifully — that tang plays so well against the sweet-tart blueberries and lemon. This step is flexible; anywhere within that window works, so build it around your schedule rather than the other way around.
Step 9: Score and Bake
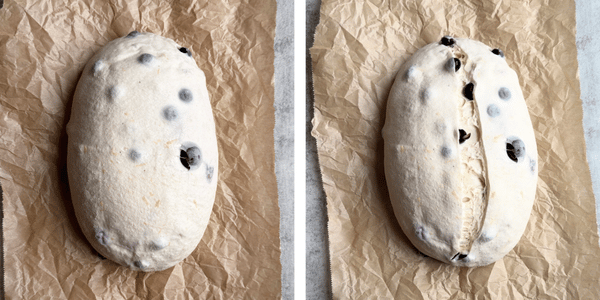
Preheat your oven. Tear off a large piece of parchment paper — larger than you’d normally use — since this loaf can release a bit of blueberry juice as it bakes, and you want that parchment to catch it rather than your Dutch oven. Flip your loaf out of the banneton upside down onto the parchment, score the top, and lower it (parchment and all) into your preheated Dutch oven.
Dutch oven method: Bake covered at 450°F for 20 minutes, then remove the lid and bake an additional 15-20 minutes until deep golden brown. Keep an eye on the top of the loaf as the blueberries can start to burn, in that case, lightly cover the top of loaf with aluminum foil.
Open baking method: If you don’t have a Dutch oven, this loaf bakes beautifully open on a baking steel or stone with a steam pan below — you don’t need specialty equipment to get a great crust here. Bake according to your usual open-baking method and temperature.
Check your loaf’s internal temperature before pulling it — you’re looking for 200°F. Let it cool completely on a wire rack before slicing.
This loaf is genuinely delicious entirely on its own — no need to dress it up. But if you want to lean even further into the lemon flavor with a touch of sweetness, this honey butter is a lovely finishing touch for a slice.
A quick note on sweetness: fresh blueberries vary. Depending on how sweet or tart the berries you find are, your loaf could lean a little more tart than you’d expect. If that happens, don’t be tempted to fix it by adding sugar to the dough next time — that’s the exact trade-off I made this recipe to avoid, and it risks that sticky, syrupy mess seeping through your loaf. Instead, a spread of this honey butter, with an extra drizzle of honey on top, balances that tartness beautifully without ever compromising the integrity of the loaf itself.
Lemon Zest Honey Butter
This loaf is genuinely delicious entirely on its own — no need to dress it up. But if you want to lean even further into the lemon flavor with a touch of sweetness, this honey butter is a lovely finishing touch for a slice.
Ingredients:
- 227g (1 cup / 2 sticks) best-quality full-fat, creamy butter, softened to room temperature
- 60g (3 tablespoons) honey
- Zest of 1 lemon
- Pinch of flaky salt (optional, but recommended)
Method:
- In a medium bowl, beat the softened butter until smooth and creamy.
- Add the honey and lemon zest, and continue mixing until fully combined and fluffy.
- Add a small pinch of flaky salt if using, and give it one more quick mix.
- Transfer to a small serving dish or roll into a log using plastic wrap for slicing later. Store in the refrigerator, and let it soften slightly at room temperature before serving.
How to Store & Freeze
Room temperature: Store your cooled loaf in a paper bag or bread bag at room temperature for up to 2 days. Because of the fresh fruit content, this loaf doesn’t hold quite as long at room temp as a plain sourdough loaf — the added moisture from the blueberries shortens its shelf life slightly.
Refrigerator: I don’t recommend refrigerating this loaf after baking. Cold storage tends to dry out and stale bread faster, and that effect is even more pronounced with a fruit-studded loaf like this one.
Freezer: This loaf freezes beautifully. Slice it first, then place the slices in a freezer-safe bag with parchment between layers if you’d like to pull individual pieces. Freeze for up to 2 months. To thaw, let slices sit at room temperature for about 20-30 minutes, then re-crisp in a toaster or a 350°F oven for 5-8 minutes to bring back that crust.
Troubleshooting
Problem: My blueberries turned to mush and streaked the whole dough purple. Why it happened: The dough was likely handled too roughly during folding, or the blueberries were overripe and delicate to begin with. How to fix it: Handle the dough gently during the second stretch and fold, folding rather than pressing or squeezing. Choose firm, fresh blueberries, and check them for any that are already soft or split before adding them in.
Problem: My loaf leaked purple liquid onto my Dutch oven during baking. Why it happened: A few berries burst during shaping or baking, which is normal to some degree with fresh fruit inclusions. How to fix it: Use the oversized parchment sling method described in Step 9 — it catches seepage before it ever touches your Dutch oven. A little juice release is part of baking with fresh fruit and doesn’t mean anything went wrong.
Problem: My dough felt too wet and hard to shape. Why it happened: This is usually a sign of over-fermentation, too much hydration for your flour’s strength, or a starter that wasn’t quite active enough to build good structure before the dough had time to overproof.
How to avoid this for next time: Keep a close eye on your percentage rise rather than letting the dough go past it, and make sure your starter is truly at peak — before you mix. If your kitchen runs warm, watch your bulk rise even more closely, since dough can overproof faster than expected and get slack and difficult to shape. Meanwhile, you can bake the current loaf in a greased bread pan if it is spreading out and not manageable to shape.
Problem: I can’t taste much lemon flavor in the finished loaf. Why it happened: Under-zesting, or zesting too lightly and only getting the top layer of oils. How to fix it: Use the full zest of three lemons, and zest with a bit of pressure to capture the fragrant oils just under the skin — without going deep enough to hit the bitter white pith.
Problem: My crumb turned out dense instead of open and airy. Why it happened: This is often a sign of underproofing, a weak and acidic starter, or of added liquid (like lemon juice, if you tried a version with it) throwing off hydration. How to fix it: Stick to the percentage rise method rather than a fixed clock time, and skip any lemon juice additions — the zest alone gives you all the citrus flavor without extra liquid weighing down your crumb.
Frequently Asked Questions
Can I use frozen blueberries instead of fresh? I don’t recommend it. Even when thawed and patted dry, frozen blueberries release too much extra moisture into the dough, leading to a wetter, harder-to-shape loaf and more color bleeding than fresh berries produce.
Why did you remove the sugar from this recipe? In earlier versions, sugar folded in alongside the blueberries would sometimes react with moisture in the dough and turn into a syrup that seeped out during cold fermentation and baking. It didn’t happen every time, but often enough that removing it entirely gave me a cleaner, more consistent bake without sacrificing flavor.
Do I need a Dutch oven to bake this loaf? Not at all. While a Dutch oven creates a lovely steamy environment for oven spring, open baking on a baking steel or stone with a steam pan works beautifully for this loaf too. Both are completely valid methods — use whichever equipment you have.
Can I add the blueberries during lamination instead of stretch and fold? Yes, and it works well. In my testing, though, replacing the 2nd stretch & fold with lamination gave the most even distribution throughout the crumb compared to laminating after bulk rise.
How long can I cold ferment this dough before baking? Anywhere from 8 to 24 hours works well and gives you flexibility around your schedule. The cold ferment also deepens the tangy sourdough flavor, which pairs beautifully with the sweet-tart fruit.
Can I prep my starter ahead of time for this recipe? Yes — feed your starter, let it reach peak activity, then store it in the fridge for up to three days and use it straight from there when you’re ready to mix. You don’t need to feed it again right before baking.
Blueberry Lemon Sourdough Loaf: The Fresh-Fruit Method That Actually Works
Ingredients
Method
- Feed your starter and let it reach peak activity — bubbly, doubled or more, with a dome on top that has leveled off and showing dimpling and beginning signs of receding. This timing will depend on kitchen temperature and starter feeding ratio. If your schedule doesn't line up with a same-day bake, feed it, let it peak, then refrigerate for up to 3 days and use it straight from the fridge — no need to feed again right before mixing.
- In a large bowl, whisk 300 grams lukewarm water (1 1/4 cups + 1 tbsp) and 100 grams active sourdough starter, at peak (about 1/2 cup) together until the starter is mostly dissolved. Add 400 grams bread flour (about 3 1/4 cups) and 8 grams salt (about 1 1/2 tsp), and mix well — knead right in the bowl for about 2 minutes until you have a shaggy but cohesive dough with no dry patches of flour. Dough will be sticky, that's normal. This short knead gives the gluten a head start, which matters more in an inclusion loaf. Cover and let rest for 1 hour.
- Wet your hands slightly. Grab the dough from underneath, stretch it upward, and fold it over itself. Rotate the bowl and repeat on all sides until the dough resists a bit. Be careful not to allow the stretches to tear the dough. Cover and rest for 30 min.
- METHOD 1 — FOLD THEM IN: Sprinkle in 150 grams fresh blueberries (about 1 cup) — fresh only, not frozen or dehydrated gradually with each stretch and fold, along with the zest of 3 medium lemons, zested, folding gently. You’re distributing fruit, not deflating structure or smashing berries.
- METHOD 2 — LAMINATE THEM IN: Gently stretch the dough out into a thin, even sheet, scatter the blueberries and lemon zest evenly across the surface, then roll or fold the dough back up to encase them.
- Both methods, done at this stage, give even fruit distribution. Avoid waiting until after bulk rise to laminate inclusions in — the dough has already built most of its structure by then, making it much harder to distribute fruit evenly.
- After adding the fruit, wet your hand and pat the dough level on top in your bowl to level it. Note where the dough sits in your measuring bowl (e.g. 900ml) — this is your baseline for tracking percentage rise later. Rest the dough 45 min.
- Wet your hands and perform a gentle coil fold: tuck your hands under the dough in the center, lift the dough straight up, letting the ends fold gently underneath as gravity pulls them down. Rotate the bowl and repeat. This gentler technique strengthens the dough without disturbing the blueberries. Rest 45 minutes.
- Repeat the coil fold a second time. Cover and set aside.
- Track the dough's rise by percentage against your baseline mark — not by the clock. In a 73°F kitchen, I let the dough double in size (100% rise): if it measured 900ml after adding inclusions, I watch for 1800ml. Above 77°F, aim for a 75% rise instead (900ml x 175% = 1575ml) to avoid over or underproofing. Warmer kitchens and humidity contribute to noticeably faster bulk rise, so check the dough itself, not just elapsed time.
- Turn the dough out onto a lightly floured surface. Gently pre-shape into a round or oval and let it rest uncovered 15 min.
- Do your final shape — cup and drag the dough toward you to build surface tension, then tuck the seam underneath. Place seam-side up into a floured banneton.
- Cover and refrigerate the shaped dough. This deepens the loaf's flavor and lets the sourdough tang play beautifully against the sweet-tart fruit. Anywhere within this window works, so build it around your own schedule.Note: The temperature in the refrigerator must be at 38F or lower in order to stop the dough from rising. If you notice a significant rise (more than a half inch) several hours in, bake it earlier then later.
- Preheat your oven with your Dutch oven inside, if using. Tear off a large piece of parchment — larger than usual, since this loaf can release blueberry juice as it bakes and you want the parchment to catch it, not your Dutch oven.
- Flip the loaf out of the banneton upside down onto the parchment and score the top.
- DUTCH OVEN: Lower the loaf (parchment and all) into the preheated Dutch oven. Bake covered at 450°F for 20 minutes, then remove the lid and bake 15-20 minutes more until deep golden brown. Note: To avoid the bottom of the loaf burning, after the 20 min bake with lid on, remove the loaf from dutch oven and place a round trivet in the dutch, or a couple of cups of rice, or a rolled up coil of aluminum paper. Place the loaf back in and bake uncovered the remainder of the time.Another option is to place a cookie sheet on a rack below the dutch oven during the entire bake to block some heat.
- OPEN BAKING: No Dutch oven needed — this loaf bakes beautifully open on a baking steel or stone with a steam pan below. Bake according to your usual open-baking method and temperature.
- Either way, check internal temperature before removing from the oven — you’re looking for 200°F.
- Let the loaf cool completely on a wire rack before slicing — this allows the crumb to finish setting.
