The Best Italian Herb and Garlic Parmesan Sourdough Bread
The Loaf That Stops People in Their Tracks
There are baking smells, and then there is the smell of this loaf coming out of the oven.
I started making this Italian herb, garlic, and parmesan sourdough because I wanted a bread that could hold its own at the table without anything on it. No butter needed, no olive oil on the side — just a slice of something so savory and fragrant that people reach for a second piece before the first one is gone. And that’s exactly what this became.
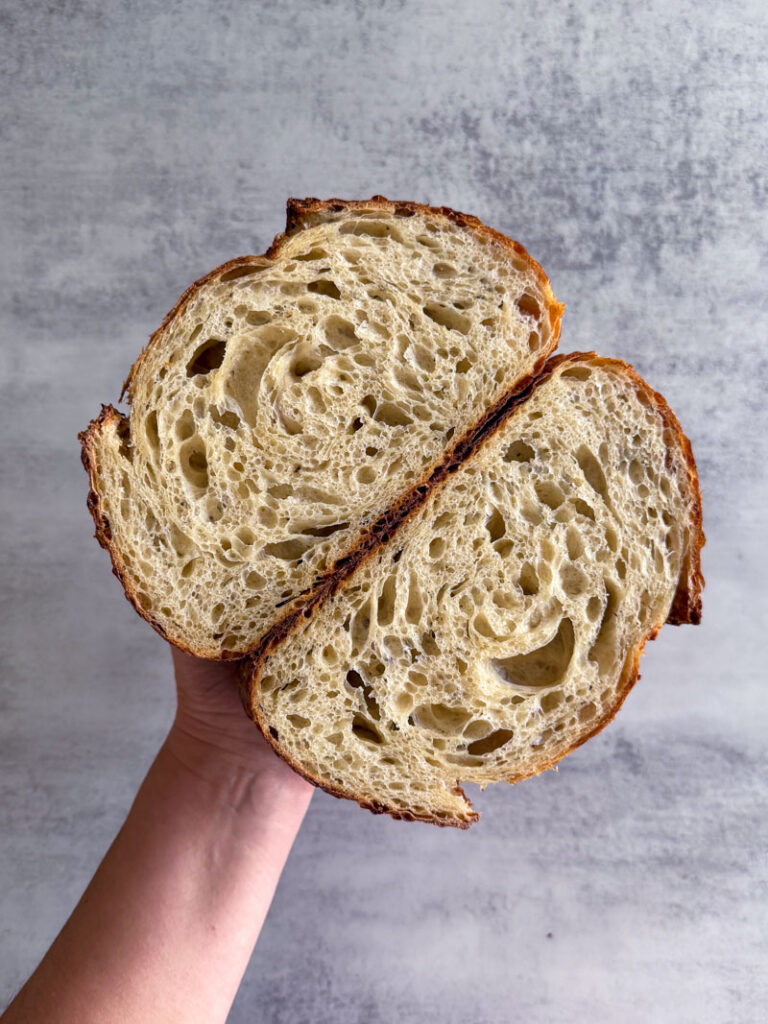
This Italian herb and garlic parmesan sourdough bread is one of those recipes I come back to again and again — for dinners at home, for gifting to neighbors, and, honestly, most often for my sourdough classes. Every time I pull this loaf out to share with students, someone asks for the recipe before we’ve even gotten to the shaping demo. The combination of Italian seasoning, dehydrated minced garlic, and freshly grated parmesan folded right into the dough creates a loaf that is deeply savory, fragrant, and complex in all the best ways. The crust gets flecked with toasted cheese. The crumb smells like garlic bread in the most elevated, artisan way possible. And if it ever lasts long enough to go a little stale — which it rarely does — it makes the most extraordinary croutons and Italian breadcrumbs you’ve ever tasted.
This one is a regular at our house and now it gets to be a regular at yours.
What Makes This Italian Herb and Garlic Parmesan Sourdough Bread So Special?”
At its core, this is the same trusted base dough from my foundational sourdough recipe — the one hundreds of you have already baked successfully, Easy Sourdough Bread Recipe that is foolproof. What transforms it into something extraordinary is the lamination step, where we fold in three flavor-packed inclusions: Italian seasoning, dehydrated minced garlic, and freshly grated parmesan.
Each of these ingredients earns its place for a specific reason, and the way they interact with the long fermentation process is part of the magic. The herbs bloom during the cold proof, deepening and mellowing into the dough. The garlic — dehydrated rather than fresh, and I’ll explain exactly why — rehydrates gently and disperses its flavor through every inch of the crumb rather than sitting in clumps. The parmesan melts into golden, slightly crispy pockets during baking and forms a gorgeous, salty crust wherever it touches the surface of the loaf.
The result is an italian herb and garlic parmesan sourdough that tastes bakery-level but is entirely achievable in your home kitchen, even if this is your first time adding inclusions to a sourdough dough.
Why You’ll Love This Recipe
- Extraordinary aroma. The moment this loaf goes into the oven, your kitchen smells like the best Italian restaurant you’ve ever been to. It is, genuinely, one of the best baking smells in existence.
- A step up from plain sourdough — without extra complexity. If you’ve already baked a basic sourdough loaf, this is the natural and approachable next step. Same dough, same process, same techniques — just with inclusions added at lamination.
- Big flavor in every single slice. Unlike some flavored breads where the additions are uneven, lamination ensures the herbs, garlic, and parmesan are distributed beautifully throughout the entire loaf.
- The crouton angle. If this loaf stales before you finish it — and it probably won’t — it becomes the foundation for the most incredible homemade croutons and Italian breadcrumbs you’ve ever made. This is a loaf with a second life.
- Flexible with what you have. No Italian seasoning in the pantry? A simple trio of oregano, basil, and thyme delivers the same warmth. No minced garlic? Garlic powder works in a pinch.
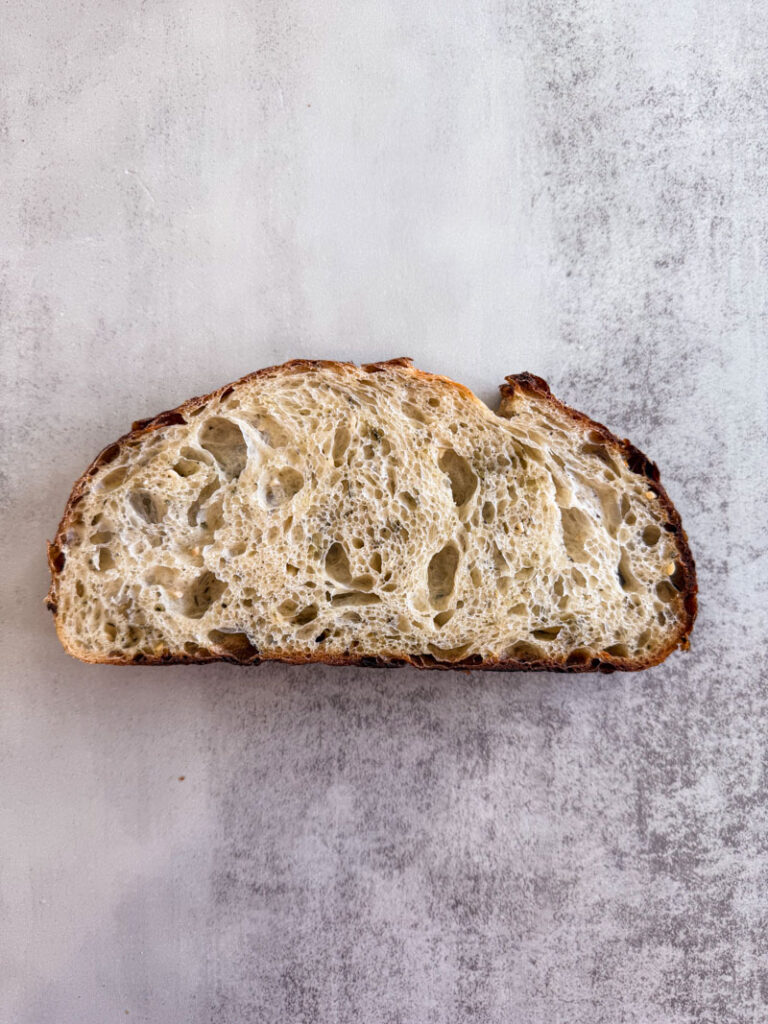
- Stunning to look at. Toasted parmesan on the crust, a warm golden color, and a crumb shot that makes people stop scrolling. This is a beautiful loaf.
- A crowd favorite. It goes with everything — soups, pasta, charcuterie boards, or just eaten warm from the oven with too much butter and absolutely no regrets.
Ingredients
For the Dough:
- 350g (1½ cups) lukewarm water
- 125g (½ cup + 1 tbsp) active sourdough starter, bubbly and at peak
- 500g (3½ cups) bread flour (unbleached all-purpose flour works in a pinch, but bread flour gives you that satisfying chew)
- 10g (1½ tsp) fine sea salt
For the Inclusions:
- 1 Tbsp Italian seasoning
- 1 Tbsp dehydrated minced garlic
- ½ cup (about 50g), packed freshly grated parmesan cheese
Ingredient Breakdown
The Dough Base
This is the same dough you’ll find in my foundational sourdough recipe — Easy Sourdough Bread Recipe that is foolproof — and that’s intentional. Once you have a reliable base dough, learning to add inclusions is a natural and achievable next step rather than a whole new recipe to navigate from scratch. The flour, water, salt, and starter ratios are proven. What changes here is everything we fold in during lamination.
Italian Seasoning (1 Tbsp)
Italian seasoning is a blend of dried herbs — typically oregano, basil, thyme, rosemary, and sometimes marjoram — that captures the warm, herbaceous backbone of Italian cooking in a single jar. One tablespoon is enough to perfume the entire loaf without making it taste herby in an aggressive way. The herbs mellow during fermentation and baking, becoming something gentle and deeply aromatic rather than sharp and dried-tasting.
Substitution: If you don’t have Italian seasoning, combine 1 tsp dried oregano, 1 tsp dried basil, and 1 tsp dried thyme. These three together hit the same flavor profile beautifully.
Dehydrated Minced Garlic (1 Tbsp)
This is the ingredient I get the most questions about, because the instinct is to reach for fresh garlic. And I understand that — fresh garlic feels more “real,” more elevated. But for this particular application, dehydrated minced garlic is genuinely the better choice, and here’s why: fresh garlic has a high water content and a pungent raw bite. When introduced to a long fermentation dough, fresh garlic can inhibit yeast activity, distribute unevenly, change color, and sometimes create a harsh, slightly bitter edge after baking. Dehydrated minced garlic, on the other hand, rehydrates gently inside the dough as it ferments, dispersing that mellow, roasted garlic flavor throughout every inch of the crumb. The result is garlic that tastes like it was slow-roasted — warm, sweet, and present in every bite rather than concentrated in pockets.
Substitution: If you only have garlic powder, it will work — use 2 tsps rather than a full tablespoon, as powder is more concentrated. Minced is still best for texture and flavor distribution, but powder is a completely respectable backup.
Freshly Grated Parmesan (½ cup / about 50g)
Parmesan is the inclusion that does the most visible, dramatic work in this loaf. Use a block of real, preferably aged parmesan and grate it yourself — the difference between freshly grated and pre-shredded parmesan in a baking application is significant. Pre-shredded parmesan is coated with anti-caking agents that prevent it from melting and integrating the way you want it to. Freshly grated parmesan melts into the crumb, creates those gorgeous golden pockets, and wherever it meets the crust — especially on the bottom and sides of the loaf — it caramelizes into something salty, nutty, and slightly crispy that makes people pick up the end piece first.
Substitution: Pecorino Romano also works beautifully here and gives an even saltier, more assertive bite. If you enjoy that, it’s a worthy swap.
A Note on Starter Prep Flexibility
One of the most common questions I get is about timing — specifically, when to feed your starter before baking. Many recipes tell you to feed it a specific number of hours before mixing your dough, full stop. What I want you to know is that your starter can be fed and then stored in the fridge for up to 3 days before you use it. You don’t have to organize your entire day around a feeding window. Pull it out of the fridge within 3 days from it’s feeding and peak and you’re good to go. Real life doesn’t always fit a 6-12 hour starter window, and your sourdough doesn’t have to either.
💡 Pro Tip: If you’re using a starter directly from the fridge, make sure to use very warm water – I’m talking 140F warm to get a cold starter activated faster.
All of this flexibility assumes one thing: a starter that is reliably active and strong. A sluggish or inconsistent starter is the number one reason sourdough loaves don’t rise the way they should, and no amount of perfect technique will compensate for a starter that isn’t pulling its weight. If you’ve been struggling with flat loaves or stalled fermentation, your starter is the first place to look.
I’ve been baking with “Phoebe” — my 170-year-old San Francisco sourdough starter — for years, and her consistency is a big part of why my loaves are predictable and reliable. If you’re looking for a proven starter to build your sourdough foundation on, Phoebe is available on my website, dehydrated and ready to reactivate.
Step-by-Step Directions
Step 1: Mix the Dough
In a large bowl, combine the lukewarm water and active sourdough starter. Whisk until the starter is mostly dissolved and the mixture looks cloudy. Add the bread flour and sprinkle the salt on top. Mix until no dry flour remains — mixing by hand is best. The dough will look shaggy and sticky, and a little rough. But give it a good 3 minutes of thorough kneading.
Flatten the dough slightly in your bowl, note the starting volume (if you’re using a clear measuring bowl, mark the level — this will be your reference point for tracking the rise), and cover with a damp towel, plastic wrap, or a shower cap.
💡 Pro Tip: A clear glass measuring bowl is one of the most useful tools in sourdough baking. Once you mix your dough and mark the starting level measurement, you can calculate exactly how far it needs to rise without relying on the clock. For this recipe, we’re watching dough percentage rise, not timing.
Step 2: Rest (1 Hour)
Let the dough rest, covered, for 1 hour. This fermentolyse rest lets the flour hydrate fully and begins gluten development naturally. By the end of this hour the dough will look slightly smoother and feel noticeably less rough.
Step 3: First Stretch & Fold
After the rest, perform your first set of stretch and folds. With wet hands, reach under one edge of the dough, stretch it up as high as it will comfortably go without tearing, and fold it over the top to the opposite side. Rotate the bowl a quarter turn and repeat, working your way around until the dough starts resisting and gathers into a rough ball — usually 4–6 folds. Cover and rest for 40 minutes.
💡 Pro Tip: Don’t stress if your stretch and fold timing is off by 10–15 minutes. Sourdough baking is forgiving. Miss a set entirely? The loaf will still be excellent. Perfection is not the goal — consistency and attention are.
Step 4: Lamination — Where the Magic Happens
This is the step that sets an inclusion loaf apart, and it’s more approachable than it sounds. Lamination is simply the act of stretching the dough out thin across your work surface, adding the inclusions directly onto that surface, and then folding everything back into a neat package. It’s the most effective way to distribute flavors evenly through every layer of the crumb.
Alternative to lamination: You can sprinkle the inclusions right on top of the dough in your bowl. Press it in with your fingers, dimpling the inclusions in and proceed with your stretch and folds.
If laminating, lightly mist your clean counter with water (this prevents sticking without adding extra flour and disrupting hydration). Turn the dough out and use your fingertips to gently stretch it outward in all directions — slipping your fingers underneath and easing it out in every direction — until it’s fairly thin. Stop before it tears in a way that can’t be recovered.
Sprinkle the Italian seasoning evenly across the surface. Follow with the dehydrated minced garlic, distributing it as evenly as you can — thin, even coverage will mean every slice is flavored. Finally, scatter the freshly grated parmesan across the whole surface.
Now fold: bring the left third to the middle, then fold the right third over it (like a business letter). Fold the top third down and the bottom third up. You should have a neat rectangular package. Tuck it into a ball shape and place it back into your bowl, seam side down.
Step 5: Coil Folds & Bulk Fermentation
Cover the bowl and rest for 40 minutes. Then perform a set of coil folds: with wet hands, slip both hands under the center of the dough, lift it up so the sides fall and coil underneath, then set it back down. Rotate the bowl 180° and repeat. Cover and rest another 40 minutes, then do one more set of coil folds.
Now the dough rests, covered, until it reaches the right volume rise. This is where I want you to watch the dough — not the clock.
The percentage rise method: Rather than setting a timer and hoping for the best, use your starting volume mark to track progress. The target rise percentage depends on your kitchen and dough temperature among other things I always recommend starting with “double in size” and adjust on your next loaf up or down:
- Below 74°F: Allow the dough to double in size (100% rise, if the temperature is cooler than 71F, I would push the rise further than double in size)
- 74°F–78°F: Aim for a 80% rise
- Above 78°F: Watch for a 70% rise and shape sooner to avoid over-fermentation
This is one of the most important things I teach in my sourdough classes: bulk fermentation is done when the dough tells you, not when the timer goes off. Temperature, humidity, and your starter’s strength all affect timing. The volume method removes the guesswork.
Step 6: Pre-Shape & Bench Rest
Turn the dough out onto a lightly floured surface. Using a bench scraper or your hands, gather the edges under and toward the center, working your way around until the dough forms a rough ball with some surface tension. Flip it seam-side down and let it rest, uncovered, for 15–20 minutes. This bench rest lets the gluten relax after all that development, making final shaping much more cooperative.
Step 7: Final Shape
For a round (boule): Cup your hands around the dough and drag it toward you on the counter in circular motions, tucking the dough under with your pinky fingers. The surface should become smooth and taut with each pass.
For an oval (batard): Gently stretch the dough into a rough rectangle. Fold in by thirds like a letter, then roll up. Drag and tighten using the same motion as above.
Place the shaped loaf, seam side up, into a well-floured proofing basket (banneton) or a bowl lined with a floured kitchen towel.
Step 8: Cold Proof
Cover the basket tightly with a shower cap or plastic wrap and refrigerate for 8–24 hours. This cold fermentation step does two essential things: it develops the complex flavor you want from a properly fermented sourdough loaf, and it firms the dough up significantly, making it much easier to score cleanly. The parmesan will partially firm up during this time as well, which helps it hold its position in the crumb rather than sliding.
The cold proof window is flexible — 8 hours is a minimum, 16 is comfortable, and I’ve baked loaves that sat for up to 2 days with excellent results. This is one of the most forgiving steps in the entire process. Fit it around your schedule, not the other way around.
Step 9: Score & Bake
Preheat your oven to 500°F (260°C) for 30–60 minutes with your Dutch oven (with lid) or baking steel on middle rack and metal empty pan on lower rack inside.
Remove the loaf from the refrigerator and turn it out onto a piece of parchment paper, seam side down. Dust lightly with flour. Score immediately with a sharp lame or razor blade — a single confident slash at a slight angle, about ¼” deep, works beautifully. You can also do a simple cross or add decorative scoring if you’re feeling ambitious. The cold dough is firm and forgiving for scoring; don’t hesitate.
Dutch Oven Method: Take the Dutch oven out of the oven, remove the lid, and carefully lower the parchment with the dough into the pot. Replace the lid and bake at 450°F (232°C) for 20 minutes covered, then remove the lid and bake an additional 15–20 minutes until the crust is a deep golden brown and the internal temperature reads at least 198°F (92°C).
Open Baking Method: No Dutch oven? Not a problem — this is a completely valid and reliable approach. Slide the scored dough onto your preheated baking steel or cookie sheet. Add steam immediately by pouring 2 cups of boiling water or dropping ice cubes into the empty metal pan on the lower rack, then close the oven quickly. Bake at 450°F (232°C) for 35–40 minutes, rotating once halfway through.
⚠️ Watch Out: Parmesan on the surface of the loaf can brown faster than a plain crust. Keep an eye on your loaf from about the 25-minute mark and tent loosely with foil if the cheese is browning faster than the bread is baking through. The goal is deep golden, not burned.
Step 10: Cool Before Slicing
Remove the loaf from the oven and let it cool on a wire rack for a minimum of 1 hour before slicing. I know. The smell at this point is almost unbearable. But slicing too early releases the steam trapped inside the crumb, resulting in a gummy, dense interior that doesn’t do justice to all the work you just put in. Give it the hour. It’s worth it.
Sourdough Tools You’ll Need
For this inclusion loaf, the same core equipment from the base sourdough recipe applies:
- Clear glass measuring bowl or Cambro container — essential for tracking your percentage rise during bulk fermentation
- Digital kitchen scale — grams are the only reliable way to measure sourdough ingredients; volume measurements introduce too much variation
- Bench scraper — for scraping the dough out of the bowl, shaping and managing sticky dough
- Proofing basket (banneton) — for holding shape during cold fermentation; flour generously, especially with a cheese inclusion
- Sharp lame or razor blade — for scoring; a dull blade drags and deflates rather than cutting cleanly
- Dutch oven or Baking Steel — both work; see Step 9 above
The Bonus Life of This Loaf: Croutons & Italian Breadcrumbs
Here’s something I genuinely love about this particular loaf: if it stales before you finish it, it becomes an ingredient in its own right.
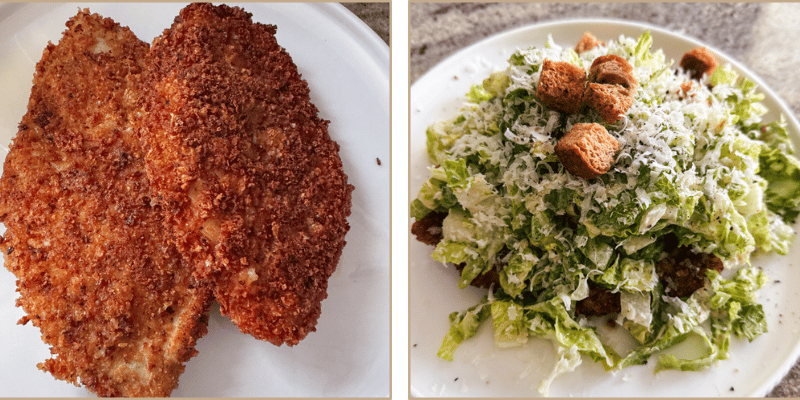
Homemade Garlic Parmesan Croutons: Cut stale slices into rough cubes, toss with a drizzle of olive oil and a pinch of extra salt, and roast at 375°F for 12–15 minutes until golden and crunchy. The garlic and parmesan already baked into the bread means you don’t need to season the croutons beyond olive oil. They are extraordinary on a Caesar salad or a bowl of minestrone.
Italian Sourdough Breadcrumbs: Cut stale slices into rough cubes, and allow them to air dry fully for a day or two. Pulse in a food processor to your desired crumb size. Store in an airtight jar. Use these anywhere Italian breadcrumbs are called for — they will be the best breadcrumbs of your life.
I stumbled across a genius recipe by Munchin’ with Maddie for Crispy Chicken Caesar Salad where she takes a crispy fried chicken breast whole and piles on the caesar salad on top with fresh shaved parmesan and croutons. I had to try it, but implement The Best Italian Herb and Garlic Parmesan Sourdough Bread croutons and bread crumbs. It’s now a staple in my home.
How to Store & Freeze
Room Temperature
Wrap the fully cooled loaf in a clean kitchen towel or store cut-side down on a wooden cutting board for up to 3 days if you live in a humid environment. If you live in drier climates, a plastic bag is great to avoid drying out. Just make sure to leave a tiny airhole so that condensation doesn’t collect.
Freezer
Whole loaf: Cool completely, wrap tightly in plastic wrap followed by a layer of foil or a zip-close freezer bag. Freeze for up to 3 months. Thaw at room temperature for several hours or overnight, then spray the loaf with water all over and refresh bake in a 350°F oven for 10–15 minutes.
Sliced: Pre-slice the loaf before freezing for maximum convenience. Layer slices with parchment between them so they don’t freeze together. Toast directly from frozen or thaw at room temperature.
💡 Pro Tip: Freezing is the best way to preserve this loaf at peak quality if you know you won’t finish it in a few days. Fresh sourdough is always best within 24–48 hours; after that, the freezer is your friend.
Troubleshooting
Problem: The crust is burning on the outside before the inside is fully baked.
Why it happened: The parmesan on the surface browns faster than a plain crust, especially in a very hot Dutch oven. Fix it: Once you remove the lid at the 20-minute mark, keep a close eye on the loaf. If the crust is browning faster than you’d like, tent loosely with foil for the last 5–10 minutes of baking. Always verify doneness with a probe thermometer — 198°F (92°C) internal temperature confirms it’s baked through regardless of crust color.
Problem: My dough felt loose and difficult to shape after lamination.
Why it happened: Adding cheese introduces fat and moisture into the dough, which can make it feel slacker than a plain sourdough dough at the same stage. Fix it: Don’t panic — this is normal. The coil folds after lamination will help tighten the structure. Keep your hands and the counter lightly floured during shaping. If the dough is genuinely difficult to handle, a 15-minute rest in the fridge before final shaping can firm it up significantly.
Problem: The crumb is dense and doesn’t have much open structure.
Why it happened: The dough may have over-fermented or under-fermented during bulk fermentation. Fix it: watch the rise percentage, not the clock. If your kitchen is warm and the dough reaches the target rise faster than expected, shape it. Over-fermented dough loses structure and produces a dense crumb regardless of inclusions. On the other hand, it might have wanted a longer rise to really puff up and become nice and airy. I always advise starting at double in size and then trying to push bulk fermentation further, if that makes things worse, then go the other way and shape your dough before it reaches double in size. This is where a measuring bowl helps.
Frequently Asked Questions
Can I use fresh garlic instead of dehydrated garlic in this sourdough loaf?
You can, but I’d steer you back toward dehydrated for this specific recipe. Fresh garlic has a high water content and can inhibit yeast activity during a long fermentation. It also tends to concentrate in pockets rather than distributing evenly, and it can develop a slightly harsh, bitter note after baking. Dehydrated minced garlic rehydrates gently inside the fermenting dough and disperses that mellow, sweet garlic flavor throughout the entire crumb. It’s one of those cases where the less “fancy” ingredient actually performs better.
What if I don’t have Italian seasoning — can I substitute something else?
Yes, absolutely. Combine 1 tsp dried oregano, 1 tsp dried basil, and 1 tsp dried thyme. These three dried herbs together capture the warm, herbaceous profile of Italian seasoning without needing a pre-made blend. If you have rosemary in the mix, a small pinch of that works beautifully too — just keep it small, as rosemary can be assertive.
Can I use pre-shredded parmesan from a bag?
I’d recommend against it for this recipe. Pre-shredded parmesan is coated in anti-caking agents (often cellulose or potato starch) that prevent it from melting and integrating the way freshly grated parmesan does. In a baked inclusion application, this means the cheese stays drier and doesn’t create those gorgeous melty pockets in the crumb. A block of parmesan and a box grater will make a noticeable difference in the final loaf.
When is the right time to add inclusions to sourdough?
For a loaf like this, lamination — after the first stretch and fold and rest — is the ideal moment. At this point the gluten network is developed enough to hold the inclusions without tearing, but extensible enough to stretch thin for even distribution. You can add inclusions once the dough has completed its bulk fermentation and achieved the desired rise. You can laminate the inclusions at this point as well, but may not achieve the best distribution.
Can this loaf be baked without a Dutch oven?
Absolutely — and I want to be clear about this because a lot of sourdough content makes it sound like a Dutch oven is non-negotiable. It is not. Open baking on a baking steel or stone with a steam pan on a lower rack produces a genuinely beautiful loaf with a fantastic crust. The steam does the same job as the enclosed Dutch oven — it keeps the surface of the dough moist during oven spring so the crust can expand before setting. See Step 9 for the full open-baking method.
What’s the best way to use this loaf if it goes stale?
This is one of the things I love most about this particular loaf — its second life is extraordinary. Stale slices make incredible garlic parmesan croutons (toss in olive oil, roast at 375°F until golden) and the most flavorful Italian-style breadcrumbs you’ve ever tasted. The herbs and garlic are already baked in, so no additional seasoning is needed. A loaf that’s past its prime toast-and-butter window is absolutely not a loaf to throw away.
A Few Final Words
This Italian herb and garlic parmesan sourdough bread is the kind of loaf that makes people ask what bakery it came from. It’s the one you bring to a dinner party and quietly accept compliments for. It’s the one your family requests by name.
And it starts with the exact same dough you’ve already been baking.
That’s what I love most about sourdough inclusions — they prove that once you have the foundation, the possibilities are genuinely endless. Master the base, and every flavor combination becomes achievable. This one just happens to be one of the very best.

The Best Italian Herb and Garlic Parmesan Sourdough Bread
Ingredients
Method
- In a large bowl, combine the lukewarm water and active sourdough starter. Whisk until the starter is mostly dissolved and the mixture looks cloudy. Add the bread flour and sprinkle the salt on top. Mix until no dry flour remains — mixing by hand is best. The dough will look shaggy and sticky, and a little rough. But give it a good 3 minutes of thorough kneading.
- Flatten the dough slightly in your bowl, note the starting volume (if you’re using a clear measuring bowl, mark the level — this will be your reference point for tracking the rise), and cover with a damp towel, plastic wrap, or a shower cap.
- Pro Tip: A clear glass measuring bowl is one of the most useful tools in sourdough baking. Once you mix your dough and mark the starting level measurement, you can calculate exactly how far it needs to rise without relying on the clock. For this recipe, we’re watching dough percentage rise, not timing.
- Let the dough rest, covered, for 1 hour. This fermentolyse rest lets the flour hydrate fully and begins gluten development naturally. By the end of this hour the dough will look slightly smoother and feel noticeably less rough.
- After the rest, perform your first set of stretch and folds. With wet hands, reach under one edge of the dough, stretch it up as high as it will comfortably go without tearing, and fold it over the top to the opposite side. Rotate the bowl a quarter turn and repeat, working your way around until the dough starts resisting and gathers into a rough ball — usually 4–6 folds. Cover and rest for 40 minutes.
- Pro Tip: Don’t stress if your stretch and fold timing is off by 10–15 minutes. Sourdough baking is forgiving. Miss a set entirely? The loaf will still be excellent. Perfection is not the goal — consistency and attention are.
- This is the step that sets an inclusion loaf apart, and it’s more approachable than it sounds. Lamination is simply the act of stretching the dough out thin across your work surface, adding the inclusions directly onto that surface, and then folding everything back into a neat package. It’s the most effective way to distribute flavors evenly through every layer of the crumb.
- Alternative to lamination: You can sprinkle the inclusions right on top of the dough in your bowl. Press it in with your fingers, dimpling the inclusions in and proceed with your stretch and folds.
- If laminating, lightly mist your clean counter with water (this prevents sticking without adding extra flour and disrupting hydration). Turn the dough out and use your fingertips to gently stretch it outward in all directions — slipping your fingers underneath and easing it out in every direction — until it’s fairly thin. Stop before it tears in a way that can’t be recovered.
- Sprinkle the Italian seasoning evenly across the surface. Follow with the dehydrated minced garlic, distributing it as evenly as you can — thin, even coverage will mean every slice is flavored. Finally, scatter the freshly grated parmesan across the whole surface.
- Now fold: bring the left third to the middle, then fold the right third over it (like a business letter). Fold the top third down and the bottom third up. You should have a neat rectangular package. Tuck it into a ball shape and place it back into your bowl, seam side down.
- Cover the bowl and rest for 40 minutes. Then perform a set of coil folds: with wet hands, slip both hands under the center of the dough, lift it up so the sides fall and coil underneath, then set it back down. Rotate the bowl 180° and repeat. Cover and rest another 40 minutes, then do one more set of coil folds.
- Now the dough rests, covered, until it reaches the right volume rise. This is where I want you to watch the dough — not the clock.
- The percentage rise method: Rather than setting a timer and hoping for the best, use your starting volume mark to track progress. The target rise percentage depends on your kitchen and dough temperature among other things I always recommend starting with “double in size” and adjust on your next loaf up or down:
- Below 74°F: Allow the dough to double in size (100% rise, if the temperature is cooler than 71F, I would push the rise further than double in size)
- 74°F–78°F: Aim for a 80% rise
- Above 78°F: Watch for a 70% rise and shape sooner to avoid over-fermentation
- This is one of the most important things I teach in my sourdough classes: bulk fermentation is done when the dough tells you, not when the timer goes off. Temperature, humidity, and your starter’s strength all affect timing. The volume method removes the guesswork.
- Turn the dough out onto a lightly floured surface. Using a bench scraper or your hands, gather the edges under and toward the center, working your way around until the dough forms a rough ball with some surface tension. Flip it seam-side down and let it rest, uncovered, for 15–20 minutes. This bench rest lets the gluten relax after all that development, making final shaping much more cooperative.
- For a round (boule): Cup your hands around the dough and drag it toward you on the counter in circular motions, tucking the dough under with your pinky fingers. The surface should become smooth and taut with each pass.
- For an oval (batard): Gently stretch the dough into a rough rectangle. Fold in by thirds like a letter, then roll up. Drag and tighten using the same motion as above.
- Place the shaped loaf, seam side up, into a well-floured proofing basket (banneton) or a bowl lined with a floured kitchen towel.
- Cover the basket tightly with a shower cap or plastic wrap and refrigerate for 8–24 hours. This cold fermentation step does two essential things: it develops the complex flavor you want from a properly fermented sourdough loaf, and it firms the dough up significantly, making it much easier to score cleanly. The parmesan will partially firm up during this time as well, which helps it hold its position in the crumb rather than sliding.
- The cold proof window is flexible — 8 hours is a minimum, 16 is comfortable, and I’ve baked loaves that sat for up to 2 days with excellent results. This is one of the most forgiving steps in the entire process. Fit it around your schedule, not the other way around.
- Preheat your oven to 500°F (260°C) for 30–60 minutes with your Dutch oven (with lid) or baking steel on middle rack and metal empty pan on lower rack inside.
- Remove the loaf from the refrigerator and turn it out onto a piece of parchment paper, seam side down. Dust lightly with flour. Score immediately with a sharp lame or razor blade — a single confident slash at a slight angle, about ¼” deep, works beautifully. You can also do a simple cross or add decorative scoring if you’re feeling ambitious. The cold dough is firm and forgiving for scoring; don’t hesitate.
- Dutch Oven Method: Take the Dutch oven out of the oven, remove the lid, and carefully lower the parchment with the dough into the pot. Replace the lid and bake at 450°F (232°C) for 20 minutes covered, then remove the lid and bake an additional 15–20 minutes until the crust is a deep golden brown and the internal temperature reads at least 198°F (92°C).
- Open Baking Method: No Dutch oven? Not a problem — this is a completely valid and reliable approach. Slide the scored dough onto your preheated baking steel or cookie sheet. Add steam immediately by pouring 2 cups of boiling water or dropping ice cubes into the empty metal pan on the lower rack, then close the oven quickly. Bake at 450°F (232°C) for 35–40 minutes, rotating once halfway through.
- Watch Out: Parmesan on the surface of the loaf can brown faster than a plain crust. Keep an eye on your loaf from about the 25-minute mark and tent loosely with foil if the cheese is browning faster than the bread is baking through. The goal is deep golden, not burned.
- Remove the loaf from the oven and let it cool on a wire rack for a minimum of 1 hour before slicing. I know. The smell at this point is almost unbearable. But slicing too early releases the steam trapped inside the crumb, resulting in a gummy, dense interior that doesn’t do justice to all the work you just put in. Give it the hour. It’s worth it.