The Best Sourdough Discard Crackers: Thin, Crispy and No Flour
There’s a moment I think every sourdough baker has experienced: you’re standing at the kitchen counter, refrigerator door open, staring down at a collection of half-full jars of starter and discard, and you think — okay, so what now? I’ve been there more times than I can count. When I started ramping up my baking schedule a couple of years ago, I found myself with more discard than I knew what to do with. And then I discovered these sourdough discard crackers — and everything changed.
These aren’t just a “use up your discard” recipe. They’ve become my most-made, most-gifted, most-requested bake in this house. I make them every single week — and on purpose, I bulk up my starter specifically so I have enough discard to make a triple batch. That’s how good they are.
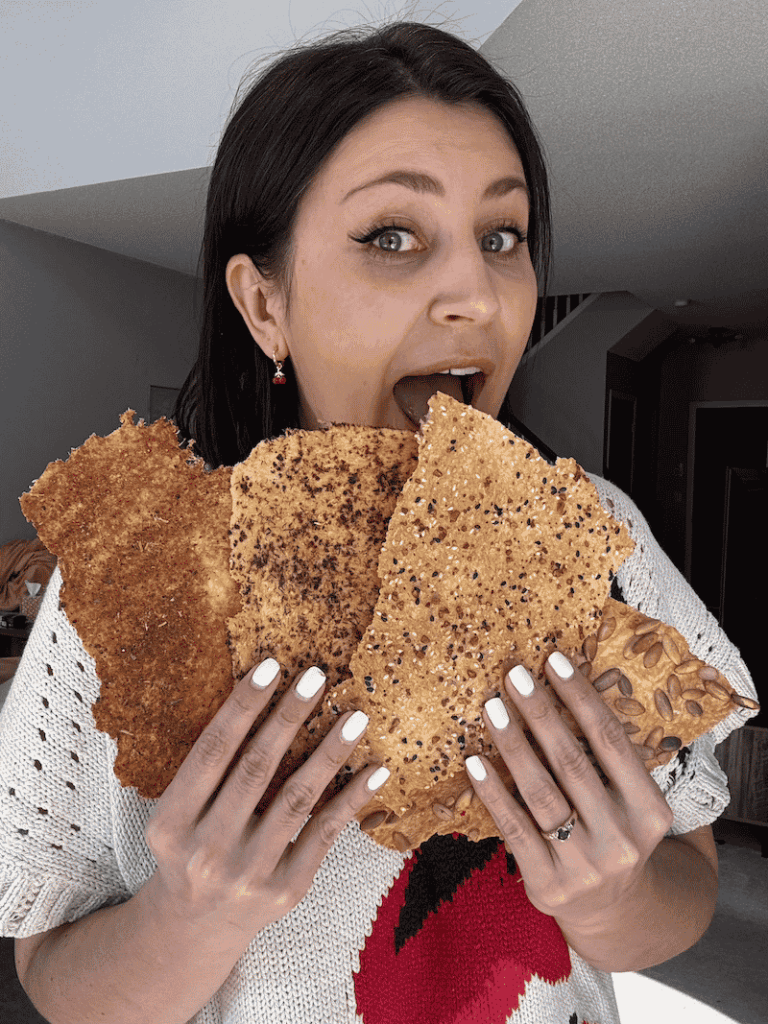
What makes these the best sourdough discard crackers? They’re lavash-style — poured thin, spread directly on parchment, and baked into shatteringly crispy, golden, tangy crisps. No flour, no rolling pin, no fussy shaping. Just two base ingredients and whatever seasonings your heart wants. The result is a cracker that’s genuinely better than anything you’ll find in a bag at the grocery store: real fermented tang, clean ingredients, and a crunch that you can hear from across the room.
I almost always make four or five flavor varieties at once — a sheet of sesame, a sheet of everything bagel, a sheet of rosemary and flaky salt, maybe a sweet cinnamon-sugar one if I’m feeling ambitious. They disappear in hours. So let’s get into it.
What Makes These Sourdough Discard Crackers Different
A lot of sourdough discard cracker recipes out there ask you to make a dough — mix in flour, chill it, roll it out, cut it into shapes. That’s a whole thing. And honestly? It’s not necessary.
This recipe takes a completely different approach. Your discard is already a batter — flour and water, fermented and ready to go. All you’re doing is whisking in a little melted butter and spreading it thin on parchment paper. That’s it. The discard does the heavy lifting. There’s no added flour, no rolling pin required, and no special equipment beyond a baking sheet and an offset spatula.
The style these bake up into is closest to lavash — a thin, unleavened flatbread cracker that’s crispy throughout, with an irregular, rustic edge you break by hand. There’s something deeply satisfying about snapping them apart. The texture is shattery and light, not dense or tough. And that sourdough tang? It’s front and center, especially as the crackers cool.
This is also the most flexible cracker recipe I know. One base, infinite flavor combinations. We’ll get into all of them.
Why You’ll Love This Recipe
- Only 2 base ingredients — discard and butter, or oil. Seasonings are optional but obviously encouraged.
- No flour added, no rolling pin needed — the discard is the batter. Mix, spread, bake.
- True zero-waste baking — every bit of that jar goes to work.
- Naturally fermented — the sourdough tang and long-fermented flour make these genuinely gut-friendly compared to commercial crackers.
- Endlessly customizable — sweet or savory, seed-studded or cheese-dusted. One batch, one recipe, a dozen flavor directions.
- Batch-friendly — I triple and quadruple this regularly to make multiple flavor varieties at once.
- Perfect for charcuterie boards, soups, salads — or honestly, just eating by the handful off the baking sheet.
Ingredient Breakdown
This might be the shortest ingredient list in my recipe collection. Here’s what you need and why each one matters.
Sourdough Discard — 1 cup / 240g (at least)
This is your base, your binder, and your flavor. Discard is essentially a fermented batter of flour and water — it’s already doing the work of holding everything together, so you genuinely don’t need to add more flour. The fermentation adds that signature tang, and it’s also what makes these crackers easier on digestion than conventional crackers.
A note on discard thickness: Discard consistency varies depending on your hydration ratio and how long it’s been sitting. If your discard is on the thicker side (closer to a paste), your batter will be thicker and may not spread quite as thin — and that’s fine. If it’s looser and more pourable, it will spread even thinner and bake up ultra-crispy. Both work beautifully; just adjust your expectations on the final texture slightly.
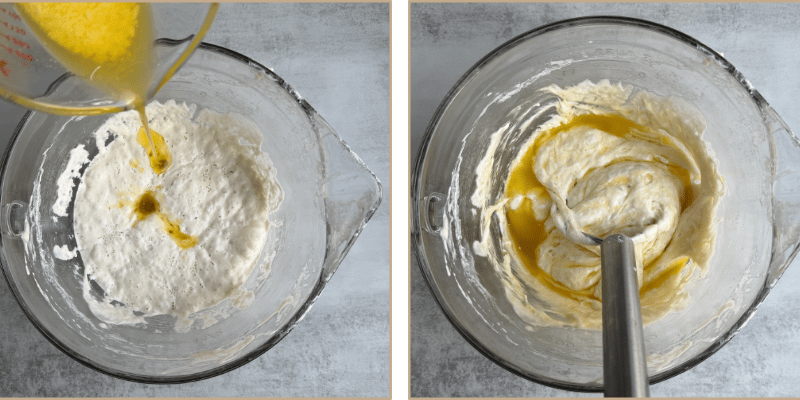
Temperature matters here: Your discard should be at room temperature before you mix it with the melted butter. Cold discard straight from the fridge will cause the butter to seize and solidify into clumps the moment it hits — which makes it nearly impossible to spread smoothly. Pull your discard out of the refrigerator a few hours before you plan to bake.
Butter, Melted — 2 tablespoons / 28g
Butter is what gives these crackers their rich, almost nutty depth. It adds fat that carries flavor and helps them crisp up beautifully in the oven. It also gives the spread batter a gorgeous golden color as it bakes.
Dairy-free? A neutral oil (avocado, refined coconut, or good-quality olive oil) works as a substitute. Olive oil will add a slightly more savory, Mediterranean note, which can be lovely with herbed or sea-salt variations. Butter is the winner here for flavor — it creates something almost cheese-like on its own — but the oil swap is completely viable.
Salt and Seasonings — to taste
Salt is non-negotiable — it wakes everything up. If your chosen seasoning blend doesn’t contain salt, add a few pinches of kosher or flaky sea salt directly to the batter. The amount you need will depend on your preference, you can always sprinkle some coarse sea salt on top once the batter is spread as well.
Beyond salt, the seasonings are entirely your call. We’ll cover the best flavor combinations later in this post — but know that you can mix them directly into the batter, sprinkle them over the top, or do both.
How to Make Sourdough Discard Crackers: Step-by-Step
Step 1: Pull Your Discard Out Ahead of Time
This is the step people are most likely to skip — and it matters more than you’d think. Pull your sourdough discard out of the refrigerator and let it come to room temperature. This takes about 3-5 hours depending on your kitchen temperature.
Watch Out: Cold discard added to melted butter is like adding cold milk to a hot pan of butter — the fat will seize and solidify into unappetizing little lumps. The batter will look broken and uneven, and won’t spread nicely across the parchment. Room temperature discard prevents all of this. Plan ahead.
Pro Tip: Don’t stress about using your discard at exactly the right stage of fermentation. Unlike a bread recipe, these crackers are genuinely forgiving. Very active discard, very mature discard, discard that’s been sitting in the fridge for a week, or even a fresh active starter allowed to peak and fall — they all work here. Older, more acidic discard will give you a more pronounced tang; newer discard will be milder. Both are delicious.
Step 2: Preheat the Oven to 325°F / 163°C
A lower oven temperature is the key to these crackers. You’re not trying to get a quick, high-heat rise — you’re gently drying out and crisping the batter over time. Too hot and the edges will burn long before the center crisps. 325°F hits the sweet spot: slow and steady, all the way through. Keep an eye on them, thinner crackers brown quicker.
Step 3: Whisk the Batter Together
In a medium bowl, combine:
- 1 cup / 240g room-temperature sourdough discard
- 2 tablespoons / 28g melted butter
- A couple of pinches of salt (if your seasonings don’t contain salt)
Whisk until the batter is completely smooth and the butter is fully incorporated. It should look like a thin, glossy pancake batter. If you’re making a single-flavored batch, you can whisk your seasonings directly into the batter at this stage. If you’re making multiple flavors (which I highly encourage — more on that below), leave the batter plain and season each sheet individually before baking.
Step 4: Pour and Spread
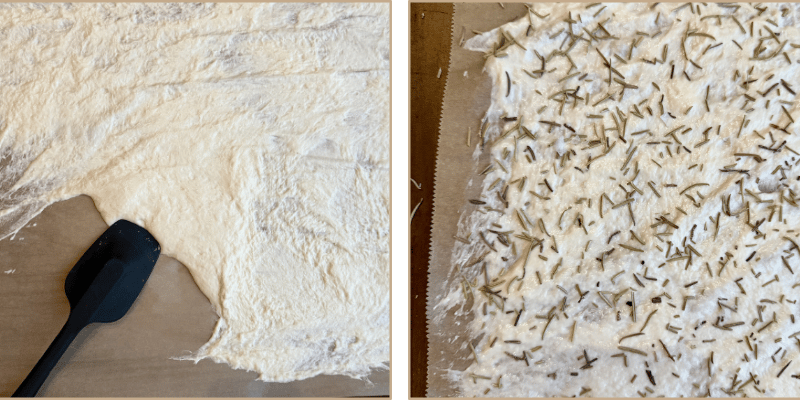
Line a rimmed baking sheet with parchment paper. Pour the batter onto the center of the parchment, then use an offset spatula (or the back of a spoon in a pinch) to spread it as thin and even as you can across the surface.
Pro Tip: Thin is your goal. Aim for a layer that’s almost translucent — you should barely be able to see the parchment through it. Thinner, translucent spread will give you thin crackers that break easily – like chips. If you spread just a little thicker than translucent, you’ll have slightly thicker crackers that you can use for dips. Take your time here. The spread doesn’t need to be perfectly rectangular or neat at the edges — rustic and irregular is the whole charm of this style of cracker.
Visual cue: Properly spread batter looks matte and even, not thick and glossy in the center. If you see a big glossy pool in the middle, keep spreading.
Step 5: Add Your Seasonings
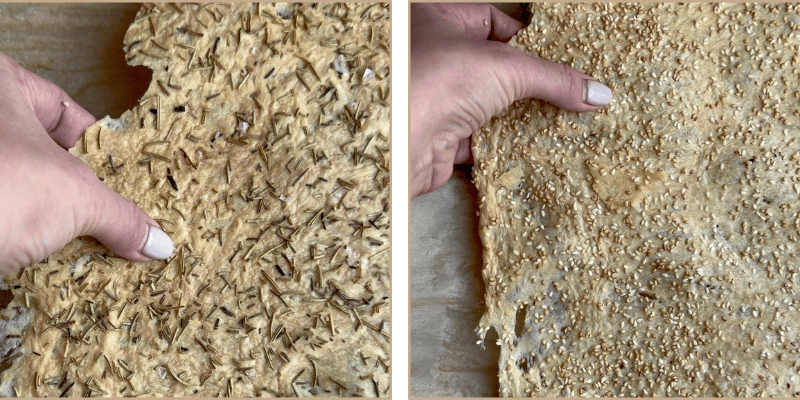
Now the fun part. Sprinkle your chosen seasonings evenly over the entire surface of the batter.
Watch Out: If your seasoning blend doesn’t contain salt, add a few pinches of flaky salt over the top in addition to what you whisked into the batter. Under-salted crackers are a missed opportunity.
Step 6: Bake Until Golden and Set
Slide the baking sheet into your preheated oven and bake for 25–35 minutes. Bake time will vary based on how thinly you spread the batter and how your oven runs.
Visual cues to watch for:
- The edges will begin to turn golden and pull away slightly from the parchment first — this is a good sign.
- The center should look dry, matte, and set — not shiny or wet.
- A light tap with your finger in the center should feel firm, not squishy.
Pro Tip: Because ovens vary and your discard thickness will vary, these crackers are more about visual cues than a strict timer. Start checking at the 25-minute mark. If the edges are deeply golden but the center still looks a little wet, that’s okay — the center will continue to crisp as it cools. If you pull them out too early and they’re still soft after cooling, simply pop them back in for 5–10 more minutes. They’re very forgiving.
Step 7: Cool Completely Before Breaking
This is the most important and most underestimated step: let the crackers cool completely on the pan before you touch them. I know. The smell is incredible and you’ll want to go in immediately. Resist the urge.
The crackers will continue to crisp up as they cool. What might feel slightly soft right out of the oven will become fully shatteringly crispy within 10–15 minutes. Once they’re completely cool, use your hands to break them into rough, rustic shards. No two pieces will be the same shape — and that’s exactly what makes them look stunning on a board.
Make It a Multi-Flavor Batch (My Favorite Way to Bake These)
Here’s the move I’ve landed on after making these dozens of times: bulk up your starter on purpose so you have 3–4 cups of discard on hand, then run three or four baking sheets at once with different flavor profiles. It sounds ambitious, but the actual hands-on time is minimal — you’re just spreading batter and sprinkling seasonings. The oven does everything else.
Here are my go-to flavors:
Savory Flavors
- Sesame Seed — classic, nutty, endlessly snackable.
- Everything Bagel — this seasoning speaks for itself, it’s a classic.
- Garlic Powder + Parmesan — this combo works best mixed into the batter.
- Rosemary + Flaky Salt — my favorite! A few sprigs of fresh rosemary torn over the top, or just sprinkle on dried rosemary and finish with a sprinkle of coarse sea salt flakes. This is the one that pairs best with cheese and wine.
- Parmesan + Italian Herbs — Italian seasoning whisked into the batter, parmesan over the top.
- Multi seed — Pumpkin seeds, flax seeds, sunflower seeds, sesame seeds. These are unbelievable!!
Sweet Flavors
- Cinnamon + Sugar — whisk 1 teaspoon of cinnamon and 2 teaspoons of sugar directly into the batter. The sourdough tang plays beautifully against the sweetness. These are magical crumbled over vanilla ice cream.
How to Store Your Sourdough Discard Crackers
Room Temperature
These crackers are happiest stored at room temperature in an airtight container — a glass jar with a tight-fitting lid, a tin, or a zip-top bag with the air pressed out all work well. Kept this way, they’ll stay crispy and delicious for up to 1 week.
Watch Out: Moisture is the enemy. Don’t store them near the stove, in a container that’s not fully sealed, or anywhere humid. Even a slightly damp environment will soften them within a day.
Refrigerator
I don’t recommend refrigerating these crackers. The refrigerator environment introduces moisture that will make them soft and stale much faster than storing at room temperature would. If your kitchen runs very warm, prioritize freezing over refrigerating.
Freezer
Yes, these freeze beautifully. Let them cool completely, then layer them between sheets of parchment in a freezer-safe zip-top bag or airtight container. They’ll keep in the freezer for up to 3 months.
To serve from frozen: You have two options. First: let them thaw at room temperature for 20–30 minutes and they’ll often crisp back up on their own as they come to temperature. Second (and my preferred method for that just-baked feel): spread them on a baking sheet and run them in a 300°F oven for 5–8 minutes. They’ll come out of the oven crispy as the day you made them.
Troubleshooting: Common Problems and How to Fix Them
My crackers came out soft and bendy, not crispy.
Why it happened: Either the batter was spread too thick, or the crackers were pulled from the oven before they were truly done. Remember: they’ll be slightly flexible right out of the oven and crisp up fully as they cool.
Fix it: If they’re still soft after cooling completely, put them back on the baking sheet and return them to the oven at 300°F for 8–12 minutes. This is almost always salvageable.
The edges burned before the center was done.
Why it happened: The batter wasn’t spread evenly — the edges were thinner than the center, so they cooked faster. Or, your oven runs hot.
Fix it: Snap off the burned edges and enjoy the rest — they’re still good. Next time, focus on spreading more evenly and lowering the temperature to 300F. You can also rotate the baking pan couple of times throughout the baking time.
My batter looks lumpy and the butter clumped up.
Why it happened: Cold discard straight was added to melted butter, causing the fat to solidify.
Fix it: Let the bowl sit in a warm spot for about an hour and whisk again vigorously — warming the mixture slightly will help the butter re-incorporate. Going forward, always use room-temperature discard.
My crackers taste way too sour.
Why it happened: Very old or highly acidic discard — stored for weeks without feeding — can have a very sharp, vinegary tang that carries strongly into baked goods.
Fix it: For future batches, use discard that has been fed at least once in the past 1–2 weeks for a milder flavor. However, very sour crackers paired with rich, creamy cheeses can actually be a wonderful contrast — don’t be too quick to write them off.
My seasonings fell off after baking.
Why it happened: They were not sprinkled on immediately after spreading the batter so the surface of the batter dried a bit and seasonings did not stick to the surface.
Fix it: Sprinkle seasonings on immediately after spreading the batter. You can also mix them directly into the batter for more even distribution.
Frequently Asked Questions
Can I use active sourdough starter instead of discard?
Yes, absolutely. Active, recently-fed starter works just as well as discard in this recipe. The flavor will be slightly milder and less tangy than crackers made with mature discard, but the texture will be identical. Use the same amount — 1 cup / 240g, but allow the active starter to peak and fall so the texture of it will be more runny than thick.
Can I make these dairy-free?
Yes. Swap the melted butter for an equal amount of neutral oil (avocado, refined coconut) or good-quality olive oil. The crackers will still be crispy and delicious — just with a slightly different flavor profile. Olive oil adds a savory, grassy note that works beautifully with Mediterranean-style seasonings like rosemary, oregano, or sun-dried tomato.
How do I know when my sourdough discard crackers are done baking?
Look for these cues rather than watching the clock alone: the edges will be golden and beginning to pull away from the parchment; the center will look matte and dry, not shiny or wet; a light tap in the center should feel firm. The crackers will still be slightly flexible right out of the oven — that’s normal. They crisp fully as they cool, usually within 10–15 minutes.
How long do sourdough discard crackers stay fresh?
Stored in an airtight container at room temperature, they stay crispy for up to 1 week. For longer storage, freeze them for up to 3 months. Re-crisp crackers in a 300°F oven for 5–8 minutes.
Can I make these gluten-free?
Since this recipe uses only sourdough discard (no additional flour), the gluten content depends entirely on what flour your starter is made with. A starter made with a gluten-free flour blend — rice flour and tapioca are common — would produce gluten-free crackers. A traditionally wheat-based starter will produce a cracker that contains gluten.
Why do my sourdough crackers taste different every time?
Because your discard is a living thing, and it changes! The age of your discard at baking time, how recently your starter was fed, the hydration of your starter, and even the ambient temperature in your kitchen all affect the final flavor. The butter or oil added can change the flavor as well if it is different than what you used before. This is one of my favorite things about this recipe — every batch is a little different, and every batch is still delicious.
Ingredients
Method
- Your sourdough discard needs to be brought to room temperature, this will take a few hours. (Discard directly from the refrigerator will solidify the melted butter when you add it, the room temperature discard will mix better with melted butter and spread easier on parchment).
- Preheat your oven to 325°F.
- In a bowl, whisk together:
- 1 cup sourdough discard
- 2 tablespoons melted butter
- Whisk until smooth and fully combined.
- Pour the mixture onto a sheet of parchment paper. Using a spatula, spread it out fairly thin.
- Now comes the fun part. Sprinkle your favorite toppings evenly over the surface. You can mix in the seasonings with the melted butter and discard in a bowl, but when you’re making a triple batch or more, you’d want to do a variety.
- Bake for 25-35 minutes, or until they have hardened to the touch and golden in color.
- Let cool completely—this is when they crisp up fully. Break apart and enjoy.
